

-
Welcome back Guest! Did you know you can mentor other members here at H-M? If not, please check out our Relaunch of Hobby Machinist Mentoring Program!
You are using an out of date browser. It may not display this or other websites correctly.
You should upgrade or use an alternative browser.
You should upgrade or use an alternative browser.
Manley mechanical press
- Thread starter C-Bag
- Start date
- Joined
- Feb 9, 2017
- Messages
- 5,248
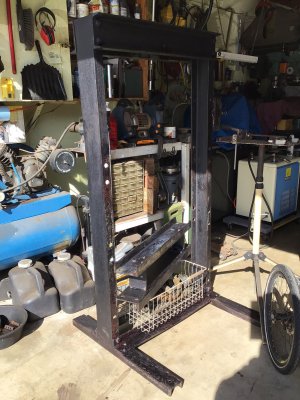
I don’t often do more than just fix the glaring problems with my CL finds but I felt this warranted it. Went down and got a $30 HF needle scaler and made quick work of the rust and loose paint. Should have gotten one years ago, two thumbs way up. Then put a couple of coats of Eastwood rust converter on it. Great stuff, NFI on both. I’m not shooting for museum quality, just working properly, daily driver if you will. Not sure about paint color. Have some JD green so might go with that.
Attachments
- Joined
- Feb 9, 2017
- Messages
- 5,248
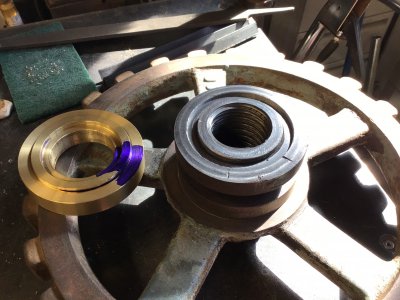
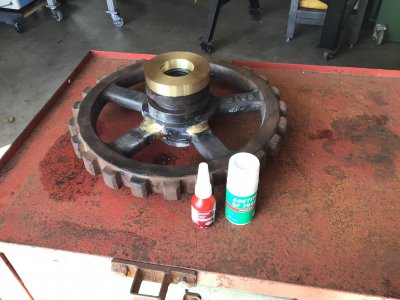
The mechanicals have proven to be the usual forensic dig into past repairs. I knew there was some wear because the screw wheel hung down with a gap between the main body. So I wasn’t surprised to find that the brass thrust bearing on top of the screw wheel was worn down to where the steel threaded insert in the cast iron screw wheel was wearing directly on the body. I thought that brass was just big washer but when I went to remove it, I think it was actually built up brazing. They had V’d the body where it met the threaded insert crudely and just laid a bunch brazing rod on there. Was tough to get off.
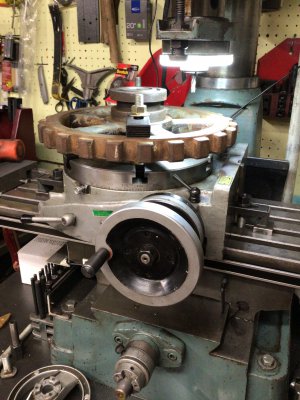
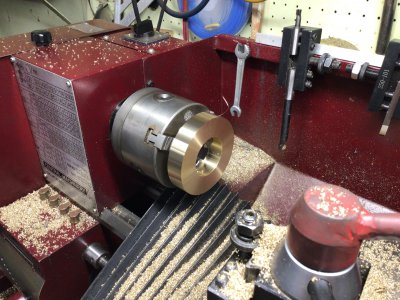
I toyed with idea of going back with the brazed rod but opted to go with a brass round off eBay. I put the screw wheel on the rotary table and cleaned up the surfaces and made the V’d are square with the idea of making the brass round slip fit to all three surfaces and use loctite 620 bearing mount to hold it. Never used it but knew of guys who did. But of course I’ve got some other things to take care of first.
In cleaning up the screw wheel I noticed 2 of the 5 spokes are cracked. So I’m going to scarf them out and braze them up before I mount the bearing.
Attachments
- Joined
- Feb 9, 2017
- Messages
- 5,248
The old cast iron body had some interesting challenges. i noticed right off the 5/16” key that keeps the screw located in the body was badly worn and had mangled the key way in the body. So the plan is to broach it to 3/8” along with re do the screw key way 3/8” and put a full length Delrin 3/8” key in it.
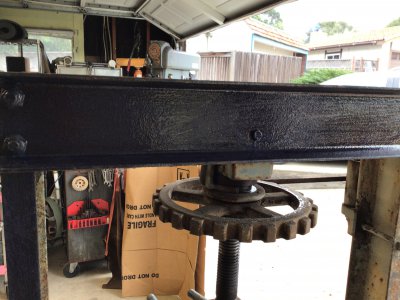
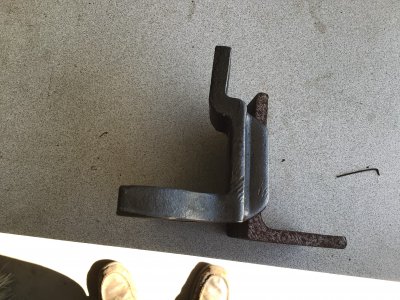
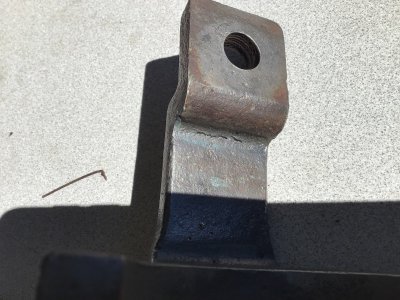
I also noticed they had broken off one of the ears that holds the body in place. Then instead of welding the original back took a chunk of steel and brazed it to the body. The braze job looks good, but for some reason didn’t decide to make it the same height as the original ear. It’s atleast 1/8” high. Better than low I guess. I can remove the extra steel. This is always the mystery why they do one part of the repair good then don’t finish the job. It’s pretty critical IMHO that the mechanism be perpendicular to the press bed but what do I know?
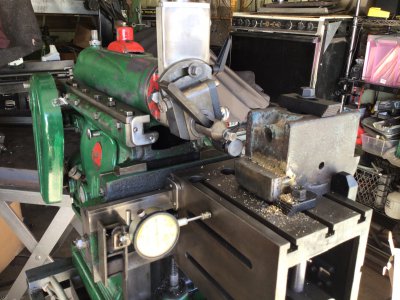
I put the body in the shaper and leveled the bearing area of the body. It originally had a big washer in there but was all galled from lack of lube. And I don’t think it was designed to have the steel insert of the wheel riding on the thrust washer.
I also noticed they had broken off one of the ears that holds the body in place. Then instead of welding the original back took a chunk of steel and brazed it to the body. The braze job looks good, but for some reason didn’t decide to make it the same height as the original ear. It’s atleast 1/8” high. Better than low I guess. I can remove the extra steel. This is always the mystery why they do one part of the repair good then don’t finish the job. It’s pretty critical IMHO that the mechanism be perpendicular to the press bed but what do I know?
I put the body in the shaper and leveled the bearing area of the body. It originally had a big washer in there but was all galled from lack of lube. And I don’t think it was designed to have the steel insert of the wheel riding on the thrust washer.
Attachments

Last edited:
- Joined
- Feb 9, 2017
- Messages
- 5,248
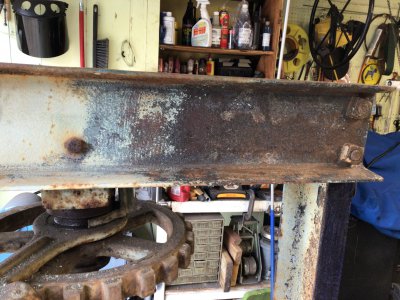
This repair has seen lots of creative use of the machines. The “ears” that locate and support the screw body were different heights. The person who did the brazing certainly knew what he was doing but didn’t pay attention to the one detail as the repair ear was about .200” off from the original. So I put the screw body back in the shaper and took it down to the height of the other unrepaired ear. I’ve always wanted to do dovetails with the shaper but didn’t have the project. So this is the logical first step doing a step cut. Remembering what I’d seen of how to set the machine up was the hard part.
Attachments
Last edited:
- Joined
- Feb 9, 2017
- Messages
- 5,248
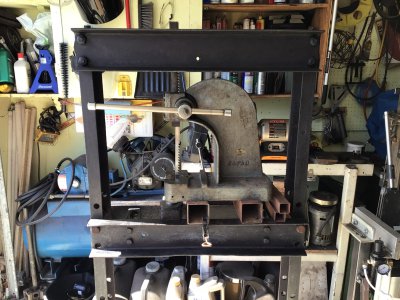
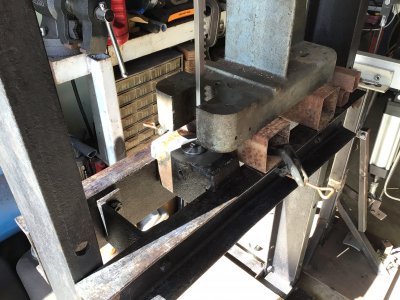
As is always the case the machine tool I need to fix the tool with, is the one that needs fixing. And the reason I wanted the old press was so I could do broaching and I needed to rebroach the old wallowed 5/16” key way in the screw body to 3/8”. I knew my old Jet 2tn could do it but didn’t have the clearance so bodged it using the old press bed ") It isn’t pretty and took weaselin’ and some fiddling’ but I got ‘er done.
It isn’t pretty and took weaselin’ and some fiddling’ but I got ‘er done.
It isn’t pretty and took weaselin’ and some fiddling’ but I got ‘er done.Attachments
- Joined
- Feb 9, 2017
- Messages
- 5,248
It took a couple of runs at the cracks in screw wheel spokes. I’ve known about preheating(but with torch) and buttering up the surfaces to braze but this was way more finicky because of the differences in the areas and the way they dissipate heat. The second spoke flowed better and I tried burying it in some clean sand I had. The first braze broke again where the original crack was. So the second run I order a 12x24 cerro wool blanket and while I was v’ing out the old braze it showed up! I remembered my powder coat oven so put the whole wheel in at 500f until the hub was 500 and wrapped most of it in the cerro wool and started in brazing. This time everything flowed 100% better and then put the whole thing back in the oven at 500 for 45min, then 350 for 45min, then covered it with the cerro wool and closed and turned off the oven. Next morning no cracks, bonus, score. I bugs me I didn’t think of that the first time, but I’ve never worked anywhere that had an oven so somehow it didn’t click first time.
Once the braze was all cleaned up it was safe to use the loctite 620 along with some catalyst and mount the brass thrust bearing I’d machined. When they say it sets up quickly they are not lying. It was solid in about 3-4sec!
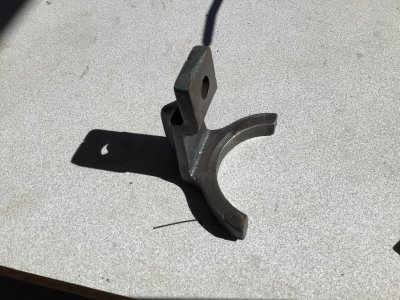
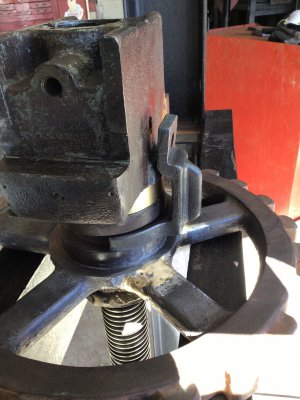
Next step is to figure exactly how much I have to take off. There is a cast iron retainer thingy that keep the screw and wheel in place and it has become bent or something I don’t understand. Its mounting flat for the mounting bolt is not perpendicular to the groove in the wheel its supposed fit into. So I thought that would be a good place to stop for the day and let it sit on my brain for a while.
Once the braze was all cleaned up it was safe to use the loctite 620 along with some catalyst and mount the brass thrust bearing I’d machined. When they say it sets up quickly they are not lying. It was solid in about 3-4sec!
Next step is to figure exactly how much I have to take off. There is a cast iron retainer thingy that keep the screw and wheel in place and it has become bent or something I don’t understand. Its mounting flat for the mounting bolt is not perpendicular to the groove in the wheel its supposed fit into. So I thought that would be a good place to stop for the day and let it sit on my brain for a while.
Attachments
- Joined
- Feb 9, 2017
- Messages
- 5,248
The later Manley screw press was rated at 32tn and looks very similar but the literature makes a point to say they have roller bearings instead of the brass for the thrust bearing between the body and screw wheel. Probably why so few of this model survived? I purposely made the brass bearing thicker just to fit it right to the retainer. But it looks like a retainer/picklefork is bent , cracked and somewhat mangled. It should have been adjustable and isn’t. and I don’t know if originally there were two, one on each side of the body. Without it, the screw and wheel fall out. So after thinking about it I think I’m going to fab a split ring affair out of some 1/2” plate to replace the picklefork with screw thread adjusters on both sides so the retainer can be adjusted properly as it wears and give even support to the screw wheel on both side of the body. Just when I think I’m almost done.........
Attachments
- Joined
- Feb 16, 2021
- Messages
- 6
C-Bag, i tried to buy that same press on facebook but see that your the one that beat me to it! Good job on the restoration. Btw, i work in Los Osos.
- Joined
- Feb 9, 2017
- Messages
- 5,248
Thanks. I kinda let my enthusiasm get the most of me as I figured it was such a simple machine, what could be wrong? What me worry? Old Iron is a gamble and I’ve got so much time into it now I can’t really quit now. Luckily it’s mostly time as I think I’ve got around $70 in materials and parts including the needle scaler.
Were you interested in it as a collector or like me hoping for an inexpensive tool?
Were you interested in it as a collector or like me hoping for an inexpensive tool?