Drill press setup/jig for indexing previously drilled stock

Bonny Jour Jour

Registered
Registered
Joined
Sep 25, 2022
Messages
11
Good morning!

I very well may be in the wrong place for a question such as this but lets see where it leads.

In my profession I am periodically tasked with recreating 100 year old parts that have worn out (I restore pianos). Pianos usually have 88 keys, and there are multiple rails per piano action-stack. In the service of recreating these with the singular alignment that is correct for that piano, the old rails come out and the drill-pattern layout is laboriously copied over to the un-drilled stock in order to be drilled with 'relatively' tight tolerances (I am made aware I am chatting with machinists :)).

What I have begun dreaming up is a jig thats alignable to the drill press, and, has a raisable / lowerable "bit" of some sort that lands in the hole of the stock I am copying and ensures that the new stock is in the exact right place for the hole that is to be drilled. Building this out once would save me time in the long haul as its laborious to copy over and punch each rail prior to drilling it. I'd be surprised if I am the first craftsperson to dream this up.

Have I explained this well enough? Is there anything here for some of you to run with?

Thanks for your time & Best,
Josh
 
Hi Josh- not super familiar with piano construction- you're speaking of the structure that holds the hammers correct? Not the pinblock?
What is the material usually?
Why is the original piece being replaced? If it's wood I assume it's cracked?
-Mark
 
Last edited:
Hi Josh,
I'm sure there are plenty of ideas around here, but can you show a pic of a typical part you are dealing with? I have to admit I have no idea what is inside a piano.
Wes
 
It depends on how big the part is. You would make a jig that is perfect in line with the spindle. It would have the drop down indicator. The new piece would be in align with the old piece. You move it and when the indicator drops in the old piece, the new one gets drilled. You could probably handle a foot or two on a drill press. Longer then that you woul need some serious out riggers to handle the two pieces and fixture. How about some pictures and some information on the drill press.
 
This is the kind of thing that brings out the engineers. It sounds like you are talking about a more complex variant of a pen drilling jig, but probably with blocks to put holes in different places. The style of drilling jig I am thinking of is :
https://www.woodmagazine.com/woodworking-plans/drilling/pen-blank-drilling-jig

You could use the above and make the different jigs for the different rails, but it might be nice to have it all in one jig you could leave on a drill press table. Just a couple of movable blocks to change the position when you need it.

I would make that out of wood, but you could go all in on aluminum easily enough. One through hole (unless rail holes are different sizes) to line the jig up every time you move a table or reinstall it.

I would start with a good key into a corner like in that pen jig, and mark the hole using a transfer punch, then work from there.

Sent from my SM-T500 using Tapatalk
 
Wow! Ask and one receives around here! Sleepy this forum is not :)

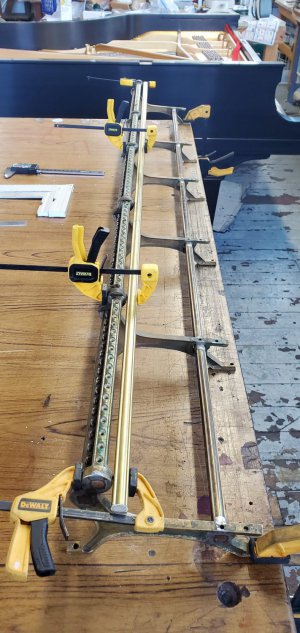
We are talking primarily about Steinway action racks and rails, picture below. You'll see a new rail clamped to action frame in the pic.

The rails are a hardwood dowel inside a metal enclosure that has a profile (specific to Steinway's) on all four sides - essentially its square but with raised, rounded centers on each face.

After being drilled, the rails are inserted into holes of the same shape in each of the support brackets (observable in the photo), and then soldered with a large soldering iron (200-600 watt required) in place.

I have a heavy-duty, radial-arm drill press mounted on an 8' long table with a 7' long raised table that serves as the drill table when desired - its also adjustable in angle relative to the drill bit. It allows me to support everything I drill for pianos - pin blocks, action rails, action frames, etc.

The picture below is specific to Steinway rails but the solution here will allow indexing for other items and would be time-saving. And yes, I am thinking of some sort of drop-down keying item made of metal.

Someone asked why. These rails can be 140 years old. The wood can rot, the metal sheathing can become brittle and repairing doesn't make sense. I will frequently rehabilitate worn out wood holes with 5 minute epoxy, inserting the correct screw (after screwing into wax) into the hole during cure. But if the whole rail is shot the correct repair is to replace.

Thanks folks!!!

Steinway Rails.jpeg
 
You already have what you need. You will need to make a frame that is twice as long as the longest rack. If the rack is 5'long then you will twice plus or around 11-12' long. The frame will mount to the drill press table. It doesn't move. Lock everything. It must be well supported so it doesn't twist or sag. The center of the frame is in line with the spindle. It has the drop down reference part on the back, hanging over the old rack. A ball on the end of a shaft, size to be determined. The distance from the drop down ball to center of spindle needs to correspond with the two racks. So if you need 12" from back rack to front (new) rack, the the ball needs to be 12" to drill center. Looking at your picture, you will probably eat up about 20-24" from spindle to back of sliding table if you use two similar racks.

You make a sliding table to go on top of the frame. If I was making it, I would use bearings to precisely align the table and make it roll smoothly. The table (and frame) need to be big enough to handle both pieces at the same time. The two pieces have to be aligned hole centers back to front. The item shown has mounting legs with hols so that will simplify things. So on a 5' rack the sliding table will be 5-1/2 to 6' long.

You mount the old (back) rack first. Then you mount the new rack so all the potential holes and such are dead straight and even and level. Slide the whole assembly until drop down ball is in hole in back rack. Your choice to clamp or hold and drill. Then just keep sliding left to right and drilling. I would run test pieces until I was sure I had all the bugs worked out. It is not clear from picture, but if the new rack part needing holes is drilled separately in a jig, that that would cut way back on size of table and frame. Maybe down to around 18". If you plan on removing the fame from the drill press, then I would key the frame to the table to allow for quicker setup.
How do you drill the holes on the side? Rotate the new piece? Can you use the original setup for spacing? Looks like in the picture the holes are on center with each other.
 
Question? Is the part with the holes straight? Not bowed or warped in the center between supports? So that a new part can be easily parallel to it?
 
Is that whole structure made out of brass? Holy cow no wonder those things are so expensive
So, yes you could build a jig with a locating pin but it would need to be very rigid and accurate. In a perfect world you would have a machine-vision hole locator and a gigantic motorized X/Y table and drill rig to do this but the cost would be insane and would weigh a ton.
I think a strong light weight jig made of aluminum with a simple pin mechanism would work fine.
-M
 
M & Chewy, thanks for the follow-up.

The rails come out of the supports before anything gets drilled so this means the space required for this exercise (and all other jobs similar) is minimal front-to-back.

I need to lock parts being copied parallel, with a lift-up/drop-down mechanism that finds the hole in the original part, centers itself in the hole, ensuring the drill goes into the correct spot in the new piece.

Yes, you would think they are spaced out perfectly, but that changes from section to section, piano to piano. The simplest manual way to do this and essentially do it once, is to make a sliding carriage that can be bolted to my elevated table and has the lift-up/drop-down hole-centering mechanism.
 
Back
Top