3-2-1 blocks, parallels, and v blocks, oh my! How do you secure your milling workpiece safely and effectively?

STEMtheMachining

Registered
Registered
Joined
Nov 20, 2022
Messages
86
So as the title suggests, I'm looking for advice on methods how to secure a workpiece for milling? are there any good sources for this?

For example, if I'm milling the face of a cylinder, how would you clamp it in a machinist vise?

And why if ever would you need those wavy parallels? I can't for my life think of a reason for them?

What are some good set up kit that a beginner should have ?

Sent from my SM-N960U using Tapatalk
 
Start with a good quality heavy milling vise and a clamp set. Then make and/purchase additional clamping devices - the additional items will go on indefinitely, so buy or make whatever you need as the task determines. The point being that with milling, you really, really need to hang on to the piece - go crazy on making that piece very, very secure.
 
Cylinder use a v-block in the vise. 3 points of contact should have a solid hold.

Wavy parallels are nice for thin parts that might be more difficult to prop up with normal parallels.

A vise and parallels is what I use for most setups on the mill. The typical clamping kits come in handy sometimes for odd shapes and large parts. And to hold down the vise.

Blocks, jacks, etc are nice to have around, but don't stress about having a big collection of them when starting out. Just build up as needed.

I get a lot of ideas from various YouTube videos from Joe Pie, mr pete, etc.. Watch them make stuff and you can see how they hold the work. Joe's model lathe in particular had some great tips for holding odd shapes.
 
Start with a good quality heavy milling vise and a clamp set. Then make and/purchase additional clamping devices - the additional items will go on indefinitely, so buy or make whatever you need as the task determines. The point being that with milling, you really, really need to hang on to the piece - go crazy on making that piece very, very secure.
Did I mention I have a Unimat, and my lathe is just a little larger than a 6 inch Kurt?

So while this is great advice for others, I need a 1/4 scale solution.

Sent from my SM-N960U using Tapatalk
 
Start with a good quality heavy milling vise and a clamp set. Then make and/purchase additional clamping devices - the additional items will go on indefinitely, so buy or make whatever you need as the task determines. The point being that with milling, you really, really need to hang on to the piece - go crazy on making that piece very, very secure.
Good advice there. The first time I milled something was on a Bridgeport. Motorcycle piece. I thought I had it secured. I was wrong; spit that piece out like nobody's business.
Lesson learned the hard way.
 
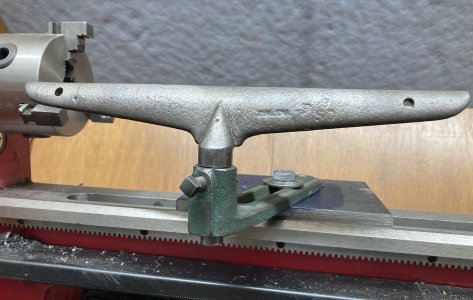
I'm a relative newbie myself, albeit with a few decades of hobby woodworking to draw on. I thought I had my clamping needs pretty much covered until yesterday - needed to reduce the diameter of a T-shaped wood-lathe toolrest's post from 3/4" to 1/2". Both arm and rest were eBay finds, and the arm's hole was too small for the rest. Why it's being mounted on a metalworking lathe is a story for another day.
The finished product:
2.JPG
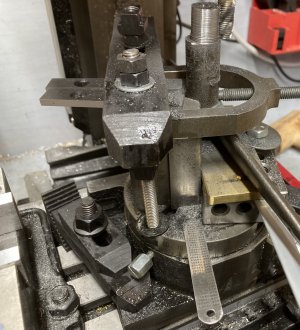
As you can see in the pic above, the rest's "T" arm was far too large for the shaft to be turned axially in that silly little lathe o' mine. My first thought had been to mount the T onto the lathe's carriage to feed the shaft horizontally past a boring head to shave it down. No luck with that, so next stop was a mill/rotary table setup: One V block, two clamping kits (mill bed + rotary table), some scrap brass and aluminum, a couple of parallels, a pocket rule acting as a shim, a handful of nuts, bolts, and washers landed me here. It literally made me laugh, hence the picture:
3.JPG
Absolutely ludicrous - but I was able to hang my weight off of the clamped part in any direction without it shifting. Upper right in the photo above is a roughing mill against the shaft being being turned down.
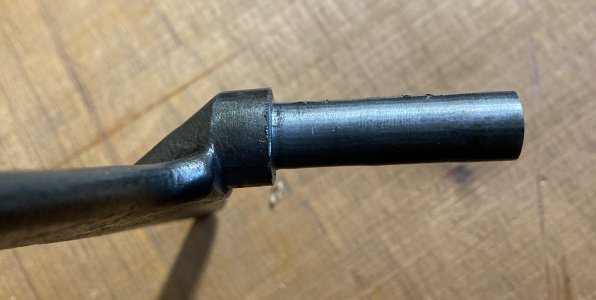
Fresh out of that setup, with a few lingering chips:
1.JPG
Lessons learned along the way: Need more threaded rod and nuts for my rotary table. Need a variety of shim stock. Need to go slowly, and stop and step back/assess often. Since yesterday I've thought of about six other approaches, including milling a one-off clamping fixture to match the angle of the T arm that bolted directly down to the rotary table, but this got it done.

I think Chipper 5783 nailed it, "Start with a good quality heavy milling vise and a clamp set. Then make and/purchase additional clamping devices - the additional items will go on indefinitely, so buy or make whatever you need as the task determines." (and have fun along the way).
 
Look at how a piece is held in a You Tube video, then downsize the holder. You will have to do this yourself. Instead of a machinist jack, use a threaded bolt and coupling nut. You can use free standing or solder the nut to a small piece of metal. I have used this inside gun receivers for support. For parallels, get a bunch on small HSS square and rectangular tool blanks. $1.5-2.5 each at any good supplier. For holding round stock, you make your own vee blocks. Starting with say 1/2" x 1" x 2" pieces tilt the head and mill an angle of 45 degrees on one and 60 degrees on the other. Work your way up to say 1" x 1-1/2" x 3". This can all be done with mystery steel or 6061. It needs to be straight and the depth consistent across the piece so you will have to figure out a way to check and adjust. A dowel pin in the groove and sweep a DTI across it will be OK. You can use a thick sheet of glass for the surface plate. If you need to index for angles, Jo Pi has a little (3") homemade angle plate that glues tor double stick tape on the end You can always down size or make several dedicated angle plates.

Everybody here knows that you have to hold it to machine it. And most likely everybody here has spent a whole darn day making a jig to do 30 seconds of machining. I know I have. As stated above it HAS to be secure. I have broke endmills and sent pieces flying, it is no fun.
 
JC Whitney, that is one interesting setup!!! An alternate way is to use a boring head in reverse, if you have one that is not threaded. You clamp the piece to the vise and indicate it. Then put the bit into the boring head backwards, set the mill in reverse. Start larger and feed in slowly to desired diameter
 
I think a short explanation of clamping funamentals is what you are looking for.
Using the following principles will help to solve most clamping issues.
For this very brief description I will be using a strap clamp + tee nut + threaded rod + nut + packing pieces on a milling machine bed.
We need to make sure that we clamp the part and not the packing pieces. To ensure this, these need to be met.
The clamping rod needs to be closer to the part than the packing.
The packing needs to be slightly taller than the part.

You will also need to consider that the part can still rotate if enough force is applied in a certain direction so it is always advised to use at least two clamps.

I hope this 101 explanation helps with what you are looking for.

Researching the fundamental "6 degrees of freedom" will really give you excellent information relating to clamping and location.

I've deliberately tried to be non specific but these fundamental principles all work on a lathe + shaper etc....
 
I had to google 'unimat'... I'm not familiar with them at all.

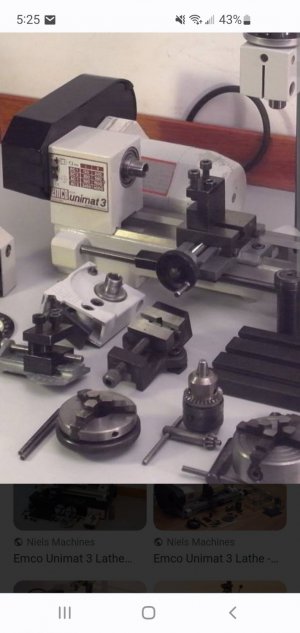
I found a few pictures that appear to show a vise that mounts to the top of the cross slide in place of the toolpost...

Screenshot_20230108-052525_Chrome.jpg

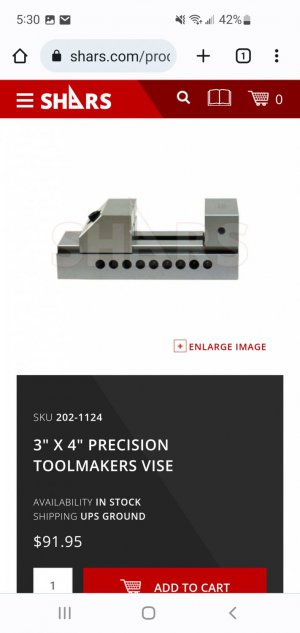
If your machine didn't come with a vise like that, maybe you could get a small toolmakers vise and clamp it to the cross slide? Something like this...

Screenshot_20230108-053004_Chrome.jpg

That is a 3" x 4", but you can get them as small as a 2" x 2½"... and maybe smaller, if needed.

-Bear
 
Back
Top