4 inch manual rotary table

Nice, when you get it done can we get a copy of the plans. That looks like it would be great for some of the projects I need to do.

I like following your threads, You do some interesting things with good ideas, that makes me think of what I can do for other things in a similar fashion. Problem is my list just keeps growing, then I have to try and decide what order I want them in.:makingdecision: or start one project and it winds up on the side while I work on something else.

Looking forward to following this project till you finish it.

KVT
 
Actually ,no. I used a second cut smooth file to smooth the surface while turning a medium rpm. This cuts the raised metal without reducing the diameter and gives an excellent finish. The marks show up pretty well, but I will probably put some black lacquer in them.

I do a lot of finish work by hand with a file. I use a lot of files, different types, shapes and grades. I love my second cut files. They give an excellent finish. If you know how to use files, they can work wonders for you.

I enjoy doing 'hand work' as much or more than machining and am fairly good at it. It does come in handy working on pistols and revolvers. :)

Prior to mentoring me, my pistolsmith friend gave me a small chunk of mild steel and told me to make a 1" cube out of it, to be dimensionally within a thou, and opposing sides parallel within a thou. I was only permitted to use the two files (a #0 and a #2), a piece of glass, sandpaper, and a old Mitu caliper that he handed me. Don't remember how long I worked at it, but I want to say weeks. I took it to him one Saturday morning and handed it to him. He smiled and picked up his caliper to see how I did. He started taking measurements and the more he took the more he frowned. Finally he set it down and just stared at me for a bit, then he asked me when I wanted to start manning the hand work station. I was within spec both dimensionally and all opposing sides being parallel. My wife thinks I'm weird when she sees me just sitting out in the shop and working a piece of scrap with a file. To me, it's a calming experience like no other.

I still have those dial calipers after 20+ years...

Sorry for the OT, but your comments about filing brought back memories. :))
 
I haven't forgotten this project. The bearings for it just came a couple days ago. The tool grinder is eating my time right now. i had to use a piece of 2 1/2" round steel that was for this table on my grinder, so now I have to hunt up another small piece for this table. I buy very little metal, some but not much. (My social security budget doesn't leave anything for hobbies.) I get my metal from scrap barrels and dumpsters at a couple shops. They think I'm nuts :nuts: when I get excited cause I find a 4" long piece of bar stock in the garbage. I tell them, you would be amazed at what I can do with what you throw away. :rofl::rofl::rofl:. Anyway, I will get back on this table soon (I hope)
 
wrmiller19;272167 Prior to mentoring me said:
When i was doing mechanical engineering the first thing they made us do was make a fish plate square with a file. Not as tight spec as you were going to but it took for ages.

If you like that sort of stuff check out switch and levers video on u tube where he makes a clamp with a hand saw and a file(basically), inspirational stuff.

The hand tools are very satisfying :)

Stuart
 
I understand that, gov checks don't seam to go very far. My dad did scrap metal when I grew up, and we did not purchase metal, we found something and made what we needed from it, Some time a little over kill, but good none the less, We did not have a lathe or a mill, but he could a take motor, gears and a shaft and make it where we could turn stuff down and grind it down then take files and finish it to what it was supposed to be. Kids though I was crazy, because I had an old Cushman Scooter that we could not get parts for any longer, We redid the rod and made our own bearings all by hand, That thing ran for years. you just have to know how and where to file and with a good clean file. In fact I am sad, Some how one of my good files that I have had for a long time, and like to finish things with some how walked off. Now I have to try and figure out what to replace it with.

Kvt
 
To: KVT;

Look in the Atlas Machine section, for thread "Tools you can make for your Atlas mill".
An artical from "Model Engineer' 1976 is uploaded. "Small Rotary Table.PDF" by: George Thomas, 5.8 meg
This may help, material sizes may be similar to Marks project.

Restorer
 
This project got pushed to the side when I started the tool grinder, but today I decided to try and finish it up while I look for a supplier for the belt for the grinder.

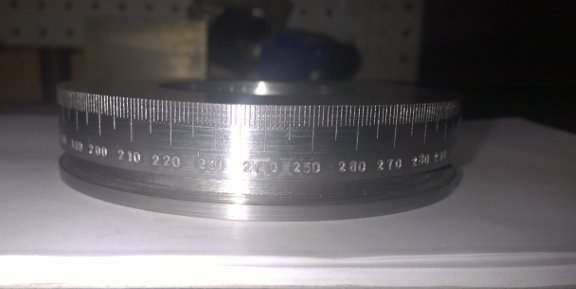
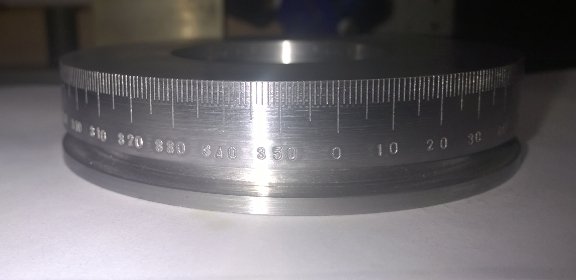
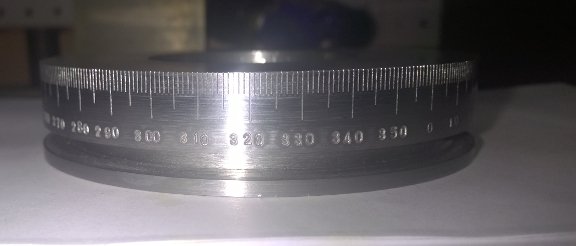
This was one of my first degrees marking projects and while it was not too bad, I learned a lot more since I did it so I chucked it up and skim cut the side to do the markings over again as I know I can do them better now. I ground a sharp point on my index pointer to make it easier to position more accurately and it helped A LOT! I re-scribed the 360 degrees marks and they came out as perfect as I could ever get them.
Table markings.jpg
Table markings2.jpg
Table markings 3.jpg These images show how uniform the degree marks came out. I am really happy with them now. The numbers are much better also, not perfect , but a lot better.
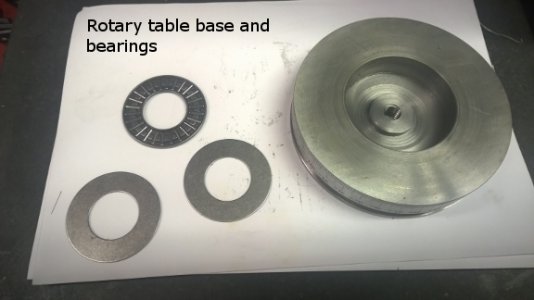
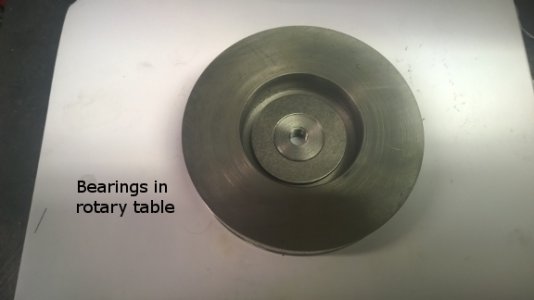
table base and baerings.jpg These are the bottom bearings for the table. They are .875" bore and 1 11/16" O.D. The table will rest on these. The center is cut a couple thousandths lower than the bearing surface.
Baerings in table.jpg The bearings are set in the table. I have begun machining the center part of the table but found I am missing a 32 tooth change gear for my SB lathe and can not cut 8 TPI with out it , which is what I need on the center piece. I don't yet know what i am going to do now. I will take some photos of the center piece tomorrow as I will get it all done except for the threads.

It feels good to be back on this project as I could have used this a few times. I think I was putting it of because I was not happy with the markings, but now they are great and I feel better about this project. There will be more tomorrow.
 
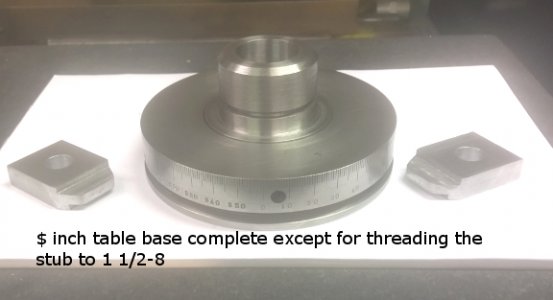
I machined the center for this little table today and it is finished all but threading the stub to 1 1/2-8 threads. The reason for the threads is I can put any of my chucks for the lathe on here, although I intend to get a 4 inch chuck and it will also work on the lathe since the table has the same threads. and I an going to make an ER 40 collet chuck that can go on here or on my lathe spindle. I can put the various size face plates for my lathe on here also and I am going to make a T slot table top for it and it can them be used on the lathe too. So this little rotary base and my lathe can share the same tooling.

Anyway.... on to the table.
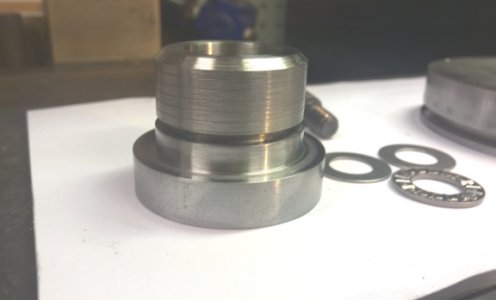
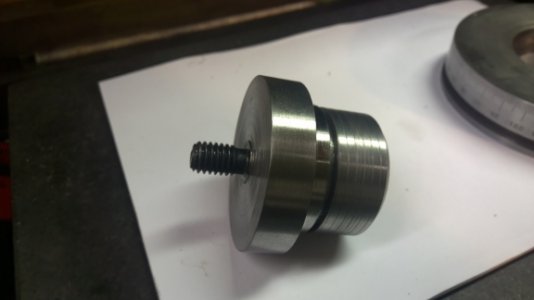
Rotary table center parts.jpg These are the center parts. There is the threaded stub, the top bearings and a shoulder bolt. The center of the stub is counter bored so that its center length is .002" shorter than the shoulder bolt and bearings together. This lets it rotate smoothly on the bearings with no up and down movement. The center hole is also bored to a smooth slip fit on the shoulder bolt so it rotates freely with no axial movement. These dimensions are very important and somewhat difficult to hold within .0005". Any mistakes and it will require shims. Fortunately, with much calculating and checking, I hit all the dimensions. The top outside side surface of the center stub sets .002" above the rotary table base so that my tooling does not rub on or interfere with the base. The section you see below the parting groove where the threads will stop is the same size as the register on my lathe spindle. This is so my lathe tooling will fit properly on the little table base. I have a blank chuck back plate, the three jaw and 4 jaw chucks, two face plates and a drill chuck that will fit on this base.
rotary table center assembly.jpg This is the center assembled and ready to go in the base. The bearings on the bottom and the bearings on the top make this a tight and smooth turning assembly.

4 inch rotary table base and clamps.jpg This is the completed 4 inch manual table base except for the threads on the stub. ( the $ sign in the photo is supposed to be a 4). There is a hole in the side that has a 10-32 set screw with a brass plug in front of it. It locks the table in any position. I made two hold down clamps to clamp it on my Burke mill table. I will take it apart and thread the stub when my new gear arrives for my lathe. Other than that , it is complete and ready to share my lathe tooling and I will make some new tools for it. first one will be a t slot plate, then an ER 40 collet chuck. I am also going to make a blank plate with a hole pattern on it to hold small items for milling. those will be NEAR future project items.

All in all, I am pleased with the little rotary table. It was fairly easy to make and the hardest part is figuring out and holding the dimensions for the bearing assembly part.
 
To: KVT;

Look in the Atlas Machine section, for thread "Tools you can make for your Atlas mill".
An artical from "Model Engineer' 1976 is uploaded. "Small Rotary Table.PDF" by: George Thomas, 5.8 meg
This may help, material sizes may be similar to Marks project.

Restorer
I went and looked up this table. It is a nice table also. I particularly liked this design I built because it and my lathe can share all the tooling between one another. I can machine something on the lathe and take the whole thing off, put it on the table for milling and if needed return it to the lathe without ever unchucking it or unmounting it. There is no dialing it back in or losing dimensions.
 
Back
Top