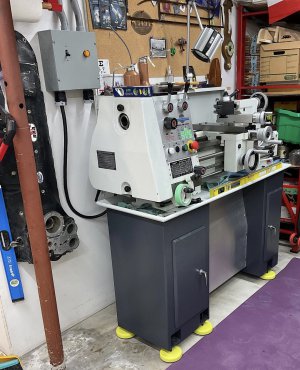
833TV picked up and finally on its stand!

Take the spring out, and make it stay engaged, with the spring the handle still goes whipping around anyway.
I may try that. Though, while it does still rotate when it's not engaged, it will stop if it hits any resistance.... though, while that's great, still shouldn't have anything in it's way, that's a problem in itself.

I'm planning to hook up some stepper motors for my power feeds, x and z at least... though step one for me at the moment is just to get it plugged in... I ended up running a dedicated 20amp circuit so I didn't have to run a 50 foot extension cord... ended up about the same price, since I'm running all my lines.
 
Nice job on the stand!

I got my PM-833TV apart and downstairs in the fall and am working on the stand. It’s taking a while since I am learning to weld at the same time.
 
Nice job on the stand!

I got my PM-833TV apart and downstairs in the fall and am working on the stand. It’s taking a while since I am learning to weld at the same time.
I can't imagine getting it down a set of stairs...I thought I had it bad by getting it through a service door. Definitely post some picks of your stand when you have it ready, good to see everyone's take on the best stand/features etc..

My welding skills aren't much past being able turn on the welder and put it in synergic mode, but it's been fun learning.... I like seamless look so I grind them all down... i figure by the time I'm a really good grinder, my welds will be at a point they won't look to bad and be acceptable as is.

I just finished my outlet for it, used 6-20R outlet but ran 10awg to the panel on a 20 amp breaker. 12 awg was all that was needed but I figured I may use the same circuit for welding so it would be easier to up it to a 30 amp breaker and outlet if needed.

One thing I find strange is that there's no on/off disconnect switch, maybe that's typical for this type of machinery. I unplug when I leave the shop. Plan to wire the power cord to a disconnect switch soon.
 
I can't imagine getting it down a set of stairs...
I took the PM-1224T lathe down the stairs in one piece, and with hindsight regretted that decision. So I pulled the mill apart into major components: Table, base and carriage, column, head. The only really heavy part was the column, and once again my pig-headiness of wanting to do it myself nearly bit me when it almost got away from me. But all’s well that ends well…
My welding skills aren't much past being able turn on the welder.
Mine neither, though I’m pleasantly surprised how much I’m enjoying learning. I have to grind down my ugly welds too…
One thing I find strange is that there's no on/off disconnect switch, maybe that's typical for this type of machinery.
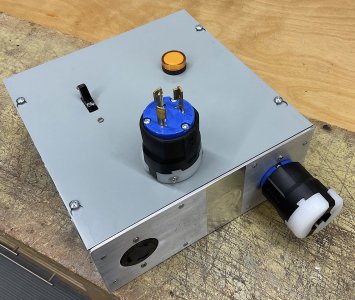
It appears to be typical. Power is needed to run the controls so you can start the machine. I put a 3 pole disconnect into a box which allows me to cut power on two circuits: the 240V lathe power; the 120V future DRO power. (Concept copied from others in this forum)
9608503C-6E0F-4CB6-9318-0F7E84E08381.jpeg

69E40D7B-81D0-4C35-A1B5-AC33E9F08D03.jpeg
 
I put a disconnect switch into the side of the 833 control box. There is enough room inside and I like how it turned out. Totally forgot that this was not something that came with the mill...

IMG_1594.JPG
 
I put a disconnect switch into the side of the 833 control box. There is enough room inside and I like how it turned out. Totally forgot that this was not something that came with the mill...

View attachment 436904
Nice!I ordered a very similar switch and once I opened up that side panel I figured as well there would be just enough room. I think these things take a very small through hole, so it should be relatively easy to install.

1675968417106.png
 
Back
Top