90 Degree Raw Castings to Machine

Chrisd

Registered
Registered
Joined
Feb 6, 2022
Messages
8
Where do I start in machining these nice little 4 X 4 inch 90 degree raw castings. I'd like them to be accurate to +/- 0.002" if possible. I have a Sieg bench top end mill from Little Machine Shop.
 

Attachments

  • IMG_1554.jpg
    IMG_1554.jpg
    14.3 KB · Views: 28
  • IMG_1555.jpg
    IMG_1555.jpg
    15.8 KB · Views: 25
Depends on what accessories you have. Easiest with a vice or good angle plate, but if you only have the mill, it will just take longer.

Start with one of the T shaped surface down on the table shimmed so no rocking and loosely clamped. Add an indicator or pointer to the spindle or height gauge to table and make sure the 4 corners of the 4x4 surface are about same height (parallel to table). Adjust shims as required, tighten clamps. Mill the 4x4 surface.

Place other T surface on table, shimmed so no rocking and loosely clamped. Adjust shims so that when the indicator or pointer in run up an down the milled surface it is as straight a line as possible (indicator reads zero top and bottom), or till a good square sitting on table touches top and bottom with no light showing. Tighten clamps. Mill 2nd 4x4 surface.

Clamp a milled 4x4 surface to table. Machine opposite T surface. Repeat for 2nd 4x4 surface clamped down, mill 2nd opposite T surface.

You now have 4 surfaces done. Place one of the L surfaces on table, shimmed so no rocking and lightly clamped. Now have fool around with shims so that indicator or pointer run up and down BOTH 4x4 surfaces are reading zero, or till a good square sitting on table touches top and bottom of BOTH milled 4x4 surfaces with no light showing. Tighten clamps and mill L surface.

Clamp milled L surface down, mill opposite L surface.

Check squareness with whatever you have, probably won't be perfect. Mark proud edges with amount to be removed. Repeat above setups so indicator or pointer reads zero and pround amount marked. Remill.
 
Wow! Thank you Grandpop. (BTW, I'm a new Grandpop myself: Baby girl named Evelyn). I do have a nice 4" Kurt vise and some dial indicators. And I now see the value in have shim stock in the shop. I really like your process sequence - very strategic and well thought out. I was lost in the desert and have now found the promised land for my 90 degree angles. Thank you so much. Now to look for some shim stock. Funny, but I really like working with cast iron. There's something special about it that I haven't put my thumb on yet. Printing out your process now to refer to when I begin the work.
 
+/- 2 thou is not too difficult to achieve as long as the alignment of the mill is good.

Depending on the method used some of the axes are more critical than the others. Assuming that you will be using a 4+ inch fly cutter / facing mill and cutting along the X axis, you will need to ensure that both the spindle and the vertical column are perpendicular to the X axis rail ( not the table surface ).

If the cutter is of smaller diameter so multiple passes will be needed, you will need to ensure that the spindle is perpendicular to the Y axis rail as well.
 
Last edited:
Here are the cutters I have - a 2 inch 5 tooth carbide cutter and a 1 1/4 inch 2 tooth carbide cutter.IMG_1557.jpg
 
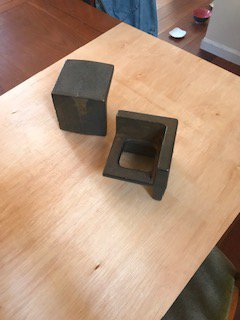
If you are using the vise, slightly different.

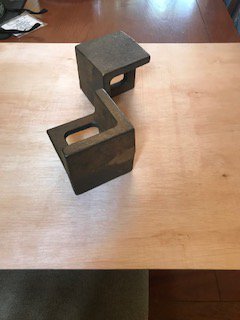
Yes, your mill head needs to be square to table both r-l & f-b.

Start out the same. You can use feeler gauges, scrap sheet metal, (3) 123 blocks, anything for shims. After first 4x4 surface cleaned up, clamp that down to table and cut opposite side T surface.

With those 2 surfaces now parallel, you can go to the vise and speed things up. If it won't quite fit in the 4" vise, take the moveable jaw out. You won't have any raw surface in contact with the half hard moveable jaw mounting surface, so won't be damaged. Place the 4x4 milled surface against fixed jaw, raw T surface down on bottom of vise, unmilled 4x4 surface up. Place 2 small dia dowels or soft stock at widest part of lower T edge. This will help balance the top surface r-l, but more importantly allows the part to pivot so completely square to fixed jaw. Mill the top raw 4x4 surface.

Turn part over with just milled surface down, same first milled surface against fixed jaw, no dowel pins or spacers under bottom. Mill top T surface.

Keeping same first milled surface against fixed jaw, place one raw L surface down on small dowel or spacer. You can secure indicator to spindle and indicate the other now vertical 2nd milled 4x4 surface top to bottom using the quill travel (probably less than 4", so as close to zero over actual travel range as possible), or you may be able to hold a good square up the milled surface so no light visible top to bottom. Final tighten vise and mill the top L surface.

Keeping same first milled 4x4 surface against fixed jaw, place milled L surface down, no dowels or spacer, tighten vise, and mill last surface. You new angle plate / square will be as good as your vise if you head is square to table.

I would probably use the 1 1/4 cutter. Better to have 2 teeth than 5, and even with the 2" one you will need to make passes to cover the 4" surface. Since you head will probably not be square to table in f-b direction, the 1 1/4 will minimise the out of square slightly over the 2" one. Will need to make 4 passes with the 1 1/4 cutter.

As with any small tolerance milling, keep the inserts sharp. Even if that means indexing before each final cut.

Also best to keep your quill nut jamming the quill full up so no chance of it dropping while cutting (even .001 drop will mess things up).
 
Use the smaller end mill for roughing. It will cut more with less effort. Make sure your carbide is for cast iron, so you don't dull it that quickly.
Not sure which mill you have, but I'm assuming it's a light duty unit, so slow is the key. Don't push it too hard, if it chatters stop, chatter leads to more chatter, and then it's hard to machine out.

Good luck.
 
Make sure your carbide is for cast iron, so you don't dull it that quickly.

I have repetitively heard about using carbide for cast iron from those who prefer HSS tools and I cannot understand why. My experience is that cast iron is relatively soft and very easy to machine. Very much like 12L14. My experience is limited to grey cast iron though. Ductile ( nodular ) cast iron may be different.
 
You showed 2 end mills that take carbide, and that's why I said make sure it's for cast iron. Cast iron takes the edge off quickly. It cuts easily, but is abrasive.
 
I have repetitively heard about using carbide for cast iron from those who prefer HSS tools and I cannot understand why. My experience is that cast iron is relatively soft and very easy to machine. Very much like 12L14. My experience is limited to grey cast iron though. Ductile ( nodular ) cast iron may be different.
I concur, good cast iron is like cutting butter. Unless you hit a spark plug insulator, then even carbide gets chipped up almost instantly. Its only abrasive on the skin, take a good cut to get under it and its not at all. If the casting has been shot blasted, or is continuous cast bar like durabar, the skin isn't even abrasive. Its mostly the silica/sand in the skin thats abrasive.
 
Last edited:
Back
Top