- Joined
- Jun 17, 2012
- Messages
- 2,220
A manual tracing attachment for any lathe. I've had this on my mind ever since a local blacksmith asked me if i could make knobs for him.
This is what it looks like all set up. You can see a handle that I just made for it in the lathe chuck. I make a pattern by tracing out the part I want to make, if i want to duplicate a part. Or i can design my own. I then cut it out onto some heavy sheet metal. I think I'm using 14 guage here. The heavier the sheet metal the better, it helps for to allow the stylus to glide a little better. I made some standoff blocks that clamp onto the back of the lathe bed. I had to make them tall enough to clear the digital readout protective cover and also to give me enough room to bolt a stylus follower mount. The stylus follower bolts onto the cross feed, where the follower rest would normally bolt up. I made the stylus out of a piece 3/8" drill rod, it's removable and it can also be rotated for better stylus orientation.
The compound is set in the same direction as the cross feed to allow for excellent part width fine tuning.
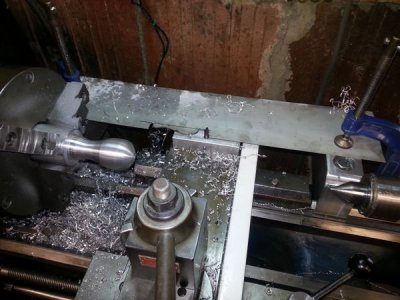
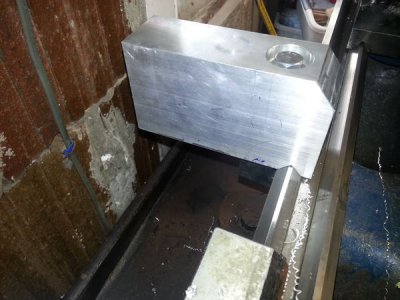
Here's a look at the standoff blocks that I made.
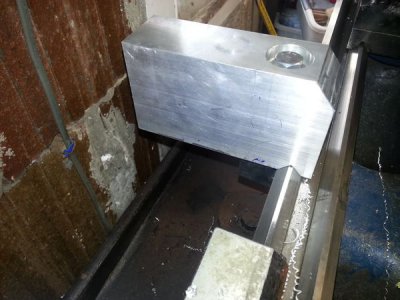
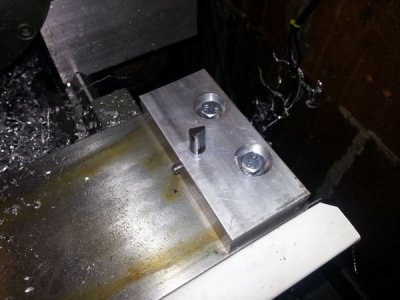
Here's a look at the stylus and mount.
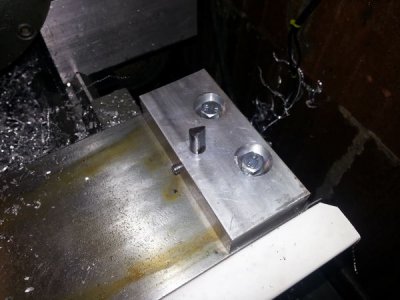
A picture of how the compound is set so that you can adjust the diameter of the part independently from the pattern.
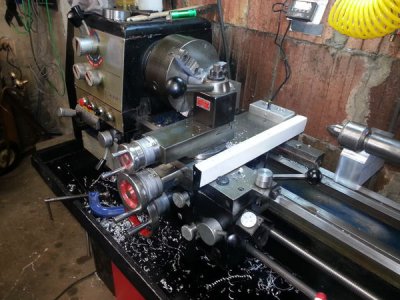
To use it I hog out the deepest parts of the pattern first by feeding in and running the carriage right and left. Once I'm close to the pattern I feed the cross feed into the pattern at one of the deepest points then I put some hand pressure on the cross feed wheel towards the pattern and move the carriage over till i hit the pattern. For the final pass , always working from the deepest part I move the carriage in the direction i'm working and as I'm doing that I turn back the crosfeed wheel just enough to get it to follow the pattern. Backlash actually helps a little here, because as you move the carriage right or left, if the pattern doesn't have a steep angle, the crossfeed will just follow the pattern, so long as the crossfeed handwheel is backed off to allow the crossfeed to follow the pattern freely. I got the hang of it within a few minutes.
Once its all turned down to the pattern, If you think the part should be a little smaller in diameter, just adjust your compound in. No need to move the pattern.
Then just file, sand, and polish for your final piece.
Every lathe is a little different, but the idea is there. I thought that this could also be used to turn a taper by clamping and indicating a piece of rigid straight edge to the blocks at your desired taper.
If anybody has any questions just ask away.
Marcel
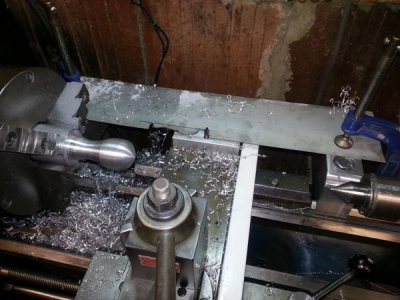
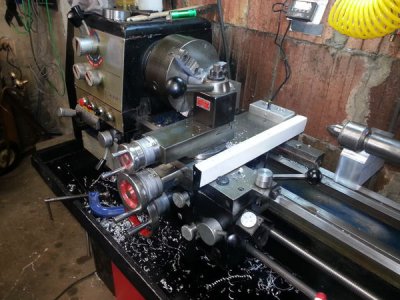
This is what it looks like all set up. You can see a handle that I just made for it in the lathe chuck. I make a pattern by tracing out the part I want to make, if i want to duplicate a part. Or i can design my own. I then cut it out onto some heavy sheet metal. I think I'm using 14 guage here. The heavier the sheet metal the better, it helps for to allow the stylus to glide a little better. I made some standoff blocks that clamp onto the back of the lathe bed. I had to make them tall enough to clear the digital readout protective cover and also to give me enough room to bolt a stylus follower mount. The stylus follower bolts onto the cross feed, where the follower rest would normally bolt up. I made the stylus out of a piece 3/8" drill rod, it's removable and it can also be rotated for better stylus orientation.
The compound is set in the same direction as the cross feed to allow for excellent part width fine tuning.

Here's a look at the standoff blocks that I made.

Here's a look at the stylus and mount.

A picture of how the compound is set so that you can adjust the diameter of the part independently from the pattern.

To use it I hog out the deepest parts of the pattern first by feeding in and running the carriage right and left. Once I'm close to the pattern I feed the cross feed into the pattern at one of the deepest points then I put some hand pressure on the cross feed wheel towards the pattern and move the carriage over till i hit the pattern. For the final pass , always working from the deepest part I move the carriage in the direction i'm working and as I'm doing that I turn back the crosfeed wheel just enough to get it to follow the pattern. Backlash actually helps a little here, because as you move the carriage right or left, if the pattern doesn't have a steep angle, the crossfeed will just follow the pattern, so long as the crossfeed handwheel is backed off to allow the crossfeed to follow the pattern freely. I got the hang of it within a few minutes.
Once its all turned down to the pattern, If you think the part should be a little smaller in diameter, just adjust your compound in. No need to move the pattern.
Then just file, sand, and polish for your final piece.
Every lathe is a little different, but the idea is there. I thought that this could also be used to turn a taper by clamping and indicating a piece of rigid straight edge to the blocks at your desired taper.
If anybody has any questions just ask away.
Marcel


Last edited:

