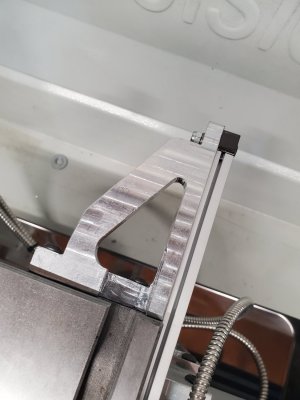
Aluminum vs steel blocks for scale install

I've used printed brackets to hold the read heads on my lathe on both the Z & X axes. I used 1um scales, and I haven't noticed any issues in the last six months. I initially made them as prototypes, but so far, I haven't seen any issues of creep, or things like that. I printed mine in PETG. Since I designed them in CAD, I can either print them again, or machine a set from aluminum, since I have a set of drawings to machine from.
 
I've used printed brackets to hold the read heads on my lathe on both the Z & X axes. I used 1um scales, and I haven't noticed any issues in the last six months. I initially made them as prototypes, but so far, I haven't seen any issues of creep, or things like that. I printed mine in PETG. Since I designed them in CAD, I can either print them again, or machine a set from aluminum, since I have a set of drawings to machine from.
I have several scales mounted on a combination of 3D printed (PETG) and aluminum brackets. No issues at all. The forces that these scales are subjected too are negligible. As far as aluminum on cast iron/steel concern - unless one uses lemon juice as cutting fluid ... ;)

Regards
Yuriy
 
I 3D printed the mounts for the scales on my pm1130, and am very happy with the results. I’ll put some pictures up if anyone is interested. In My time it was very economical. I did do a couple of rounds of modifications, but they are working great I think, and so much easier than trying to manufacture them out of aluminum. Now in printer time, well, it just runs all night, and I can sleep or whatever…
 
I got my DRO scales and mounts installed and successfully powered it all on yesterday.

For the z-axis reader mount, I started with the metal angles and long piece included with the scale/mount from Aikron. Then printed an orange plastic piece to space this the right distance from the carriage. It worked fine
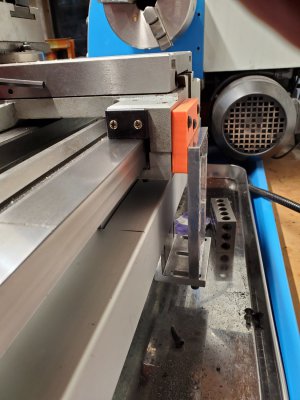
1stPaddz-mount.jpg
However, I'd drawn up the part in Fusion 360 and it was designed to only need machining on one side. So, after the plastic protoype proved the shapes and sizes, I used my printNC to cut the part from aluminum. I suspect the plastic part would have worked just fine, but the aluminum one does look nice.
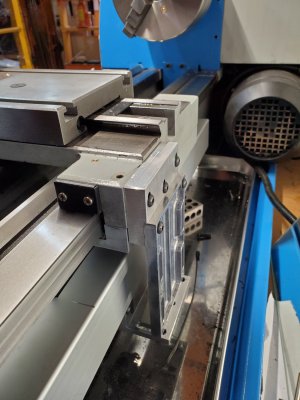
zmountAlum.jpg
For the x axis reader mount, I had cut a piece of aluminum with the bandsaw and drill press. Pretty easy to do with hand layout. For the scale, I printed a bracket to attach the back bolt and brace the side (picture is taken from above). Part worked on the first attempt.
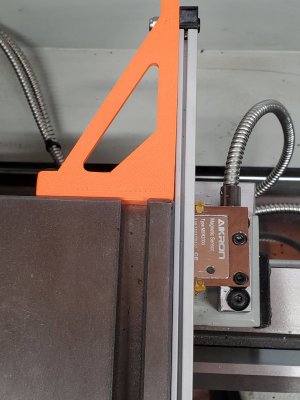
CossSlideMount.jpg

However, I'm not quite satisfied with this part. Two reasons.

First, I suspect that for this use the ABS plastic might not be the best material. It's almost 4" long and the coefficient of thermal expansion for ABS is pretty high compared to steel and cast iron. So the part may tend to expand in a Texas summer.....which may move the scale.
Second, I'm blocking the end of the T-slot with the part. Granted that I don't even know why I want a T-slot there, but I'm sure there are good reasons for it. If I do remove some material to allow access to the T-slot, the remaining section will be fairly thin.

So, I will likely redo this part in aluminum too. But, it will probably be a month or more till I get some 1" by 3"aluminum stock to cut it.
 
, I'm blocking the end of the T-slot with the part. Granted that I don't even know why I want a T-slot there, but I'm sure there are good reasons for it.

You can always leave the tee nuts in the slots, maybe with grub screws in them to stop them vibrating about when not in use for clamping.

Stu
 
You can always leave the tee nuts in the slots, maybe with grub screws in them to stop them vibrating about when not in use for clamping.

Stu
Good point. One could even remove the brace to add the T-nuts......it's only three screws.
 
Good point. One could even remove the brace to add the T-nuts......it's only three screws.
just print it with a pocket in it large enough for the t-nut, should still be strong enough, then machine it out of aluminum.
 
I've got all the parts for a Touch DRO install on my PM 1130-V lathe either here or on the way. Was thinking about the installation. I've been planning to make the mounting parts out of aluminum.

I'm cheating and doing a fairly close copy of Blondihack's install:

Her video describes the process and parts more completely, but the quick summary of the mounting parts is:
  1. I may use a block at each end of the long scale between the lathe and scale as I need a bit of space to clear some raised bosses. I might be able to use washers, but I'd like to have a place at each end to mount the scale and a cover w/o Swiss-cheesing the lathe with multiple holes.
  2. There's an L bracket to mount the optical read head that bolts to the saddle.
  3. On the cross slide, I'll need to support the magnetic read head with a block to elevate it over the carriage a small amount.
  4. Also on the cross slide, I'll need to extend the slide portion beyond its back by about three inches (because the read head mounts on the back side of the carriage).
I have a CNC mill (printNC) and can mill T6061 just fine....but to date I have not done any steel machining. The printNC can do steel, but I'd need new stock and new mills.

Is it OK to mix aluminum and cast iron for something like this? Most (but not all) of the lathe surfaces are painted which should minimize the opportunities for electrolytic corrosion. Most of the steel (12.9) bolts go thru clearance holes in the aluminum and thread into the lathe.
Aluminum will work fine. When I remounted my new scale I put my Dial indicator on my carriage and let it ride the back of the lathe where I intended to mount my scale then milled 2 pieces of aluminum to the correct thickness for the 2 spots, the PM Chinese mills use body filled to give them the smooth supple appearance and the surface can, and in my case did, vary which if enough will bind the read head on the scale. Additionally, I am going to space the cross slide DRO scale on mine out from the back of the cross slide enough to get a wrench on a bolt head, I think I will get a longer set screw for the cross slide lock and mill it to a hex, so I can use the cross slide lock.

Not that you wanted my 2 cents worth but there it is.
 
Only took 8 or 9 days for Midwest Steel to deliver my 1x4" aluminum bar (fast for them). Machining a replacement for the 3d printed L-bracket part was not easy. It needed machining from 4 edges and I couldn't figure out the workholding. But, I got finally got the part made (with lots of grinding/hand drilling) and installed. And there should be enough room to add and remove t-nuts now.
AlumBraceforScale.jpg
 
Here is my installation on a LMS Hi Torque 7500 lathe. Glass 1um scale for Z, Ditron 1um mag scale on X. 3d Printed parts to mount the sensors. Also 3d printed brackets to mount the tablet.View attachment 467769View attachment 467767View attachment 467768
Nice install. I have the same lathe and I was curious how much space you lost between the carriage and the tailstock. I currently have a iGaging scale on my cross-slide but I mounted it hanging off the back of the cross-slide so I didnt limit how close the tailstock could get to the carriage. I also have a custom carriage lock that mounts between the bed ways (under the carriage) so where you have the readhead mounted might be an issue for me. I’m hoping I can find a replacement scale that is slimmer if I go back to the traditional mounting location like you have.
 
Back
Top