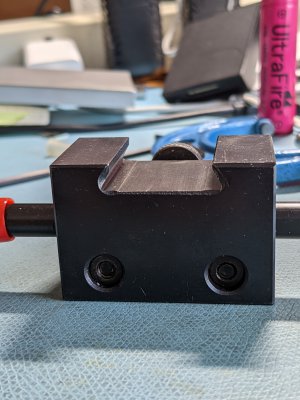
An OXA boring bar holder

WobblyHand

H-M Supporter - Diamond Member
H-M Lifetime Diamond Member
Joined
Dec 18, 2019
Messages
6,464
A while back I got a Circle Machine carbide boring bar, but I don't have a boring bar holder for it. I do have a cheapo OXA boring bar holder, and it is passable for steel bars. However, the stock OXA boring bar holders are NOT recommended for carbide bars due to their clamping mechanism. They use little small blocks that put extremely high local forces on the bar, which can cause carbide bar breakage. Recommended boring bar holders clamp the entire bar along the whole part and are more rigid. So I want to make a boring bar holder.

Have squared up a block of 7075 aluminum to the approximate dimensions 30 x 39 x 67 mm. This holder is for a 1/2" bar. Looking at how to measure dovetails. In my Machinery's Handbook there is a paragraph on measuring dovetails. I understand how to measure a male dovetail using two dowel pins and an outside micrometer. The part I want to make is the female piece. I don't understand how to measure the dimension y accurately. Is there some kind of tool I can use to fit to the dovetail and dowels and then measure that with an outside micrometer? What is it called? For the dowel pins, I measure 0.260" from the top of the dovetail to the machined lower dovetail surface, is a 0.250" dowel ok, or go a little smaller? The lower machined surface is about 0.160" wide before it steps down as a relief.
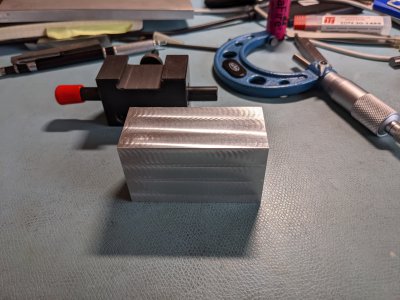
PXL_20210806_190641278.jpgPXL_20210806_190552678.jpg
 
One thing that might work is an adjustable parallel. Was struggling to remember what it was called. Don't have any, so I'll add it to my arsenal. 0.1875" dowels look to be a more appropriate size.
 
Last edited:
Two youtubes on how to measure dove tails


There is really no need for all the math to duplicate the dovetail on a holder, just measure a holder by the method shown with the pins and adjustable parallel and duplicate the measurement on the new holder, an approximate layout could be made by simply scribing against an existing holder onto the new holder blank, cut width and depth to measurement, rough dovetails, finish one side and sneak up on the other to finish dimension by the same pin and parallel dimension using a micrometer.
 
I agree with you.

However, I will work through the math once, and probably write a little program to do the calculations. Writing a program forces me to understand it. The program is something I can refer to later, when I have totally forgotten the basics. I usually write tons of comments in my code, so that when I read it again, I can be refreshed on how it all works.

Some of my tool holders are a little tight, (tolerances!) so measuring the male dovetail is probably a good idea too. As I recall, the boring bar holder I just took a picture of was a little tight to install.
If one were designing a dovetail slide from scratch, the math would probably be more important.
 
Yes. I could just add a couple thousandths to the measurement and be done with it. Unfortunately I don't have any variable parallels, so can't make the female measurement at the moment. Don't have any precise dowel pins either, but I could use some ground O1 rod for sanity checking and doing the male measurement.

I just finished the whole program. 5 minutes, including documentation. Easier than typing it in a calculator! My programs always document where the formulas come from, so I can find the authoritative source again. Kind of a habit I've developed while writing programs. I've tossed the program into my machining directory. Helps defend a little against CRS.
 
Lacking an adjustable parallel, you could set dowels in the dovetail with the ends protruding and take an outside measurement instead.
 
I was thinking about measuring the male dovetail. The QCTP is an Aloris type I think, so there is sort of a gib that cams outwards. I would think (a big assumption on my part!) that when one takes the measurement, one would not want the lever fully closed. That way one can fully guarantee full lock on the female. Or if the lever was fully closed, then one would want to slightly subtract a few thousandths. Would want to somehow lock the lever in place consistently, say 65-75% of maximum gib displacement.

This is trickier than I expected.
 
Back
Top