Apprentice exercises.

Filing is a good place to start. The first project at my last job was forming form blocks out of aluminum. All of the tool makers were required to file radiuses and angles on these blocks. The blocks were used to bend aircraft aluminum parts using a hydropress. We used radius gages, machinist protractors and file cards to do the job.

Can you explain the term hydropress more cleanly , all that I understand is hydro are referring to water
 
NoShopSkills, Thank you for posting your beautiful hammer. How is the head held onto the handle?

Harold Hall, Thank you for your post. I've seen some of your books and will pick up copies at some point. I have been looking through some old issues of Model Engineers workshop, my next project is a set of dial indicator accessories from the 1990s issues. I've found the Model Engineers workshop useful for project ideas.

I will have to make use of your website in the new year. Thank you for providing a valuable resource, it's nice to know what my lathe is capable of.


I hope everyone has a lovely Christmas and new years, and I look forward to making some chips in a week or two.

All the best,
Carlos.
 
Can you explain the term hydropress more cleanly , all that I understand is hydro are referring to water

I don't know for sure ... but I'm pretty confident that "hydropress" is a contraction of "hydraulic press."
 
I think Carlos you are probably referring to the indicator accessories in issue 14 of MEW. In which case this was an item of mine, though not stated as I was editor at the time, and was updated in issues 151 and 152. If you do not have these later issues, but also for the benefit of those who do not obtain the magazine, the accessories have also been included on my website here http://www.homews.co.uk/page408.html

The kit of parts has many uses some beyond use with dial indicators, typically, a mini instrument makers vice, photo 13.

Harold Hall
 
Since there was some interest...

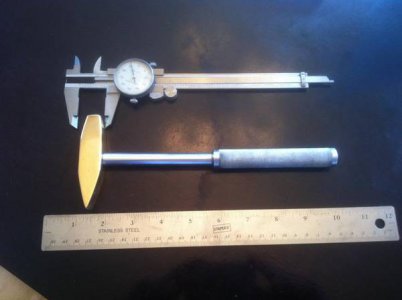
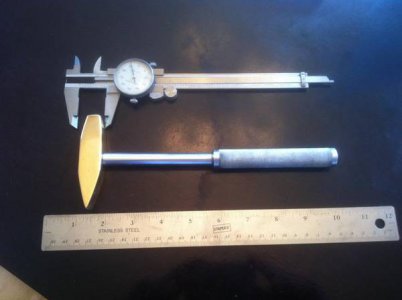
The brass head of the hammer started life as a 3.5" piece of square .750" brass stock. The sharp tapers to the tail start 1.250" from the back and taper down to a .100" trailing edge. The more subtle taper to the head, start 1" back from the face. I remember my teacher critiquing that head tapers were cut incorrectly. Only the corners were supposed to be tapered. The layout lines on the original prints were trying to illustrate a chamfer to run on the 4 corners .150 deep at the face. I cut off too much material. The blue print (mimeo-graphed, as photo copiers had yet to be invented) intended to have the sides un-taperd to the face, giving the hammer more head weight than it has. Not a problem. it's almost perfectly balanced. Since it will never be used to hit anything anyhow, the extra bevels give more surfaces to reflect light.

The center hole for the handle is 1.625 aft of the face. The .325 hole was under drilled and tapped to receive the threaded 3/4" end of the handle. Sorry...can no longer remember the thread pitch, except that it was coarse and the blue prints were never saved by me. It's locktighted on and severely torqued in place. I remember clamping the handle in a wood jaw vice and using a 2' steel channel to torque the head on until the threads married. Not sure if there is much galvanic activity between aluminum and brass, but it's now on there forever.

The 9" aluminum bar-stock handle is turned to .680 for 4.5 inches, then knurled. A .200" bit is left un-knurled at both ends. The remainder of the handle is turned and highly polished to a final dimension of .465. All of the final finish was done by hand using files, then progressively finer emery cloth and ultimately hard hand polishing on a terry cloth towel, stretched taught on a flat piece of lumber, with rubbing compounds and finally "Brasso" brand metal polish as a mild abrasive.

As an adult I now own the tools to make this project much easier than it was in H.S. shop class.

photo_zps9ccdd6c5.jpg

photo_zps9ccdd6c5.jpg
 
Last edited:
I aint talking a true machinist on paper. There are some true machinist IMO that have never left their own garage. I'm talking a guy who can hit the mark, look at a drawing and see how to get to the end result, a problem solver and a thinker. Every one cant be a machinist but anyone can run a machine. The teacher gives us blue prints and send us on our way. Like yours, he has nothing to say unless we are wrong. He even lets us screw our own pooch and learn from it. But with out triangles your not getting to far with him and without gd&t you cant understand the prints. Our current project you need to mill two 20* angles with a reamed hole between them. You need trig for the sine bar and trig to find and check the angles. He dont expect us to know all about gd&t but you cant work off your datum if you dont even know what a datum is.

My point is you can become one of 3 kinds. If you wish to be what I would consider a machinist you need to know alot more then how to run a machine. If you cant find 21* on a lathe using just a indicator your not a machinist. If you cant set 7 holes in a 6.325 Dia circle equally spaced with pen and paper or at least just a calculator your not a machinist. And you almost certainly are not a machinist at the end of most machinist schools. And many who have 30yr on a mill, well they still are not a machinist.

Are you looking for blue prints of things to make? I can copy what we are doing as we do it. What machines do you have access to?

how do you find 21* on a lathe using just an indicator? Is this a way to set the compound to turn a taper? Also, I'd like to know how to figure a bolt circle using math instead of the online calculator that allows you to just punch in the numbers. I've worked in a few shops over the years and I've not ever had to use these methods. Now that I have some machines at home, I find I need to learn how to calculate angles and figure bolt circles to complete projects. I have an old bench top lathe ( six inch), several drill presses a grinder and some secondhand books. I have access to a larger lathe and a Bridgeport if I need them. My math isn't too bad ( algebra and some trig), but I can't always apply the knowledge to specific shop problems. If you don't mind sharing some ideas I'd appreciate it.
thanks.
 
Well to set a 21* included angle you would need to set the compound at 10.5*. I use 1inch for easy math. I cant explain how to do all the math with pen and paper yet. But I can on a cheap casio fx-260 calculator. You need to find side opposite. 1in is your side adjacent.

Oscar Has A Heap Of Apples. o/h = sine, a/h = cosine, o/a = tangent The top number devided by the angle will always give you the bottom number. The bottom number multiplied by the angle will always give you the top.

You have side A and need side O. So you need O from A you use tangent function.

A=1 so Ax10* 30' then hit tangent button then hit equal you should get .185339044. That number is how much your dial indicator should travel from zero in 1in of compound slide movement.
 
For bolt circle it's the same thing. If you need 6 holes in 6in circle evenly spaced. You have 360* circle. So divide your holes into you 360. 6/360=60* So each hole is 60* apart. So you know your radius is 3.0in cause thats half your dia. So you know every triangle has a 3.0 hypotenuse. You devide the included angle of 60 by 2 and you get 30*

so 3.0 x sine of 30= 1.5 So O=1.5
3.0 x cosine of 30 = 2.59807

If you dont have any off set on the first hole it will be at 0y and +3x. The second hole will be at +1.5y and + 2.59807x

Bear in mind I am just learning this stuff my self. There are tons of online and smart phone apps that can do most this for you. But I figure when you need it you need it. So I try to learn it. I still do alot of looking at notes and getting things wrong.
 
Here is an exercise for you. You have 7 holes evenly spaced on a 4.5 inch circle. #1 hole is at TDC. Count clockwise to hole #5. Using any math you wish, tell me the distance in inches to 3 places from the center od hole #1 to the center of hole #5 on the circumference.

"Billy G"
 
Last edited by a moderator:
Back
Top