Are glass scales affected by vibration?

durableoreo

H-M Supporter - Gold Member
H-M Supporter Gold Member
Joined
May 3, 2020
Messages
229
My DRO is losing position while I operate my mill.

What could cause a small random error in position? The work is mounted in a fixture that has a central dowel pin. If I put the Indicol on the dowel before and after making a part, I find errors in position.

The mill is a G0755 (RF-45) and I've mounted the glass scale for X directly to the underside of the table. The X-axis read head is fixed on a bracket near the lead screw. The Y axis scale is fixed under the mill and the read head travels with the Y saddle. This is the kind of thing that happens when you watch too many Renzetti videos.

COULD IT BE VIBRATION? I'm cutting a 0.750" deep pocket in 4140 with a 1/4" endmill. There is some vibration when cutting the pocket and for finishing cuts at full depth, there's some vibration in the corners. If it is vibration, I would expect more in the X axis and less in the Y axis because of the geometry of the mill.
 
Are both axis changing or just one?
I assume the scales can take a fair amount of vibration unless there is something loose in the read head or a cracked scale
If just one axis changing you could swap the plugs and see if the problem follows the scale
 
Last edited:
This sounds like a read head going bad. I had something similar happen, but it wasn't under heavy load. I'd get cumulative error, or more descriptive non return to zero. Chips and debris had collected near the read head and somehow penetrated the lip seal. Even though I removed the scale and cleaned the glass and read head, the error persisted. It was less, but it was enough to ruin parts. The fix was to replace the read head. Now the x axis is repeatable when returning to zero. I tested this by zeroing the scale, moving the axis the length of a 123 block, and returning to the origin of the block. The block was clamped to the table and a DTI was used to ensure I was measuring the 123 block correctly, by having the same preload. A good scale returns to the origin. My bad read head was skipping counts in one direction, resulting in greater and greater accumulating error. Fortunately, read heads are not that expensive.

Of course it could be the installation, check that everything is snug and in the correct locations. That's a quick check, along with the cable swap at the display unit as described in the previous post.
 
You can turn down the sensitivity of the scales in the controller if its do to vibration. Had to do that to my Z.
 
Are both axis changing or just one?
I assume the scales can take a fair amount of vibration unless there is something loose in the read head or a cracked scale
If just one axis changing you could swap the plugs and see if the problem follows the scale
Both. X is worse than Y
 
A couple more questions:
  • Whose scales are you using?
  • What readout/display are you using?
Knowing that both axes are affected , and to different degrees possibly points to readout issues, but more information is always helpful.
 
OK then I would definitely swap the scale plugs because if the problem doesn't follow the scale it's a readout issue
 
Suggestions so far:
  1. Plug scale into different channel on DRO (mark)
  2. Bad read head (Wobbly)
  3. Installation/alignment (Wobbly, OT)
  4. Adjust sensitivity (radm1)
Tried plugging X scale into Y input on the DRO. Good suggestion but no change. Probably the DRO isn't the problem.

The other issues are addressed below.

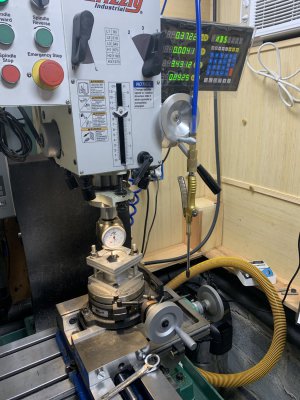
Here's the test setup:
dro_problem.jpeg
I'm indicating in the pocket, getting inconsistent readings in one direction but not the other. When I move the work left, I get 0.372,2 When I move right, I get a variety of values, mean 0.380, standard deviation 0.001,2. So one side repeats, the other has random error, +/- 0.002,5. I've tried this several times and sometimes I get a +/- a tenth on the left side but the right side changes wildly.

If the error was random, I wouldn't able to return to the same spot. If the error was the same in both directions, it would have to change slowly so that I get the same size error traversing right and when returning. If that were the case, how would I get different error for each cycle of measurements?

I think the scale or read head is shifting position. There's a hard stop as I move the work left but something is moving when I move the work to the right. While fiddling around, I noticed that slow movements resulted in much less error. So if I back off 10 thou and slowly return, the reading repeats. If I turn 10 thou past 0, the reading changes but then repeats. This all sounds like backlash and somewhat reluctant sliding somewhere in the system.

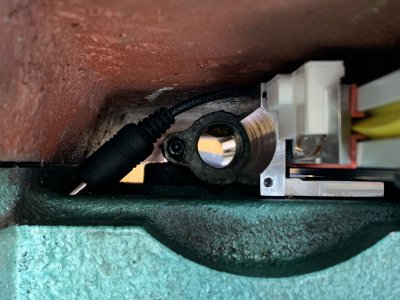
The alignment was set with the spacer installed (see photo). Then I aligned the scale with the dovetail (right) before fastening the ends. So alignment should be within 0.010 over 18" of travel.

@WobblyHand If you're right about the failing read head, it's going to be a lot of work to replace it. I had to do quite a bit of modification to get the read head to fit under the table.
dro_problem2.jpeg
 
A couple more questions:
  • Whose scales are you using?
  • What readout/display are you using?
Knowing that both axes are affected , and to different degrees possibly points to readout issues, but more information is always helpful.

ToAuto DRO and scales from fasttobuy2012


I don't recommend it. Wrong manual, no support. Seems to mostly work but there's no way to combine Z and quill.
 
Back
Top