- Joined
- Aug 3, 2017
- Messages
- 2,437
At one point I want to be able to make internal keyways (and don't want to spend money/space on a keyseat meachine), and the shaper seems like the tool to do it! I didn't get a tool holder to do so with, so I figured I'd make one to have in my tools drawer for when I first one one! My goal here was to use a 1/4" square tool to match the existing tool holder. This is what required the ~5/8" shaft. Hopefully if I find myself needing a smaller one I can come up with a better plan. I DO have an idea to mount a small round tool at a 45 degree angle on a much smaller bar, but I chose a more traditional one here.
I have some 1 1/4" bar that I THINK is 4140, it machined pretty cleanly, but I don't remember ever buying a rod this long of anything else. First step was face/center drill.

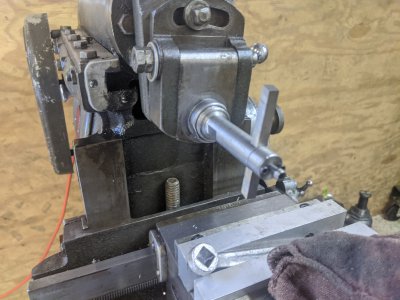
I turned down a bunch of it to ~1.180 for the inner 'flange' to the clapper, and the rest down to just under 1" proper to fit in the slot. Here is the test fit.

I turned down the main shaft to .615, so about 10 under. The goal was to make it small enough I could barely cut a keyway in a 5/8" hole, but still have enough material to hold the 1/4" bit. I also used the parting tool to make a 'gutter' for the threading.

I single-pointed 1"-20 UNEF threads, though they are a little undersized. See (https://www.hobby-machinist.com/thr...threads-a-comedy-of-errors.84617/#post-749556) for details n how that went")

And here it is, fitting just right in the clapper box!

Next, I took the rest of the 1.180 OD part, and center drilled, then bored it, then started threading it. I used the 45 degree holder section on my boring bar with a ground tool to cut the threads.

The threads went about 1" deep, and turned out pretty good! I had cut the ID to size, then cut until the blue was basically all gone.

And, if you read my other thread, I lucked into a nice, tight fit with my bar! I didn't have the ability to test it (and was likely going to remake the bar if need be), but it all fit! I made 2 nuts out of that threaded portion, I think this is the thinner one.

I considered using a 'pin' wrench on these, but I couldn't find an endmill that would fit my pin wrench. SO, I went with 1-1/16" square, which matches one of the wrenches I have in my lathe caddy.

I also parted off a small spacer to go where the washer goes. Its a bit thicker than a normal washer (~140 thou?), but it does the trick. Without it, I think I bottom the threads out before getting the bar tight.

Then, the tool holder part for the bar. I originally tried using a 1/4" endmill with it stood straight up (and had it clamped poorly), and ended up with a crooked, offcenter slot. SO, I turned it on its side and used my 1/8" cutter! This part went easy as pie! I did .252 wide by .245 deep.

I then flipped it upwards to drill/tap some 4-40 holes.


Next, I needed to make the 'clamp' to hold the tool in. I found some scrap that came from... something at one point, turned it down to .615, #32 drilled it in 2 places, and #10-32 tapped in the center. You'll see why in a moment!

And here it is assembled! The side bolts clamp it down more than sufficiently, with a 5 thou undersized slot. I added the #10 bolt for extra assurance, particularly because I wasn't sure I could add it after the fact.
You'll also note in these pictures I put some wrench flats on the side of the bar. These were SUPPOSED to be for a 9/16" wrench, but that fits pretty loosely. Turns out however, my 14mm fits it like a glove, so its now a 14mm. I typically hate mixed wrenches like this, but I didn't feel like putting in the effort for a 1/2" wrench.


I have some 1 1/4" bar that I THINK is 4140, it machined pretty cleanly, but I don't remember ever buying a rod this long of anything else. First step was face/center drill.
I turned down a bunch of it to ~1.180 for the inner 'flange' to the clapper, and the rest down to just under 1" proper to fit in the slot. Here is the test fit.
I turned down the main shaft to .615, so about 10 under. The goal was to make it small enough I could barely cut a keyway in a 5/8" hole, but still have enough material to hold the 1/4" bit. I also used the parting tool to make a 'gutter' for the threading.
I single-pointed 1"-20 UNEF threads, though they are a little undersized. See (https://www.hobby-machinist.com/thr...threads-a-comedy-of-errors.84617/#post-749556) for details n how that went
And here it is, fitting just right in the clapper box!
Next, I took the rest of the 1.180 OD part, and center drilled, then bored it, then started threading it. I used the 45 degree holder section on my boring bar with a ground tool to cut the threads.
The threads went about 1" deep, and turned out pretty good! I had cut the ID to size, then cut until the blue was basically all gone.
And, if you read my other thread, I lucked into a nice, tight fit with my bar! I didn't have the ability to test it (and was likely going to remake the bar if need be), but it all fit! I made 2 nuts out of that threaded portion, I think this is the thinner one.
I considered using a 'pin' wrench on these, but I couldn't find an endmill that would fit my pin wrench. SO, I went with 1-1/16" square, which matches one of the wrenches I have in my lathe caddy.
I also parted off a small spacer to go where the washer goes. Its a bit thicker than a normal washer (~140 thou?), but it does the trick. Without it, I think I bottom the threads out before getting the bar tight.
Then, the tool holder part for the bar. I originally tried using a 1/4" endmill with it stood straight up (and had it clamped poorly), and ended up with a crooked, offcenter slot. SO, I turned it on its side and used my 1/8" cutter! This part went easy as pie! I did .252 wide by .245 deep.
I then flipped it upwards to drill/tap some 4-40 holes.
Next, I needed to make the 'clamp' to hold the tool in. I found some scrap that came from... something at one point, turned it down to .615, #32 drilled it in 2 places, and #10-32 tapped in the center. You'll see why in a moment!
And here it is assembled! The side bolts clamp it down more than sufficiently, with a 5 thou undersized slot. I added the #10 bolt for extra assurance, particularly because I wasn't sure I could add it after the fact.
You'll also note in these pictures I put some wrench flats on the side of the bar. These were SUPPOSED to be for a 9/16" wrench, but that fits pretty loosely. Turns out however, my 14mm fits it like a glove, so its now a 14mm. I typically hate mixed wrenches like this, but I didn't feel like putting in the effort for a 1/2" wrench.