Good job at getting into the guts of the thing.
Next comment: Your first application of Tri-Flo on the pinion dispensed enough liquid to properly lube about 2 dozen DTIs. You need a proper watch oiler. Dip the tip in the fluid then touch to the pivot. I don't know the long term characteristics of Tri-flo. What lubricant do watchmakers use?
Buy Bergeon 55-710 Set of 4 Oilers Plastic Watch Repair Kit and other Repair Tools & Kits at Amazon.com. Our wide selection is eligible for free shipping and free returns.
www.amazon.com
Regarding the retaining clip: use a small screwdriver against the beveled end to move it toward the center of the bezel. Concurrently, lever the beveled end up (toward the camera) and rotate the bezel clockwise under the retaining clip. Continue until the retaining clip is removed.
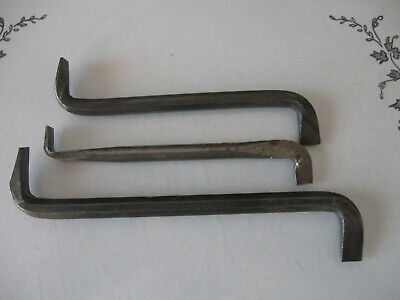
Regarding the special screwdriver: You will probably have to make something to get it done. Because of the limited swing arc available, you will need at least 2 screwdrivers with the blades at 90° to each other, relative to the handle(s). Conceptual example below is defective due to modern manufacturing loss of knowledge.
Had to go to eBay vintage tools to find better conceptual examples.
Find many great new & used options and get the best deals for VINTAGE MACHINING TOOLS MACHINIST OFF-SET RIGHT ANGLE SCREWDRIVERS 3x at the best online prices at eBay! Free shipping for many products!
www.ebay.com
Also, You have set the pointer to be on Zero when the indicator is at rest. Although pleasing to aesthetics, it's not desirable for practical use. Take a look at pictures of other (factory new) DTI and you will see that the hand points at about 4:30 (standard clock face) at rest. This is so the stylus is preloaded against the workpiece when the hand points at Zero. What you want is for the hand to be on Zero when the indicator is at 50% of it's total travel, not at rest.
If I was trying to clean the indicator, with the bezel/crystal in place, I think I would give the pinion and inner case a spritz of aerosol Brake Parts or Carburetor Cleaner. What I mean by spritz is get it moist, Don't try to flush it. Work the pinion while it's wet and repeat as necessary. My thinking is that those cleaners seem to cut varnished oils well. By minimizing the amount of cleaner present, I'm hoping that it will wick up into the pinion bearing journals, but not up onto the face. YMMV