Base Feet for a Bridgeport

My BP clone came with the holes threaded as well
Greg
 
I had ordered a 3/4"-10 tap and it arrived today. Can anyone provide some insight as to how you lifted and mill to install the feet?
I have a 2 ton motor lift I was thinking of using, but the center of gravity will be off if I use it for the mill. I guess it might be able to lift it enough so I can get a 4x4 on one end to install the feet and then switch to the other end.

Union Butterfield 1600(UNC) High-Speed Steel Hand Tap, For Cast Iron,
Nitride Over Black Oxide Finish, Round Shank With Square End, Plug Chamfer, 3/4"-10 Thread Size


$36.05

Yes Dean, that is exactly how I did it, only I used an engine crane. I think I tilted the machine forward and then blocked the back. I then tilted the machine rearward and blocked it. Then just hand tapped it, I don't recall having to tap drill the hole to size.
 
Thanks Randy... That sounds like the plan then. I will have to dig out the hoist on the other side of the garage. :encourage:
 
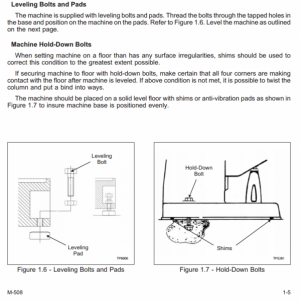
I found this in the BP manual. I wonder how folks have feet and they do not know it? In the drawing there is kind of a hideaway for the feet that are not associated with the mounting holes. The holes are evidently for screwing the machine down to the floor.

upload_2016-12-1_22-53-6.png

Here is the link to the bolt at Hardinge;
https://goo.gl/E0Xaz7

The pads;
https://goo.gl/OkMxU3
 
I've made my own on my mill drill table. I was concerned with the stability of the set up. So on each corner I made outriggers that can be moved out to twelve inches in an arc . They have rubber pads under cast iron cups. I bought those on eBay , I used 1' lengths of 1/2 all thread with a jam nut and large handle on each to level and steady the mill . Looks funny but works well . They're far enough back to be out of the way and I find I can use two after moving the mill anywhere I need it. The swing out arms are box tubing 1"x 2"x 12" with tubing welded to both ends plus two on each corner to make the hinge. I thought I was paranoid about it till I read these . Always better to over engineer then to not.
R
 
Thanks Dean, I didn't know that.

I kinda like my set up because I can make the leveling adjustments from the top.
 
Randy, I tapped the four corner holes in the base of my mill and installed jack bolts [machined square on top] with rubber feet at the bottom end. To level the mill just takes a pinch bar under the corner you need to lift, a little pressure to take some of the load off the jack bolt, turn and level. The rubber feet are very stable and help the machine run much quieter than otherwise. Works well for me -- Jack
 
Back
Top