- Joined
- Dec 18, 2019
- Messages
- 6,464
My wife is a Librarian for our church. She was asked to look for new shelves for the kids library. She found a nice book tree that would work well. The cost of this book tree was a bit out of budget, at least for the one she found, but it was obviously made sturdy for the intended use. Looking on A***n there were several knock offs, but just judging by the weight and size we ruled those models out. They were obviously flimsy and wouldn't stand up to long term use. Knick nacks, maybe, but not books.
My wife was able to talk a congregant who is a carpenter. He said he'd be glad to take it on, but needed a basic plan. A plan bigger than a little picture in a catalog. So that brings me into the picture, who said, "You know, in one of my CAD lessons we traced out a design over a picture." Wouldn't you know it, my wife took me up on it.
My CAD tool of choice, (because it's the only one I have) is FreeCAD. It's not the easiest thing to work with, but it does work well enough, and the price is right. I built FreeCAD a couple of weeks ago from source from git, so I am using 0.21. It's pretty similar to 0.19, which is what I learned from.
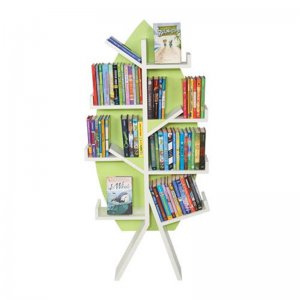
So I started with this picture. In real life, this is supposed to be 59" high x 28.25" wide x 8" deep. I will make the shelves 10", as I think it is more practical for books.

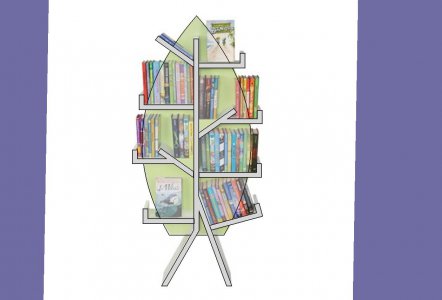
I imported it using the Image tool. I placed the image in the XY plane at z = -13.7mm. The idea is to have the image in the background, so I can trace over it. FreeCAD assumes a dimension of 1mm per pixel. FreeCAD thought the Xsize was 211.7mm and Ysize was 211.7mm. I don't know why, but ok. I then increased the size of both Xsize and Ysize to 1600 x 1600. This enlarged the picture. Unfortunately, as it turns out, this was only 85% of real size, so I will have to fix that. However, I didn't realize this until I had done a lot of work...
I traced over the frame to make the main unit, and realized the image was crooked. How did I know? It was obvious that my vertical lines where not lining up with the picture! The image is tilted by about 1 degree. So I rotated the image until it looked better. Then I translated it a little in X to get closer to my model. Since this image is not part of the model, it didn't affect the design. Thought that was pretty nice. The camera view is not straight on, since you can see the depths of the shelves, but I winged it. This is what I have so far.

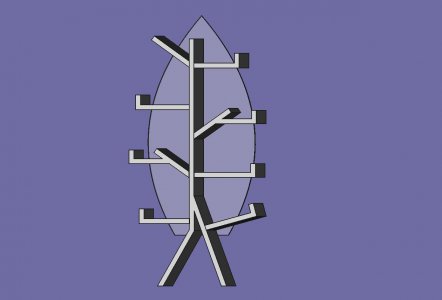
The arcs are b-splines that approximate the image curve. I made them symmetric, but they don't have to be. If I turn off the image plane, just the model is visible.
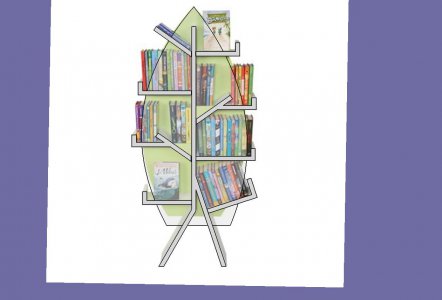
Here is the model with a slight rotationl, so it is not a dead on view. The tree portion is made of 1/2" plywood, whereas the rest is pine. In the back, or perhaps along one of the edges of the vertical, I think I will put in a section of aluminum or steel strapping so that the tree can be bolted to a wall stud. Wouldn't want it to fall over on the kids. The frame itself and the shelves will be attached to the backing. Probably will need some metal brackets for additional strength, but haven't thought about that fully yet. The non perpendicular angles will definately need some custom bracket, unless the vertical has some sort of slot cut in it. Think I will discuss that detail with the carpenter. I don't know this woodworking stuff all that well, I'm limited to stair treads and risers, not furniture.

When I am done, I will attempt to get it printed on D or E sized paper. But first I need to scale it to the final dimensions. I made the model out of 9 Bodies, so it will take a little bit. I obviously don't want to scale the thickness of the boards, but just the overall length and width.
My wife was able to talk a congregant who is a carpenter. He said he'd be glad to take it on, but needed a basic plan. A plan bigger than a little picture in a catalog. So that brings me into the picture, who said, "You know, in one of my CAD lessons we traced out a design over a picture." Wouldn't you know it, my wife took me up on it.
My CAD tool of choice, (because it's the only one I have) is FreeCAD. It's not the easiest thing to work with, but it does work well enough, and the price is right. I built FreeCAD a couple of weeks ago from source from git, so I am using 0.21. It's pretty similar to 0.19, which is what I learned from.
So I started with this picture. In real life, this is supposed to be 59" high x 28.25" wide x 8" deep. I will make the shelves 10", as I think it is more practical for books.

I imported it using the Image tool. I placed the image in the XY plane at z = -13.7mm. The idea is to have the image in the background, so I can trace over it. FreeCAD assumes a dimension of 1mm per pixel. FreeCAD thought the Xsize was 211.7mm and Ysize was 211.7mm. I don't know why, but ok. I then increased the size of both Xsize and Ysize to 1600 x 1600. This enlarged the picture. Unfortunately, as it turns out, this was only 85% of real size, so I will have to fix that. However, I didn't realize this until I had done a lot of work...
I traced over the frame to make the main unit, and realized the image was crooked. How did I know? It was obvious that my vertical lines where not lining up with the picture! The image is tilted by about 1 degree. So I rotated the image until it looked better. Then I translated it a little in X to get closer to my model. Since this image is not part of the model, it didn't affect the design. Thought that was pretty nice. The camera view is not straight on, since you can see the depths of the shelves, but I winged it. This is what I have so far.

The arcs are b-splines that approximate the image curve. I made them symmetric, but they don't have to be. If I turn off the image plane, just the model is visible.
Here is the model with a slight rotationl, so it is not a dead on view. The tree portion is made of 1/2" plywood, whereas the rest is pine. In the back, or perhaps along one of the edges of the vertical, I think I will put in a section of aluminum or steel strapping so that the tree can be bolted to a wall stud. Wouldn't want it to fall over on the kids. The frame itself and the shelves will be attached to the backing. Probably will need some metal brackets for additional strength, but haven't thought about that fully yet. The non perpendicular angles will definately need some custom bracket, unless the vertical has some sort of slot cut in it. Think I will discuss that detail with the carpenter. I don't know this woodworking stuff all that well, I'm limited to stair treads and risers, not furniture.

When I am done, I will attempt to get it printed on D or E sized paper. But first I need to scale it to the final dimensions. I made the model out of 9 Bodies, so it will take a little bit. I obviously don't want to scale the thickness of the boards, but just the overall length and width.


