Broken Hearted... My new to me 1942 VN No.12 Spindle Ring and Pinion shot

A quick count looks like 26:13. The page @middle.road posted shows they are available unhardened. You can figure out how to fab up some adapters to mate the parts to the existing drive, I have confidence!
 
A quick count looks like 26:13. The page @middle.road posted shows they are available unhardened. You can figure out how to fab up some adapters to mate the parts to the existing drive, I have confidence!
OK, I wanna know what voodoo you used to count them. I tried (3) times and couldn't... -hehe
 
The first half of the ring gear has 13 teeth exposed, and the pinion has 6-1/2 teeth exposed. I figured either it was a perfect ratio (2:1 makes the most sense) or it has a hunting tooth on the ring gear for 2.077 ratio. Looking at the tooth breakage, and how there are a few single undamaged or less-damaged teeth on both gears, I decided it did not have a hunting tooth and the teeth mesh with the same teeth over and over, preserving some of the teeth after the damage started. That's the whole secret, I swear!
 
Replacing both the ring and pinion they have to match (tooth pattern) but don’t need to be same stock teeth as long as they fit in place. So may be able to find a matching pair by shaft sizes. Not stock but may work
 
I haven't even counted the teeth on both gears yet, but I know it is supposed to be 2:1 or close to it. I need take a number of measurements before I tear down the cutting head, then start measuring the gears to see if there is a good substitute if it comes to that. Still hoping for a spare, but we will see.

Does anyone know of any salvage places that specialize in old machine equipment?
 
Unfortunately, Repair Parts Inc. (RPI), the company that used to support Van Norman milling machines, went out of business around 2010 and most of their inventory of parts went to scrap.

You might check with Nelson. Back when he first started this site he had a No. 12 that he was parting out. IIRC, he was going to keep any extra gears and whatnot that he had. You might see if he still has any cutter-head parts.
 
Thank you for the information Cal, I'll check with Nelson. I have been reading some of your posts on Van Normans. While I have seen some discussion regarding there are measurements, reference marks to make, etc. prior disassembling the VN spindle; I have searched but have not found a detailed description on this site. Do you have any links to some of your past posts on the topic?
 
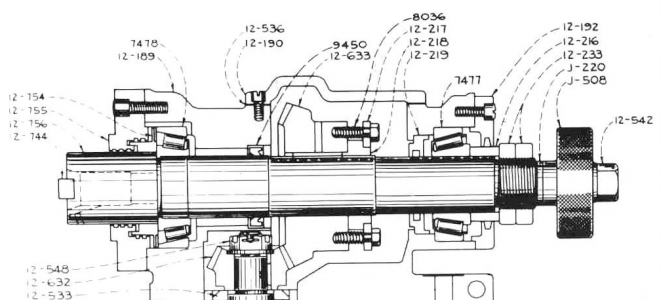
Here's a section of the drawing for the cutter-head of the type used on your machine (several other versions were used on No. 12 millers):
VN12_10 cutter-head.png

The part that controls the axial position of the ring gear is an internally threaded ring, part number 12-218. You want to put witness marks on it and the spindle (12-756). Make the mark on the ring at keyway and you don't need to mark the spindle. You also want to count the number of exposed threads on the spindle behind the ring and measure the gap between the front of the ring gear and the front of the casting, so that you can get the threaded ring to approximately the right spot before lining up your witness mark. However, since your ring gear is trashed, you probably won't need to put it back in position, so you could skip marking it if you like.

The ring gear has 45 teeth with an OD of 4-1/2" and an ID of 1-9/16". The pinion has 21 teeth with and OD of 2-17/64" and an ID of 7/8".

I reached out to one of my contacts, the owner of American Machine & Gear Works. He looked at your photos an doesn't think the gears can be repaired. He can make new gears, but they'll be expensive.
 
Here's a section of the drawing for the cutter-head of the type used on your machine (several other versions were used on No. 12 millers):


The part that controls the axial position of the ring gear is an internally threaded ring, part number 12-218. You want to put witness marks on it and the spindle (12-756). Make the mark on the ring at keyway and you don't need to mark the spindle. You also want to count the number of exposed threads on the spindle behind the ring and measure the gap between the front of the ring gear and the front of the casting, so that you can get the threaded ring to approximately the right spot before lining up your witness mark. However, since your ring gear is trashed, you probably won't need to put it back in position, so you could skip marking it if you like.

The ring gear has 45 teeth with an OD of 4-1/2" and an ID of 1-9/16". The pinion has 21 teeth with and OD of 2-17/64" and an ID of 7/8".

I reached out to one of my contacts, the owner of American Machine & Gear Works. He looked at your photos an doesn't think the gears can be repaired. He can make new gears, but they'll be expensive.
Nice Cal. Now that is some awesome invaluable information!
 
Hello Cal,

Thank you very much for the detailed instructions, it's great that you have so much knowledge of the mill and are willing to share. I will tear into the cutter head this weekend, and even though I will have to replace my gears the thread count and witness marks will get me in the ball park; I will still have to adjust but this gets me close.

Best regards,
Montie
 
Back
Top