Can I hold a 3/8" HSS bit directly in the lantern toolpost?

Just to clarify, in what direction are you seeing the movement? E.g. parallel with the carriage, or with the cross-slide/compound? Are you turning or facing when this happens? Just off hand, it seems that the problem was with your cutting tool, not your machine. What does the original tool look like?

If I understand what you are saying, it seems to me that the bit does not have enough clearance, or is set too high above the center line of the part. If the entire tool holder is flexing, make sure that it is securely locked to the t-slot, and there is no swarf that it could be rocking on. I have also seen rocker posts that are worn out, and splitting in the center of the t-nut.

Also, when facing saw cut pieces, be sure to lock the carriage to the ways. Either use the carriage lock, if equipped, or disengage the lead-screw feed, and engage the half-nuts. (I use this all the time on my mini lathe.)

-Cody
 
Just a few thoughts that have come to mind.

1. Do you have the top slide advanced pretty far or is it retracted towards you as much as possible? I am thinking that the top slide is flexing at the t-slot area if it is not supported by the upper swivel which has the lower dovetail.

2. Was the top slide ever cracked or broken through the t-slot? The reason is that mine had been repaired in the past and it was not flat on the underside. The forward section of the t-slot was suspended in mid-air so my tool holder would bob back and forth as the load varied. That can be corrected by lapping on a flat glass plate or cleaned up on a surface grinder, but the dovetail may need addressing if too much metal is removed.

3. How are the swivel pins that hold the lower swivel base to the cross slide? Good fit to the angled circular surface or more squarish and more like a small line contact leaving little surface to lock it down securely. Also check that the swivel base is not cracked around the swivel. This happens even on bigger machines. Likely have to remove it and look at the underside for cracking.

That is it for the moment.
Pierre
 
First, congrats on getting the part made. You may have had to fight for it but you got it and you should feel good about it.

Second, if the threads are rough then there are many conditions that can do that - cutting speeds, whether the tip of the tool is on center, proper tool geometry, cutting fluid type, technique (how much you take off per pass, feeding with compound or straight in, etc), tightness of your gibs and tool holder, and probably other things I've missed. If the fit is tight but your thread form is good then perhaps a spring pass or two might have helped. If at all possible bring the mating piece to the lathe and check fit, then cut until you get the fit you need.

Third, you ground a tool that did the job - great! It might not look or work as well as you might have liked but it got the job done. Nobody starts off grinding tools like a pro - nobody - stay with it and don't be discouraged. In time you'll be able to grind tools to suit whatever your needs are.

Fourth, consider a quick change tool post.

Thanks for sharing your project. It took me back to my newbie days and for what its worth, I didn't do nearly as well as you did. Hang in there ... it will come.
 
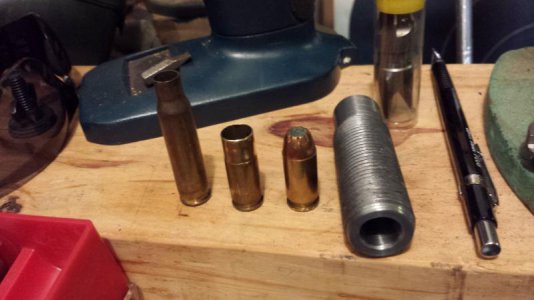
Done with die #1. Now for a crimp die.

20130817_202912_zps7b502b37.jpg

The rocker is pretty badly worn/mashed up. A QCTP is probably going to have to wait unless I find a ridiculous deal...I've already spent too much getting this 'free' lathe up and running.

Yes the carriage is locked and the compound is retracted enough to have the front slide dovetail bearing, not hanging into air.

There is no sign of damage or repairs anywhere except for some minor dings in the bed here and there.

No guarantees on mounting pins. They looks like a piece of rod ground with a 45 degree side about half their thickness and rounded off.

I guess I need to shoot a short video showing the setup and what it's doing.

20130817_202912_zps7b502b37.jpg
 
Atleast now we know that area is not the issue with the movement. A QCTP will not fix the problem if it is more than just the tool post that is moving. I did put a QCTP on my Atlas, made setups much quicker. Now it lives on my other lathe, as I sold my Atlas last year. Atlas are good within their operating envelope, just have to find what your problem is and fix it. Keep looking and report back. We are here to help.
Pierre
 
I am interested in the .45 cartridge you are making. As I started reading the thread I was wondering how you were going to get it to headspace but your picture shows nice even shoulder for that purpose. Would love more info as to how you machined the ID of the forming die! BTW, do you have your knives on the market? I saw some that looked just like the one in your picture at a hardware store in Cuero.
 
I am interested in the .45 cartridge you are making. As I started reading the thread I was wondering how you were going to get it to headspace but your picture shows nice even shoulder for that purpose. Would love more info as to how you machined the ID of the forming die! BTW, do you have your knives on the market? I saw some that looked just like the one in your picture at a hardware store in Cuero.

This is my guide for the shotshell project. The link is to my Dropbox account...let me know if you can open it. I tried to set it to publicly available. It basically follows a 1971 article by C. E. Harris in American Rifleman. Die dimensions are included. I ended up making a 3 die set as necking in one step was crushing cases, so I have 2 dies to reduce the mouth in stages. Tuning the loads in my pistol has been problematic. About 20% still jam...usually lengthwise in the ejection port.

https://www.dropbox.com/s/hzccrzepqmtcm5c/45_shot_cartridge dies.pdf

I only sell knives by word of mouth or on forums like this on the rare occasion I have one built and not already spoken for. Lately I'm running a 2 year backlog, mostly because I've found it very hard to break away from other projects to do knife work. The '3 finger knife' in my avatar is not a common style, but you can find similar knives here and there. So far the one pictured is the only little one I've completed in that style.
 
The three ( 3 ) rules of good machining. Rigidity, Rigidity, and then there is Rigidity. !!!!!!!!!!
 
This is my guide for the shotshell project. The link is to my Dropbox account...let me know if you can open it. I tried to set it to publicly available. It basically follows a 1971 article by C. E. Harris in American Rifleman. Die dimensions are included. I ended up making a 3 die set as necking in one step was crushing cases, so I have 2 dies to reduce the mouth in stages. Tuning the loads in my pistol has been problematic. About 20% still jam...usually lengthwise in the ejection port.QUOTE]

Thanks for the information, I was able to access your Dropbox just fine. I think this will be a worthy project for me to attempt. I know this is getting away from the the thread, but on the topic of jamming, have you experimented with recoil springs of different weights specifically for the shot loads? You would want to change back to the heavy spring for hotter loads so another choice might be a combination of an extended ejector and a lowered ejection port if you are using a stock gun. My thoughts are to make the gun reliably eject anything that you run through that has enough energy to fully cycle the slide. I may be preaching to the choir here and if that is the case I apologize, I get carried away when the subject turns to .45's.
 
I still have the factory spring and guide rod installed. I have shied away from a light recoil spring because where I am (about 1 hours from the TX-Mexico border) is a known corridor for all kinds of bad traffic, and this is my field carry pistol. I want to be able to reliably use full power ammo with only a mag change...or better yet load the top 1-2 with snakeshot and the balance with hollow points...for 4 or 2 legged coyotes.
 
Back
Top