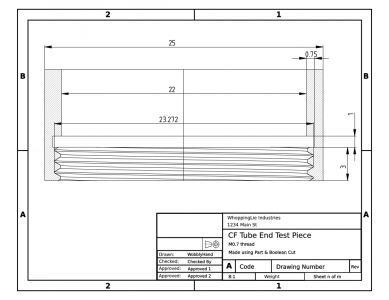
Can someone let me know how to get a dimensioned view of this tube end?

Found an updated macro, or at least one that temporarily fixes EasyAlias. But discovered an insidious bug, quite by accident. Using EasyAlias, I was stepping the height of the thread groove, to see where the section view fails. Then suddenly the groove vanished, but not the thread.

When I went to the sketch of the groove, I found that my dimension was referring to a different point than when I originally assigned it. Instead of the ID of the groove, it now was set to the OD!!! That's insidious. So my groove was present, but it had moved into the bore, so it was invisible. Hope this settles out soon, as I'd hate to count on FreeCAD right now. Have to find an earlier build, this one has serious issues. If one's physical constraints are borked, then the utility of the tool are seriously compromised...
 
Someone on the FreeCAD forum provided a different way of doing this. They used a custom diameter screw tap (FSScrewTap aka threaded metric rod for tapping holes) found in the Fastener workbench and used a boolean cut operation to form the thread. They formed the groove with a sketch revolution. This seems to render ok, with the groove in place. However, I have not tried to move the "groove" about. They used Part, rather than Part Design, but I'm not sure that really matters. The tap remains in the model, it's just made invisible.

Here's a working file.

Apparently there's some kind of workaround for the flipping, but I'm not yet comfortable with it yet. I don't think FreeCAD preserves the sign of distances, which can allow "flipping".
 

Attachments

  • threadsectiontest_0.22dev_Syres.FCStd
    350.1 KB · Views: 0
Apparently there's some kind of workaround for the flipping, but I'm not yet comfortable with it yet. I don't think FreeCAD preserves the sign of distances, which can allow "flipping".
I've run into that doing simple dimensioning in the sketch workbench. The results, when dimensioning a more complex sketch, can be really confusing. I have yet to try anything parametric. Seems like it could be a useful tool but just haven't made that step.

Having an alternative approach for the threading is helpful but not a fix. Again, I've mostly used PartDesgin, haven't explored the Part workbench much. FreeCAD seems to have a lot of alternative approaches that partially overlap in functionality but still have unique aspects. At my level of use that adds to the complexity/confusion.
 
Well I have finally blundered through this. Simply couldn't get Part Design to do a boolean. I followed the wiki instructions and they don't work. But if you use Part, the boolean is simple. It becomes a cut object. Click on the cut object to make it active, insert view, and then do a section. Easy as pi, err, not really. I'd rate this as quirky as h3ll.

Jeepers, all I wanted was to draw this...
1695839851336.png
 
I haven't had problems with the very few boolean operations I've done in part design, have you had any experiences with it outside of this piece? I do find beveled and chamfered edges to be very flaky. Glad you were able to work this out even if it cost you a few days.
 
I haven't had problems with the very few boolean operations I've done in part design, have you had any experiences with it outside of this piece? I do find beveled and chamfered edges to be very flaky. Glad you were able to work this out even if it cost you a few days.
Pretty sure I've done booleans before. Definitely did them during the tutorials. Bevels and chamfers are a pain in the neck. Basically have to do them all at once or they seem to fail, at least in Part Design.

Yeah it was a minor setback. Had to fix a printer along the way, it was perpetually jamming. Sticking solenoid due to rubber bumper material deterioration. Fortunately a simple fix. Maybe tomorrow I can get back to making stuff, instead of fixing things.
 
Pretty sure I've done booleans before. Definitely did them during the tutorials. Bevels and chamfers are a pain in the neck. Basically have to do them all at once or they seem to fail, at least in Part Design.
Yeah, all at once, as the very last step. And much like what you're running into with the threading to groove, seems like they fail on certain end criteria. I only bother with them for 3D printing, for manual machining I just add them in when machining rather than during drawing.
 
Yeah, all at once, as the very last step. And much like what you're running into with the threading to groove, seems like they fail on certain end criteria. I only bother with them for 3D printing, for manual machining I just add them in when machining rather than during drawing.
Agreed. A lot of fiddling for little rewards, only do it for printed parts as well.
 
Back
Top