Captive nut puzzle...my first "real" lathe project

Threadkiller

Registered
Registered
Joined
Feb 19, 2014
Messages
112
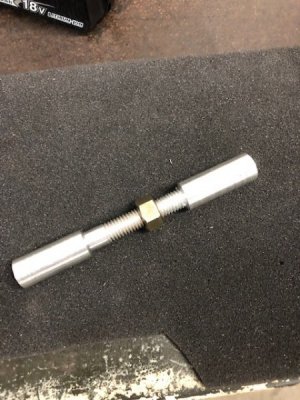
Hey all. Up until this project Ive just tinkered and arbitrarily turned down stock. I wanted to see if I could successfully cut threads and just work on taking measurements and fundamentals. I always wanted to make one of these and thought it would be a cool little piece to have, so I figured Id give it a shot. It came out pretty decent aside from the poor surface finish resulting from a broken insert. I did one side and I didn't have anymore so I had to ruin the other side to match haha. I took it easy on myself and used aluminum but definitely want to make one out of steel in the future. Last night I took some emery cloth and some files to it and cleaned things up a tad but didn't take any pictures. Comments, advice and criticism welcome.
 

Attachments

  • IMG_4463.jpg
    IMG_4463.jpg
    69.2 KB · Views: 77
Made one of those myself some time back. It's a great exercise - makes you think ahead while you're milling it. Like you, I figured this would be an interesting project to practice thread-cutting.

I like to show it to mechanics, tinkerers, etc. I don't tell them it's a puzzle. I just say I can't quite figure out how I got that nut on there, and now I can't figure out how to get it off. (I made the ends only about 3/16" longer than the threaded section, so it looks 'possible' to remove the nut.) You should hear some of the theories guys come up with! Only one guy figured out what I did. Interestingly, if I lined up everyone I showed it to and guessed who would 'get it', it was him. And he got it in about 6 seconds. The guy is a mechanical genius. He should be a machinist.

Regards,
Terry
 
Good job, Threadkiller. That was one of my first “real” projects, too. I was amazed at how the seam literally disappeared when you screwed the 2 halves together and machined the threaded part as one piece. I hear some folks Loc-tite the 2 halves together so no one can unscrew them and say, “Aha!”. I didn’t Loc-tite mine. I just screw it together as hard as I can by hand. I figure if someone solves it, they’re entitled to their “Aha!” moment.

Tom
 
Made one of those myself some time back. It's a great exercise - makes you think ahead while you're milling it. Like you, I figured this would be an interesting project to practice thread-cutting.

I like to show it to mechanics, tinkerers, etc. I don't tell them it's a puzzle. I just say I can't quite figure out how I got that nut on there, and now I can't figure out how to get it off. (I made the ends only about 3/16" longer than the threaded section, so it looks 'possible' to remove the nut.) You should hear some of the theories guys come up with! Only one guy figured out what I did. Interestingly, if I lined up everyone I showed it to and guessed who would 'get it', it was him. And he got it in about 6 seconds. The guy is a mechanical genius. He should be a machinist.

Regards,
Terry

Hey Terry thanks for the response. It was a lot of fun figuring out the order of operations needed. I may leave the ends shorter next time. That's a good idea. One guy I showed it to asked me if I pressed the nut on ha.

Good job, Threadkiller. That was one of my first “real” projects, too. I was amazed at how the seam literally disappeared when you screwed the 2 halves together and machined the threaded part as one piece. I hear some folks Loc-tite the 2 halves together so no one can unscrew them and say, “Aha!”. I didn’t Loc-tite mine. I just screw it together as hard as I can by hand. I figure if someone solves it, they’re entitled to their “Aha!” moment.

Tom

Thanks Tom. Yeah I was surprised too how the seam disappeared. I loctited the two halves together haha I cant have anyone knowing my secrets!
 
Back
Top