

- Joined
- Aug 13, 2020
- Messages
- 1,342
My mill table was shaped like a bowl. I think it was shipped that way from the factory. It's a round column mill, and the pattern is what you would get from letting a block get too hot will grinding. The center swells from the heat more than the sides, the grinder cuts it flat in that condition, and then the middle sinks like a souffle after it cools back down. The sides were .006 higher than the middle, with several swells and dips. Well, I don't have the money to keep buying accessories AND send the table out to be reground, sooo.....
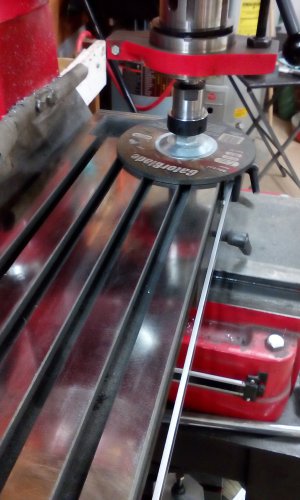
Got an 8" grinding wheel made for an angle grinder. It has a 7/8"-11 arbor, so I cut a 2" piece of a bolt off my homemade steadyrest, and turned one end to fit in my ER32 collet. Lowered the head all the way down, and mounted the disk. It didn't tram, so I had to knock off the top of one side of the disk's arbor. The nut in the disk registers against the bottom of the collet, and removing a little material from the nut forces it to cock in the correct direction.
Cranked the speed up to the highest it will go, brought the disk down to make sparks on the high spot, and slowly start moving the table around. When it stops making sparks, I lower it about half a thousandth. So far I have a mirror finish, with just a few small places that are still making sparks. You can also tell a spot is high by listening for the wheel contacting the table. Go over the louder portions a few times, even with no sparks, and they will quiet down.
So far, I have a mirror finish on the table top, and grinding dust everywhere else. The next step will be to disassemble the table and power wash it.
Attachments
Last edited:
")