checking x axis alignment of g0704 milling machine

eweissman

Registered
Registered
Joined
Dec 7, 2012
Messages
29
a couple of thoughts / questions here. just got in a grizzly g0704 mill. did the spindle break in last night and was
checking things out, cleaning the machine. the vertical face of the dovetail way on the front of the milling table
seems to be finished a bit poorly on my mill. the dovetail on the bottom where it interlocks with the saddle.
looks like it wasnt ground, or something. i tried placing a dial indicator
with magnetic base on the top of the cabinet and running the table past it to check flatness, has a bit of variation. also,
over the entire length of the table motion, it seems to have about about 8 thou (.008) runout if thats what you would call it.
its like the table is bowed? i did have to disassemble the table to move it down stairs so i wonder if i reinstalled the gib wrong?
checked it a bit when it was off the mill and mostly looked okay, lightly stoned it and scrubbed it down.

did i get a dud table? i'm pretty new to this stuff, so any recommendations on how to better check the alingment of these parts?

i can post some pictures later, but was wondering if others had experience with these mills, how theirs was finished particularly.
thanks
-eian
 
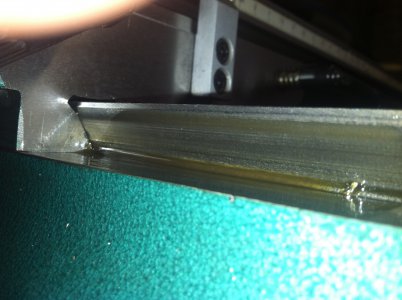
pictures of the table ways. IMG_4271.JPG
you can see the worst of it here, in the pic below. just looks and feels like fairly rough finish.
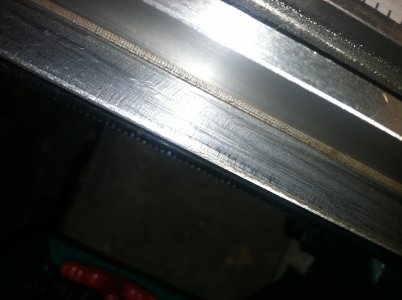
IMG_4273.JPG
finish is kinda inconsistent, the ways on the back of the table look to be ground much more nicely. dont feel or look rough or show tool marks.
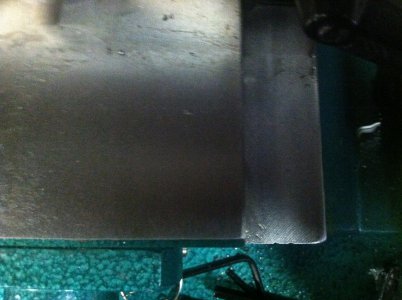
IMG_4278.JPG
the finish on the saddle ways are kinda weird, the top surface looks nicely ground, but doesnt actually contact the saddle at all?
the ways look like they were just machined with a dovetail cutter, not ground?

most concerned with the table ways on the actual table. the motion is fairly smooth on the x axis, not binding or anything.

IMG_4271.JPG IMG_4273.JPG IMG_4278.JPG
 
I think some pictures would help here a lot. If your standing in front of the mill and look under the table the dovetail is usually a 50 deg angle and there is vertical lip at the bottom that is usually about an 1/8 wide, is this what you mean? That's a clearance surface and it is usually rough. So take some pictures so we can understand better.

UPDATE

After seeing the picture, the dovetail looks trashed. The top picture looks like the shorter saddle has burrs on it ..did you drop it? The dove tail is rubbing very hard and will be worse soon. The gib could be to tight and no oil on it. It looks like the damage to the saddle has scoured the dovetail. The middle picture looks bad too, It looks like it has chatter in it.

(2nd picture) Sort of looks like they used an old planner to plane that way and it has chatter. After looking at it again, the ways were scraped and those are chatter marks the guy doing the scraping did. A poor job!. The bottom picture of the top of the knee, I am guessing the top wide flat is clearance and it ground for looks and it rides on the lower way that could have been ground by a cup wheel on a way grinder. It's a cheap way of making machines. But you need to pull apart the table ASAP so it doesn't get worse. Your option would be to have a professional fix it or learn to scrape and do it your self. If your indicating the diagonal dovetail way and your getting .008" it's BAD. I have seen Chinese made machines bad like that new and the workmanship is terrible over there in some factories. If the machine is new, I would suspect with the damaged saddle with the burrs because you dropped it or damaged it somehow going down the stairs, your warrantee is voided. But if you did not damage the ways and it came that way from the factory you should return the machine. I do not feel you should let them come in and try to scrape the machine in your shop if you did not cause the damage. To discover what are clearance surfaces, get try sliding in a .005" feeler gage in between the components. If I lived down the street , I would come and show you.

I am a professional Machine Tool Builder and Rebuilder and have taught machine building in Taiwan, Europe an here in the USA. If you want to call me..651 338 8141.
 
Last edited by a moderator:
i definitely didnt drop anything. just brought it home from the freight terminal, and we carried it down the stairs into the basement without any incident.
may have had some kind of incident on its way from china while ups had it or elsewhere, but crate didnt seem particularly damaged or anything like that.
looks like the roughness was caused by tool chatter like you said. it isnt like gouging, just more like a poor finish. going to try to call grizzly and see
what they can do, i assume it can be warrantied, but i guess i'll figure that out. i should try to look at the underside of the saddle to see if that looks like
marks could have come from there, but from feeling it, it seems like that surface has a better finish than the table ways. thanks for the reply.
-eian
 
I hate to be the barer of bad news. But that machine need some help. Good luck with Grizzly. If you want write me and I will send you a letter via Email describing the condition of the ways. It may help. Richard@Handscrping.com
Good Luck. Rich
 
just a few clarifications. i looked things over tonight after getting off work, with the dial indicator on the actual dovetail face of the table ways, it showed
very little variation in the surface. this is a dial indicator with only 1/1000 inch resolution, so not a great indicator of surface finish, but it actually showed almost
no runout, not moving at all through most of the range of table movement, and showing about .0005 to .001 at the extreme 2 inches of table movement on either
end of the x axis. maybe that can be attributed to the weight of the table throwing off the measurement? i did check on front, back dovetail, and at two different
points height-wise on the dovetail face.

the .008 i was getting was measuring off the inside face of one of the t-slots, on the table, definitely not as carefully finished on that surface...
kinda dumb of me, should have thought to measure off the actual dovetail...
still looks poorly finished to me, on the dovetail, as you said. and i might see if i can get grizzly to send a replacement
table for the mill. there are a few spots i can feel a high spot (or maybe low spot) with my fingernail.

the opposite mating surface on the saddle seems better finished. looks cleaner, and the gib strip in there shows obvious signs of hand scraping,
the perpendicular surfaces on the saddle dovetails
look a lot better too. there is a similar rough spot on the vertical dovetail on the column. but its way at the top end of the column,
about the last two inches on one side... seems like less of a problem since i will mostly be working on smaller stuff.

thanks for your input. might try to give you a call some time to ask a few questions. would be fun to learn hand scraping.
-eian
 
Back
Top