Clamp Cylinder to Lathe Faceplate for Hammer Handle Hole?

MaverickNH

H-M Supporter - Gold Member
H-M Supporter Gold Member
Joined
Nov 6, 2012
Messages
128
I’m making a Hemingway Machinist’s Hammer and need to drill a hole to mount the handle. I have a LMS 7x16 mini-lathe and a Faceplate & Clamp Kit. I figure to use a Tailstock Center to locate the correct longitudinal location, which is off-center )see link below), but am not sure how to locate the center “high point” across the narrow width, other than manually moving the part to match the Tailstock Center.

What’s a good way to align my part on a faceplate to drill/ream that centered hole? Precise isn’t necessary, but if there’s a better way, I’d like to learn it. I’ll be drilling/reaming a 7/16” dia hole through and 1/2” dia shoulders to mount the handle, so will have to flip it once for the 2nd 1/2” dia shoulder.


BRET
 
Use a dial test indicator to locate the two opposing jaws on the four jaw. Adjust the jaws so the reading is equal on both jaws.
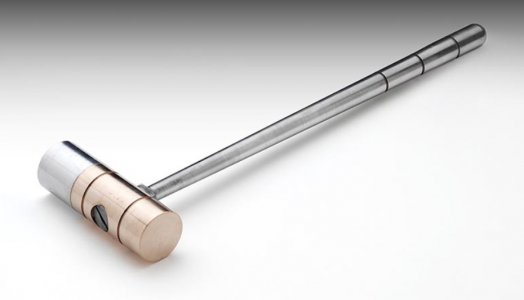
Sorry, I’m not following you. Just for clarity, I’m looking to drill/ream the hole in the hammer head as pictured.

IMG_2841.jpeg
 
you seem to reference a face plate, and not a 4 jaw. I'll assume you don't have a 4 jaw.. if you do that's the way to go.
first mark your hammer head with where you want the hole from each end.
create 2 straps to hold the head down. Lightly clamp the head in the approx location using the clamps. use your tailstock with a center to find the high spot of the cylinder. I would use a ruler/scale and hold it between the tip of the center and the cylinder with the scale 90* to the long axis of the hammer head. that will help to roughly (very close) get you there. I use this method to set my tool heights on my lathe..
use something like a wooden dowel and small hammer to tap the head over to center. Then tighten and check again.
 
Sorry, I’m not following you. Just for clarity, I’m looking to drill/ream the hole in the hammer head as pictured.
Sorry, I assumed you had a 4 jaw chuck.

You can accomplish the same with a faceplate but it will be more tedious. Clamp the part to the faceplate as close as you can by eye. Mount a dial test indicator on the cross slide. With the part aligned vertically, move the carriage in to approximately half the diameter from the faceplate and move the cross slide to contact the part. Move the carriage slightly back and forth to to find the high spot. Zero your dial test indicator and note the cross slide dial reading. Back the cross slide out until it will clear the part and rotate the faceplate 180º. Move the cross slide in until it contacts the part and the dial test indicator again reads zero. Note the reading on the cross slide dial.

One of three cases will occur. If the reading the same as the previous reading , you're done. The part will be centered to the spindle axis. If the reading is greater than the previous reading, the current side is too far away and you will have to move the part towards the front by half the difference in the readings. If the reading is less than the previous reading, the current side is too close and you will have to move the part to the rear by half the difference in the readings.

If you lightly clamp the part, you can move it by gently tapping it with a soft block. When you have verified the centering , clamp the part securely and drill your hole.
 
I would center punch the spot where the handle goes. push a lathe center in the tailstock up to the hammer. clamp the tailstock and crank the tailstock handwheel and guide the hammer into the punched hole. This will hold it where you want until you can get some clamps on the faceplate. Then drill and tap. You can still use the same procedure if you remove it.
That's if I read your question right?
Martin
 
Use a dial test indicator to locate the two opposing jaws on the four jaw. Adjust the jaws so the reading is equal on both jaws.
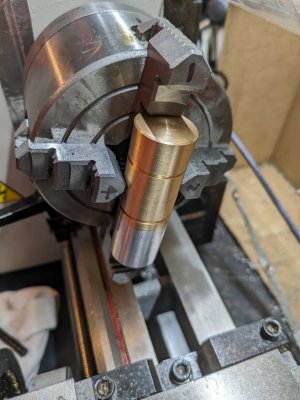
OK, I think I figured out what the 4-jaw chuck method is - did I get it right?PXL_20240420_143345324.jpgI will mount with copper to protect the surface - this is just set in loosely.
 
OK, I think I figured out what the 4-jaw chuck method is - did I get it right?View attachment 487194I will mount with copper to protect the surface - this is just set in loosely.
Looks good. Run the dial test indicator on the outside surface of jaws 2 and 4 to center. Those surfaces need to be the same distance from the spindle axis.
 
Put a center in your tail stock and bring it very close to your work piece. Look directly down from the top and move the piece until the center is directly over the highest spot. Bring the center in to touch the work piece and spin the chuck. The mark that will be made should be a spot on the piece. If it is a circle, you need to better center your work until you get just a spot. This can get you within a couple of thou of exact.
 
Back
Top