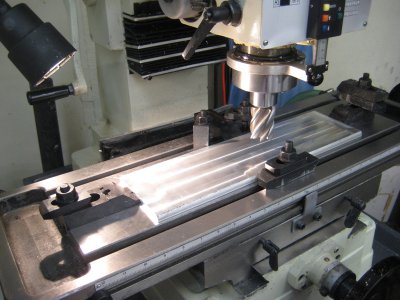
Clamping flat plate to the mill table

jgedde

Active User
Registered
Joined
Jun 23, 2011
Messages
786
I need to face 1/2" flat plate to make some 10 mm stock for a small model engine (Jan Ridder's Otto). I'd like to be able to clamp it once and do all of the milling without repositioning clamps (as it inevitably changes the height a tiny bit and ruins the flatness - tried it and have the T-shirt!) to complete the operation. The plate is about 18" long by 5" wide.

I have a clamping set (two actually). So far I've stacked two straps on each side of the plate and tapped them in tight. 4 step blocks are inserted into the table slots, narrow end first, creating a 90 degree fixed jaw of sorts along the front of the plate. If I could figure a way to make a quick and dirty moveable jaw on the back edge of the plate that I could use to push the plate against the step blocks, I think I'd have it. Any suggestions?

Take a look at the photo if it's not clear what I'm trying to explain...

Is there a cool trick to do this sort of thing as far as clamping goes using HSM type stuff? If it was lowly wood I'd just pass it thru my planer...

Thanks!
John
100_0011.JPG
 
Last edited by a moderator:
I agree with Paddy, that setup is scary. I am assuming this plate is the base, if so why not just leave it at 1/2"? If you must plane it how about some countersunk allens in non critical area's? BTW, I also use dowel pins (2) to align work to the table.
 
Thanks to all for their advice. The material is a cutoff from a piece of large 6061 extruded L-stock. It has to be 10mm because the pieces that will be made from this stock are used as bearing support uprights.

You may ask why I don't just make the pieces, then face them down to 10 mm. I thought of that, but I still have the "move the clamp" scenario. Furthermore, I'm bound to screw up the facing after putting hours into making the part - I tend to get complacent doing the easier stuff and make mistakes. Furthermore, I don't spend enough time making jigs and fixtures like I really should. Don't they say, the first step to overcoming something is to recognize the problem?

My time in the shop is so limited due to work, home ownership, and "she who just be obeyed" (giving credit to Cyrus' moniker here). I'm watched by the latter as she still frowns on the whole HSM thing - she just doesn't understand. She loves the finished product, no matter what it is, but unless it happens quick, fails to see the blood, sweat and tears that goes into it. Worse, I don't have contiguous blocks of time I can get down there and "lose the groove."

My plan with the plate was to somehow make a vise of sorts right on the mill table with sufficient clamping force to prevent the stock from moving around.

You've all given me some food for thought and since I don't want to buy anything new, I will work with what I have. Nonetheless, unless I have some sort of revelation, the setup shown will NOT be used.

Please don't consider this thread closed because I thanked all for their advice. Keep the ideas coming...

Thanks!
John
 
Yeah John,
It looks like you have some potential for dining on aluminum plate. ;)
You might want to consider some Mitee Bites, Clamp downs or other low height clamps.
 
David Utidjian link=topic=2662.msg18114#msg18114 date=1309798735 said:
Since, presumably, these uprights will support bearings any warpage due to facing will be compensated for by doing the bearing mounts after the stock has warped from facing.

-DU-

My thoughts exactly. I did figure out a workable clamping method and went at it with a 1" end mill followed by a fly cutter. Afterwards, I discovered my mill head shifted out of tram (loose bolts) and the finish flycut left ugly steps. After I cleaned up the steps, the plate ended up at 0.385 instead of .394

It'll likely work that way, but a print is made to be followed. Now that I have a more or less piece of 3/8 plate, it'll go into the stock box and I'll try it again with another piece.

Tomorrow I'll see what I can find in the junk box at work. There is endless jig plate, but for what I'm making, I fear cracking will occur.

Thanks again!
John
 
Last edited by a moderator:
Mitebites, toe clamps or semi finish and remove the temporary hold down tabs after finish.

I have used toe clamps, they work. Have milled and drilled .080" Kovar down to .045" using those.

I would rather go with the idea of DU stated, semi finish and temp hold downs that are removed at the end. Very secure and much more flexible with how and where to hold the part(s) down.

Hey It did NOT rain today but had to work.

I can hear the fireworks are going off right now.
 
I borrowed a set of toe clamps. They seem to be exactly what the doctor ordered.

John
 
Clean everything really well, stone down any burs on the table..... stick plate down with double back tape, whack with rubber mallet to seat. machine with high rake tool and light feed. Release tape with acetone when done.

Cyclotronguy
 
The toe clamps are definitely the ticket. I like them so much, I want my own set. Anyone know who sells affordable toe clamps? Most of the ones I've seen are a bit pricey - like $40-$50 each!

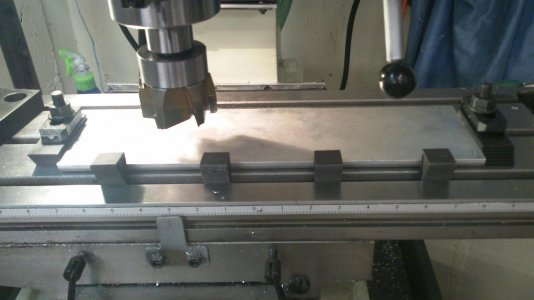
Here's my setup with the toe clamps (see picture). The front hold down is nothing more than a stop for a toe clamp mounted in the rear of the table (the table wasn't big enough in Y to accomodate two toe clamps). This setup worked like a charm and I ended up with a 10mm plate +0.000/-0.001. Good enough for me!

Thanks for all the advice!

Cheers!
John

setup.jpg
 
Last edited by a moderator:
Cyclotronguy link=topic=2662.msg18169#msg18169 date=1309893345 said:
Clean everything really well, stone down any burs on the table..... stick plate down with double back tape, whack with rubber mallet to seat. machine with high rake tool and light feed. Release tape with acetone when done.

Cyclotronguy

Great Idea! assuming the tape isn't too springy. I'd probably let the tape "set up" for a few hours. I'll add that to my mental database of "in a pinch" techniques.

Thanks!
John
 
Last edited by a moderator:
Back
Top