Considering a New Saw.

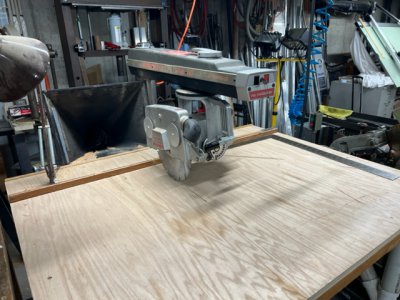
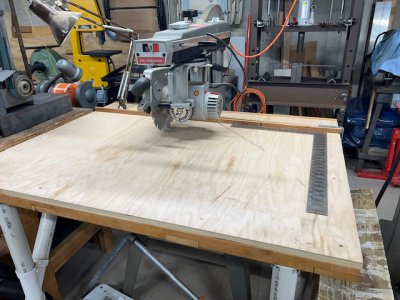
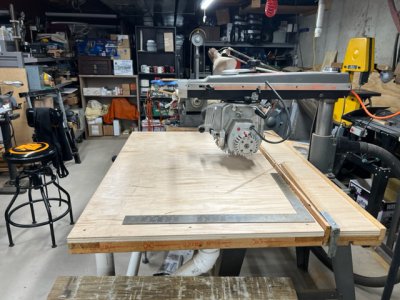
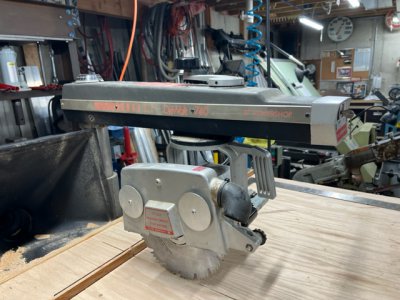
Here are some pictures of the 10" Dewalt saw that's going into semi-retirement. I've had it for almost 50 years, and it's done yeoman's work for the majority of that time. It was used to build 2 houses, a number of pieces of furniture, a large deck, the last iteration of pier decking, and lots of other projects. It was even used to cut bricks when we built the patio at our first house.

It's gone through a couple tables, and dozens of blades. It's time to let it do the easy stuff and leave the grunt work to the new kid on the block. As you can see it's considerably lighter duty than the newest acquisition and works great for smaller projects. Rather than strain it to the edge of its ability one more time I'll put the newer, larger saw to work.
 

Attachments

  • IMG_1795.jpg
    IMG_1795.jpg
    152.7 KB · Views: 10
  • IMG_1796.jpg
    IMG_1796.jpg
    108.1 KB · Views: 9
  • IMG_1797.jpg
    IMG_1797.jpg
    157.6 KB · Views: 8
  • IMG_1798.jpg
    IMG_1798.jpg
    147.6 KB · Views: 8
Got a chance to take a closer look at the "new" saw today. At first glance I thought it was going to be a plug and play machine. Now that I've gotten up close and personal, I think it's going to be a bit of a project to bring it back to the world of the living.

I started with a close inspection of the table and fence. I should have realized why it looked the way it did knowing that it came from a high school. In essence it has been kid proofed. The board behind the fence was permanently attached to the rest of the table by a couple braces lag screwed to the bottom. They used counter bored holes and square head lag bolts to make disassembly difficult without the right tools. The fence was also screwed from the back side to the front portion of the table. With the rear board permanently attached to the table it would be difficult at best to be able to remove and reposition the fence. I'll have to measure and cut an additional board to fill the gap between the clamps at the rear of the table and the one that was permanently mounted behind the fence. Once that part is finished, I should be able to move the fence as was originally intended.

I should have the table disassembled this afternoon. I'll set it off to the side and do a little electrical work. The cord currently on it is only a few feet long. Apparently, it was plugged into an outlet directly behind the machine. I'll be replacing it with a 25' 12/3 SOOW cord that should be long enough to allow the saw to be placed anywhere in the current garage, the shop at home, or outside if necessary. Along with a new power cord I'll also install a 220-volt 20-amp circuit in the new sub panel, and a new twist lock outlet for the saw.

Once the power and table parts of the equation are completed it's time to look at the mechanicals of the saw. I'll start from scratch making sure all the operational controls function as they should as well as leveling and squaring the head. I doubt I'll finish anything more than the table, and possibly a bit of the electrical this weekend, then it's back to the real world for a few more days. I'm sure the finished product will be more than worth the effort, and another great addition to the shop.
 
No big loss with the table. I wouldn't trust theirs to be flat. Better to make a new one you can be confident in since all the saw's adjustments are relative to the table.
 
I got the machine up and running yesterday. About only things I had time for were to replace the power cord and wire in a new circuit and outlet for a power source. When I opened the starter box to replace the power cord, I also found a few wires disconnected. Thankfully there was a wiring diagram on the cover, so it didn't take long to figure out where everything had to go. Today if there's enough time, I'll check over the operational controls to be sure everything works properly.

The final steps this fall will be to reinstall the front half of the existing table and make a couple new boards to replace the fence and the missing parts behind it. I did a quick check of the table with a 4' straight edge, and it seems to be flat enough for general use. It's made of random widths of white oak. The braces that held the fence and back board permanently in place are 2 1/2" x 4" white oak as well. All the boards are glued together. I'm guessing this table was a project for the first class. According to the manual the machine came from the factory with a much smaller "table board set" in the carton that had to be assembled.

Once these steps are complete, I'll start some 5/4 red cedar to replace the deck boards on the pier.
 
We're back at the cottage today not to work on the saw, but rather to meet with the contractor that's supposed to start re-roofing the house tomorrow morning. While we're waiting, I thought I'd take a look at the saw and see if I could get anything more done as far as checkout and getting it ready for the pier project.

In an earlier post I mentioned I thought the saw could rip either 29" or 33". Closer inspection reveals it will rip 29" when in the out-rip position and the fence is set for normal crosscutting. When the fence is moved all the way to the rear of the table it will rip 41" in the out-rip position. I was originally going to cut the table depth and width down a bit, but at its current depth of 45" I probably shouldn't change the depth if I ever want to use the full rip capacity. I will have to cut a small amount of the right end to square it up and remove some damaged material.
 
Back
Top