F
Firestopper
Forum Guest
Register Today
I had a request to elaborate on the rear bumper I built for my 05 D-max GMC on the "lets see your shop thread. I didn't want to upset the moderators, so I felt this would be more appropriate.
This build was done back in 06 and no problems have been encountered thus far with well over 68K miles including rough dirt roads.
The tire size prohibited the use of the spare tire carrier under the bed, and I also had other plans for that space for a propane tank (propane injection system).
The bumper Skin is 10 gauge and was cut on the CNC plasma table (like an unfolded box). The real structure for the bumper is a section of 9" channel that mounts to the frame and redesigned hitch. All mig welded in pulse mode. The skin, once broken on the break is held in place with stainless steel hardware. The recovery anchors where welded to the rear of the channel for a flush finish to the skin. All penetrations where done on the initial CNC cutting.
The tire carrier hinge, brakets and over center latch required machining for the most important feature.
This feature allows me to lower the entire spare tire to the ground without killing myself handling this large heavy tire. At 160 lbs and 52 years old , my back is not what it once was, so this is what I came up with.
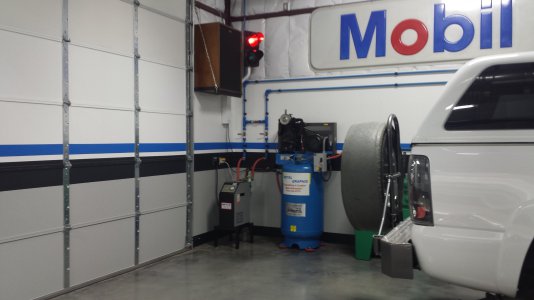
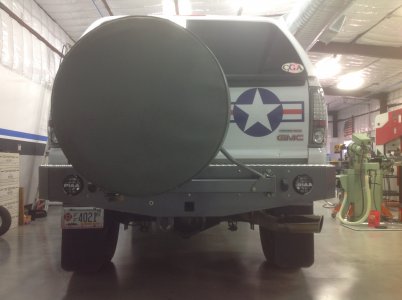
The spare tire lowers to the ground for removal.
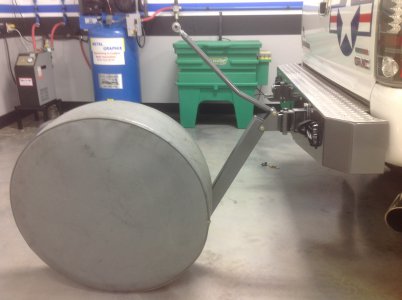
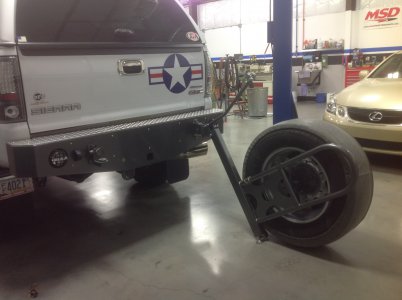
Hinge was bored at both ends to press in HD precision bearings, all brackets where made on the fly as I really had nothing on paper for the moving parts. All hardware used was grade 8. The 2"x3" 1/8" wall tubing was sleeved and delrin bushings made for a smooth quiet operation. The upright support that secures the carrier had a heim joint for easy alignment when raising from the ground. This upright also required a slight bend to allow clearance of the tail gate when loading material into the bed.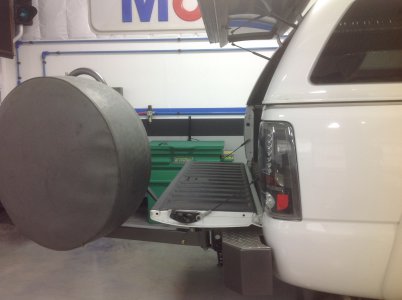
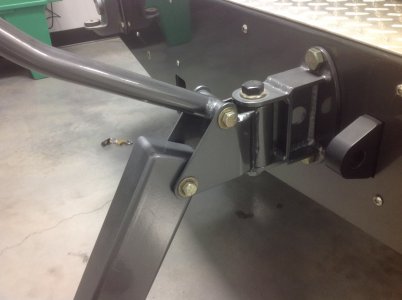
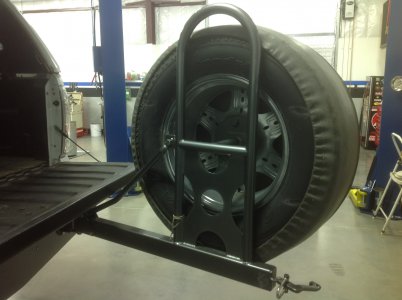
The over center latch bracket is also drilled and tapped into the channel and aids in securing the skin flat to the channel/bumper. The pin that allows rotation of the SS u-bolt was turned and two grooves secure it center with snap rings. The SS u-bolt is threaded for adjustability. The bracket that secures the swing arm has large delrin pads for a squeak free ride.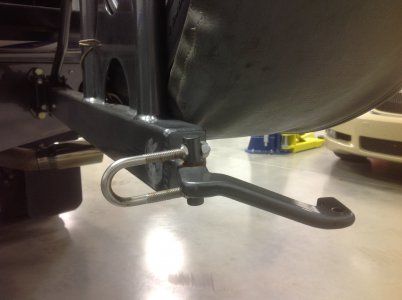
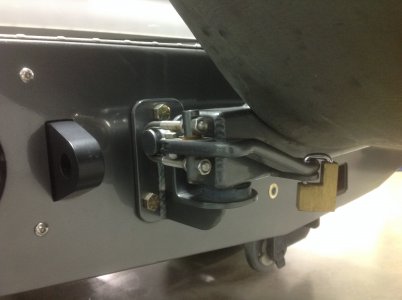
A back up camera to the left of the lock really comes in handy for hitching to a trailer. Gun metal gray finished up the build of the skin, and PC black to the main bumper/hitch completed the project.
I also wanted to share another neat feature up front.
Many years ago, I owned a millermatic 200 (1987) that required re arranging the leads for amperage change.
Many of you older guys will remember these machines. Any way, I secured a bunch of the male/female connectors and found a use for them years later.
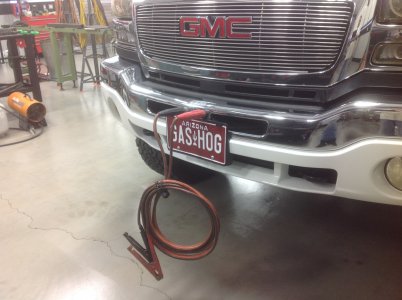
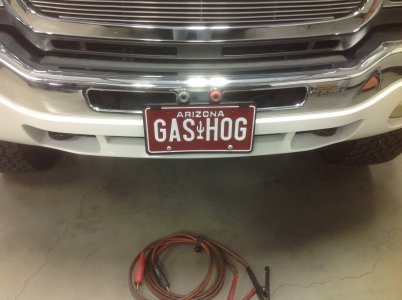
I modified two jumper cables with the male ends for quick connection for jumping others or being jump started my self.
I had to machine a two piece isolator (delrin) as the front bumper is metal.
I did the same on my 82 FJ40 front bumper build.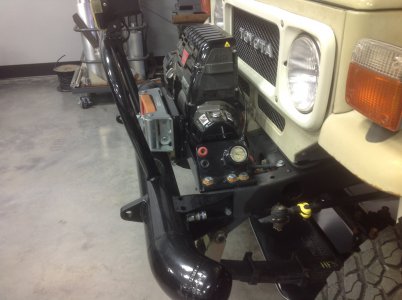
If any ones is interested in this build I can post up more details and photos. Its a pressure vessel bumper that holds 160 psi max feed by the power plant winch. The air provides air lockers to the front and rear diff, as well as tire inflator.
Tanks for looking.
Paco
This build was done back in 06 and no problems have been encountered thus far with well over 68K miles including rough dirt roads.
The tire size prohibited the use of the spare tire carrier under the bed, and I also had other plans for that space for a propane tank (propane injection system).
The bumper Skin is 10 gauge and was cut on the CNC plasma table (like an unfolded box). The real structure for the bumper is a section of 9" channel that mounts to the frame and redesigned hitch. All mig welded in pulse mode. The skin, once broken on the break is held in place with stainless steel hardware. The recovery anchors where welded to the rear of the channel for a flush finish to the skin. All penetrations where done on the initial CNC cutting.
The tire carrier hinge, brakets and over center latch required machining for the most important feature.
This feature allows me to lower the entire spare tire to the ground without killing myself handling this large heavy tire. At 160 lbs and 52 years old , my back is not what it once was, so this is what I came up with.


The spare tire lowers to the ground for removal.


Hinge was bored at both ends to press in HD precision bearings, all brackets where made on the fly as I really had nothing on paper for the moving parts. All hardware used was grade 8. The 2"x3" 1/8" wall tubing was sleeved and delrin bushings made for a smooth quiet operation. The upright support that secures the carrier had a heim joint for easy alignment when raising from the ground. This upright also required a slight bend to allow clearance of the tail gate when loading material into the bed.


The over center latch bracket is also drilled and tapped into the channel and aids in securing the skin flat to the channel/bumper. The pin that allows rotation of the SS u-bolt was turned and two grooves secure it center with snap rings. The SS u-bolt is threaded for adjustability. The bracket that secures the swing arm has large delrin pads for a squeak free ride.


A back up camera to the left of the lock really comes in handy for hitching to a trailer. Gun metal gray finished up the build of the skin, and PC black to the main bumper/hitch completed the project.
I also wanted to share another neat feature up front.
Many years ago, I owned a millermatic 200 (1987) that required re arranging the leads for amperage change.
Many of you older guys will remember these machines. Any way, I secured a bunch of the male/female connectors and found a use for them years later.
I modified two jumper cables with the male ends for quick connection for jumping others or being jump started my self.
I had to machine a two piece isolator (delrin) as the front bumper is metal.


I did the same on my 82 FJ40 front bumper build.

If any ones is interested in this build I can post up more details and photos. Its a pressure vessel bumper that holds 160 psi max feed by the power plant winch. The air provides air lockers to the front and rear diff, as well as tire inflator.
Tanks for looking.
Paco

