- Joined
- Jan 1, 2014
- Messages
- 233
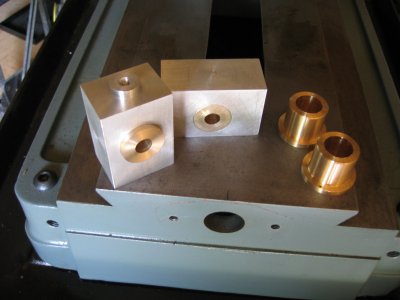
When I purchased this mill in 2008 I did a full teardown to clean everything up, refurb what was needed, and paint it. One thing I noticed right away was that the backlash in the table nuts was excessive, .080" on the Y and about .030" on the X. Part of the Y problem was a loose mounting bolt and the backlash adjustment was way out on both axis. I personally don't like the slit/pinch bolt method of adjustment as it takes away some of the total thread length in an already skimpy nut. I thought I could make a nut/jam nut arrangement which would give more overall nut length and better adjustment capability. There seemed to be room within the casting areas to take larger nuts so careful measurements were made. I didn't have enough bronze to make full bronze pieces so made AL carriers with pressed inserts of brass. I did have enough bronze for the jam nuts.
View attachment 68192
Carriers were milled up to spec vis-a-vis centre to flange surface and the Y carrier had the necessary lug turned on the end. All the turning and threading was done on my SB 10" lathe. Carriers were held in the 4 jaw and dialled in to get the proper "on centre" location.
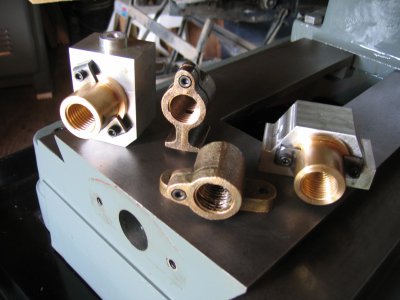
Interesting work turning both RH and LH ACME threads for the X and Y respectively. I used the actual table screws as test gauges to get the best fit for the finished internal threads. Much to my surprise the table screws were not worn in the middle so I got a good fit end to end.
View attachment 68195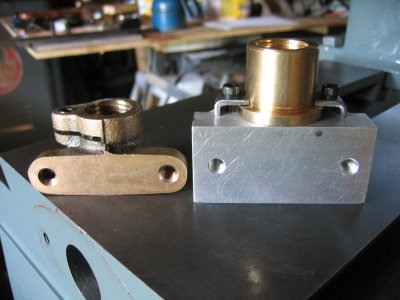
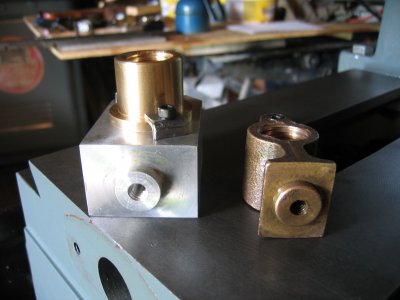
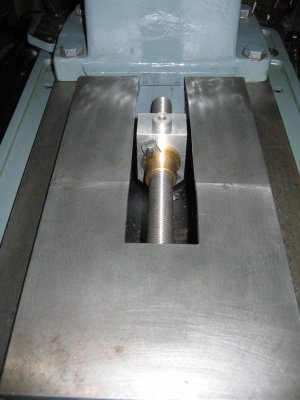
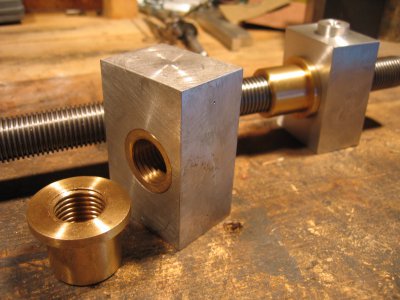
This picture shows the start of the new nut(s) buildup. The jam nut adjustment capability is now evident and also the replication of the mounting points. The total length of each of the X and Y nuts is now 3" vice the original 1 5/16" Y, and the 1 7/16" X.
View attachment 68198 View attachment 68199 View attachment 68200
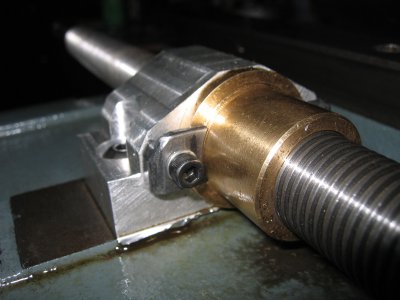
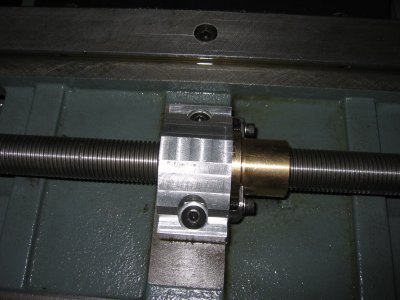
These pictures show the nuts in situ. On the left I gained a little Y travel by squaring out the casting opening at the front. The two pictures of the X nut shows the refinement of the AL carrier shape to fit under the table with some clearance and one very subtle change in that I changed the mounting bolts so that they are now inserted from the top. This involved drilling out the holes in the saddle casting to 1/2", turning up two plugs with shoulders, tapped 5/16"-18 and then pressed into the saddle from the bottom. The X nut can now be bolted "down" instead of having to take the saddle off everytime to get at the mounting screws.
The funny side of all this was having only one mill, and, needing to make changes to make things fit as I went along, I wound up by taking the table apart, reinstall the old nuts, do some machining, then reinstalling the new stuff again I don't know how many times. I was now ready for final assembly.
It was CRITICAL at this point to take ALL the end play out of both X and Y screw thrust bearing mounts. I did this with necessary shims so that the whole bearing buildup was snug but not tight when the retaining roll pin was reinserted back into the screw shaft. Adjusting the nuts themselves is simply a matter of rolling the jam nut lightly up against the carrier nut and locking the clamps. I made sure everything was well oiled and ran full X and Y travel to ensure no tight areas existed. Tight areas would have meant backing off the jam nuts and accepting the resultant backlash. Happily in my case I'm down to .001" to .002" max.
As a result of this mod I am now able "climb" mill with confidence on either axis.
Any comments would be welcome.


View attachment 68192
Carriers were milled up to spec vis-a-vis centre to flange surface and the Y carrier had the necessary lug turned on the end. All the turning and threading was done on my SB 10" lathe. Carriers were held in the 4 jaw and dialled in to get the proper "on centre" location.

Interesting work turning both RH and LH ACME threads for the X and Y respectively. I used the actual table screws as test gauges to get the best fit for the finished internal threads. Much to my surprise the table screws were not worn in the middle so I got a good fit end to end.
View attachment 68195


This picture shows the start of the new nut(s) buildup. The jam nut adjustment capability is now evident and also the replication of the mounting points. The total length of each of the X and Y nuts is now 3" vice the original 1 5/16" Y, and the 1 7/16" X.
View attachment 68198 View attachment 68199 View attachment 68200
These pictures show the nuts in situ. On the left I gained a little Y travel by squaring out the casting opening at the front. The two pictures of the X nut shows the refinement of the AL carrier shape to fit under the table with some clearance and one very subtle change in that I changed the mounting bolts so that they are now inserted from the top. This involved drilling out the holes in the saddle casting to 1/2", turning up two plugs with shoulders, tapped 5/16"-18 and then pressed into the saddle from the bottom. The X nut can now be bolted "down" instead of having to take the saddle off everytime to get at the mounting screws.
The funny side of all this was having only one mill, and, needing to make changes to make things fit as I went along, I wound up by taking the table apart, reinstall the old nuts, do some machining, then reinstalling the new stuff again I don't know how many times. I was now ready for final assembly.
It was CRITICAL at this point to take ALL the end play out of both X and Y screw thrust bearing mounts. I did this with necessary shims so that the whole bearing buildup was snug but not tight when the retaining roll pin was reinserted back into the screw shaft. Adjusting the nuts themselves is simply a matter of rolling the jam nut lightly up against the carrier nut and locking the clamps. I made sure everything was well oiled and ran full X and Y travel to ensure no tight areas existed. Tight areas would have meant backing off the jam nuts and accepting the resultant backlash. Happily in my case I'm down to .001" to .002" max.
As a result of this mod I am now able "climb" mill with confidence on either axis.
Any comments would be welcome.


Last edited:

