-
Welcome back Guest! Did you know you can mentor other members here at H-M? If not, please check out our Relaunch of Hobby Machinist Mentoring Program!
You are using an out of date browser. It may not display this or other websites correctly.
You should upgrade or use an alternative browser.
You should upgrade or use an alternative browser.
Diy Heat Treat Furnace
- Thread starter catoctin
- Start date
BASIC DESIGN
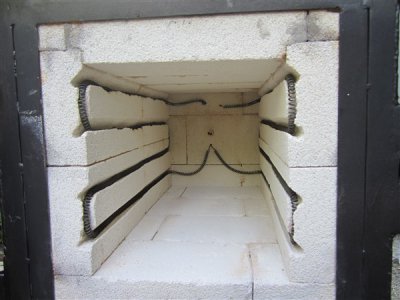
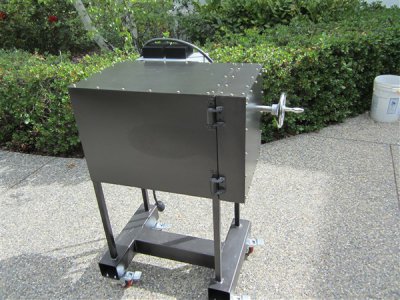
Usable interior - roughly 8"x 8" x 17"
Inner frame 1" x 1" angle iron with 14 gauge sheet metal floor
Outer frame 1" x 1" angle iron
Frame
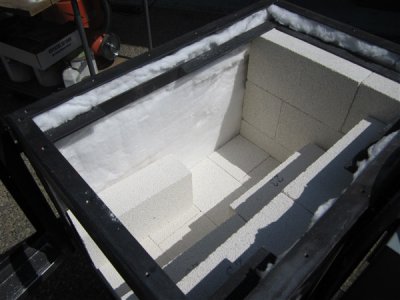
The inner frame holds the refractory bricks and floats inside the outer frame. The front faces of both frames are flush in the front and the inner frame is supported in the
back with two 1"x1"x1" pieces of rectangular tubing welded in. Ceramic insulation is used between the two frames. The outside covering is a mixture of 12 and 14 gauge sheet metal remnants.
The mobile base is from 4"x4" rectangular tubing remnants. The entire interior is painted with Rustoleum high temperature paint. Sorry but there are no pictures of the early stages of welding this guy together.
Door Hinge
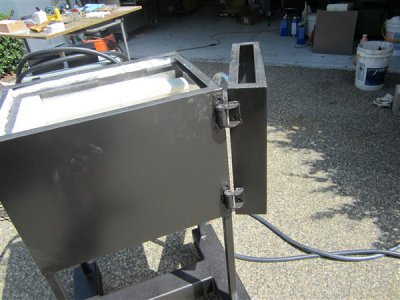
Most folks that have build oven have had hinge sag issues. I ended up using "4" Bolt On Gorilla Hinge" from hardwaresource.com at $17 each.
A pair of these has a load rating of 250 lbs.
Door Latch
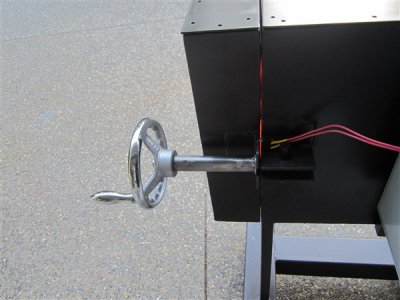
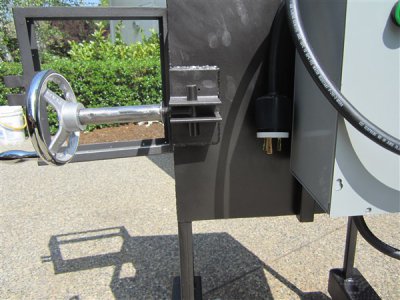
The door latch is made from a Grizz 6" wheel, 5/8" piece of drill rod, 5/8" grade 8 bolt, 1" tubing and angle iron. It's a pretty simple design that allows me to control the compression pressure.
I plan to add a rope seal for the door once I order it.

Usable interior - roughly 8"x 8" x 17"
Inner frame 1" x 1" angle iron with 14 gauge sheet metal floor
Outer frame 1" x 1" angle iron
Frame
The inner frame holds the refractory bricks and floats inside the outer frame. The front faces of both frames are flush in the front and the inner frame is supported in the
back with two 1"x1"x1" pieces of rectangular tubing welded in. Ceramic insulation is used between the two frames. The outside covering is a mixture of 12 and 14 gauge sheet metal remnants.
The mobile base is from 4"x4" rectangular tubing remnants. The entire interior is painted with Rustoleum high temperature paint. Sorry but there are no pictures of the early stages of welding this guy together.
Door Hinge
Most folks that have build oven have had hinge sag issues. I ended up using "4" Bolt On Gorilla Hinge" from hardwaresource.com at $17 each.
A pair of these has a load rating of 250 lbs.

Door Latch
The door latch is made from a Grizz 6" wheel, 5/8" piece of drill rod, 5/8" grade 8 bolt, 1" tubing and angle iron. It's a pretty simple design that allows me to control the compression pressure.
I plan to add a rope seal for the door once I order it.


- Joined
- Feb 1, 2015
- Messages
- 9,604
A really nice looking furnace! How are you planning to control the temperature?
Screw-on Panels
The top and front door panels plus the main chamber top panels are screw-on in order to do repairs.
Refractory Brick
I bought my K23 bricks and insulation from Clay Planet in Santa Clara. They were one of the cheapest around and I could do local pickup. I also bought "smoothset dry mortar" there for setting the bricks.
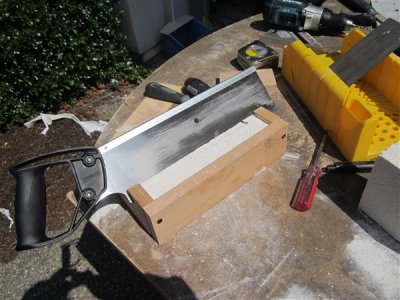
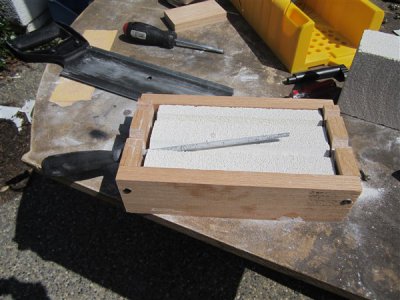
I did a dry fit-up before mortaring the bricks in. The bricks are pretty easy to cut and ruin any tooling that touches them. Home Depot has Stanley miter box/saw combos that work real well with
the brick size. The store brand was too small. I built a wood fixture for carving out the channels for the heating elements. Both the HF file and the saw in the pictures are useless now. I was surprised
since the brick cuts like balsa wood.
.


There's more coming....A really nice looking furnace! How are you planning to control the temperature?
Refractory Brick
I dunked the bricks in water when shaping and mortaring them. It keeps the dust down and keeps the mortar from drying out too fast.
I used a minimum amount of mortar between the bricks to get a seal. It is "very" important to do an oven break-in when adding water
to the bricks. I will cover this later.
Controls
Almost every article on homemade heat treat furnaces on the web mentions Auberins and Budget Casting Supply as the go-to places for the heating equipment.
Budget Casting Supply
1. 120 Vac Kanthal Heating Element - 2300 °F Max #7101 (Qty=2)
2. Insulation board #1089
3. High temperature hookup wire #7105
Auberins
1. PID #SYL-2352P
2. Thermocouple #TC-K-KLN 8 gauge/6 inch
3. Panel Mount connector #TCCON
4. SSR #40A SSR(Qty=2)
5. Heat Sink for 40A SSR (Square)(Qty=2)
6. High Amperage Main Switch 32A 440VAC
7. LED Indicator, 22 mm, 120/240V
8. Alarm lights/buzzers (Qty=2)
1sourcedist.com
1. Hoffman ASE12X12X6NK 12" x 12" x 6" Screw-Cover Pull Box
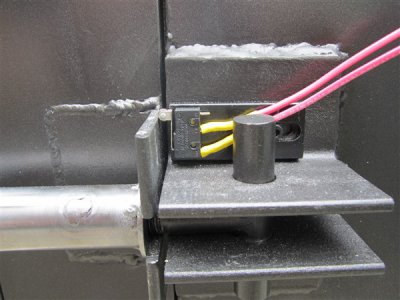
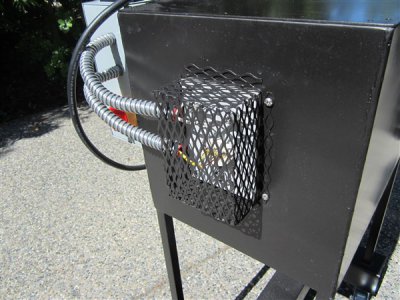
My control setup is like most others documented on the web using Auberins and BCS parts. The oven runs on 220VAC and the controls are housed in th Hoffman box ($19). Slo-blow fuses are used on the two legs of the 220VAC power and a single inline 1A fuse is used to supply power to the PID unit. The two heating elements are tied in series. All connection for the heating elements are done on the outside with stainless bolts. This includes the common connection point for the two heating elements. The insulation board from BCS holds the heating element connections and the thermocouple. I fabricated ventilated a safety cage to go over all of the connections. This was made from a sheet of expanded sheet metal screen and TIG tack welded together. The SSR switch line is routed through a micro switch on the door to a front panel light and then to the SSRs. I machined a piece of flat bar stock to be the mounting plate for the switch.
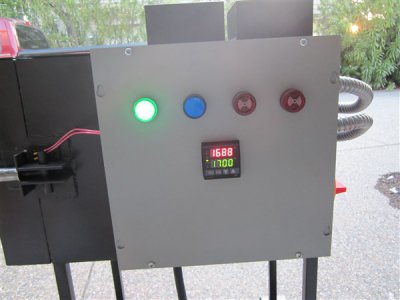
The SYL-2352P PID is fairly complex. It can hold 30 programming steps for controlling things like ramping, timed soaking, and alarm triggering. I got caught by an internally programmed alarm setting while going through the initial break-in procedure. The first alarm was set at 1000 deg F in
the overall setup as an overtemp alarm. Man it was noisy. I changed the setup to have it go off at 2000 deg F. The two PDF manuals are complete but a quick setup guide would have useful. I did some highlighting on the manual to easily find specific key sequences
for changing modes and programming setup.
I dunked the bricks in water when shaping and mortaring them. It keeps the dust down and keeps the mortar from drying out too fast.
I used a minimum amount of mortar between the bricks to get a seal. It is "very" important to do an oven break-in when adding water
to the bricks. I will cover this later.
Controls
Almost every article on homemade heat treat furnaces on the web mentions Auberins and Budget Casting Supply as the go-to places for the heating equipment.
Budget Casting Supply
1. 120 Vac Kanthal Heating Element - 2300 °F Max #7101 (Qty=2)
2. Insulation board #1089
3. High temperature hookup wire #7105
Auberins
1. PID #SYL-2352P
2. Thermocouple #TC-K-KLN 8 gauge/6 inch
3. Panel Mount connector #TCCON
4. SSR #40A SSR(Qty=2)
5. Heat Sink for 40A SSR (Square)(Qty=2)
6. High Amperage Main Switch 32A 440VAC
7. LED Indicator, 22 mm, 120/240V
8. Alarm lights/buzzers (Qty=2)
1sourcedist.com
1. Hoffman ASE12X12X6NK 12" x 12" x 6" Screw-Cover Pull Box
My control setup is like most others documented on the web using Auberins and BCS parts. The oven runs on 220VAC and the controls are housed in th Hoffman box ($19). Slo-blow fuses are used on the two legs of the 220VAC power and a single inline 1A fuse is used to supply power to the PID unit. The two heating elements are tied in series. All connection for the heating elements are done on the outside with stainless bolts. This includes the common connection point for the two heating elements. The insulation board from BCS holds the heating element connections and the thermocouple. I fabricated ventilated a safety cage to go over all of the connections. This was made from a sheet of expanded sheet metal screen and TIG tack welded together. The SSR switch line is routed through a micro switch on the door to a front panel light and then to the SSRs. I machined a piece of flat bar stock to be the mounting plate for the switch.


The SYL-2352P PID is fairly complex. It can hold 30 programming steps for controlling things like ramping, timed soaking, and alarm triggering. I got caught by an internally programmed alarm setting while going through the initial break-in procedure. The first alarm was set at 1000 deg F in
the overall setup as an overtemp alarm. Man it was noisy. I changed the setup to have it go off at 2000 deg F. The two PDF manuals are complete but a quick setup guide would have useful. I did some highlighting on the manual to easily find specific key sequences
for changing modes and programming setup.
BREAK-IN
Following a break-in procedure gets the moisture out of the bricks and seasons the heating elements. Trapped moisture in the bricks can cause a superheated steam explosion from what I read.
I waited a week after setting the bricks to start break-in. This procedure was adapted from one specified by a commercial heat treat oven manufacturer:
Step 1. Heat at 200 deg F for 24 hours. I did not install the screw on panels while performing this operation. The top panel was left laying on the top for the first hours and was soaked with water.
It was left off for the remainder of this step. Opening the front door every few hours would release quite a bit of steam so I propped it open an inch to allow the trapped water to escape
Step 2. Heat at 1200 deg F for 2 hours
Step 3. Heat at 1300 deg F for 1 hour
Step 4. Heat at 1400 deg F for 1 hour
Step 5. Heat at 1500 deg F for 1 hour
Step 6. Heat at 1600 deg F for 1 hour
Step 7. Heat at 1700 deg F for 1 hour.....done
I was really concerned about cracked bricks and the heating elements coming loose during the break-in. No problems were noted.
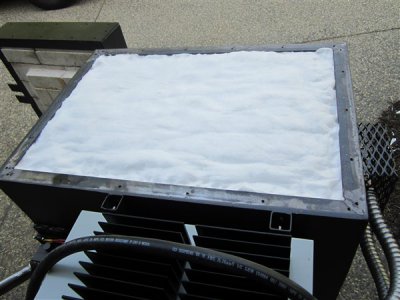
I did the break-in yesterday and shut the oven down around 7 PM. It was still warm this morning when I installed the top insulation and screw-on panels.
-Joe
Following a break-in procedure gets the moisture out of the bricks and seasons the heating elements. Trapped moisture in the bricks can cause a superheated steam explosion from what I read.
I waited a week after setting the bricks to start break-in. This procedure was adapted from one specified by a commercial heat treat oven manufacturer:
Step 1. Heat at 200 deg F for 24 hours. I did not install the screw on panels while performing this operation. The top panel was left laying on the top for the first hours and was soaked with water.
It was left off for the remainder of this step. Opening the front door every few hours would release quite a bit of steam so I propped it open an inch to allow the trapped water to escape
Step 2. Heat at 1200 deg F for 2 hours
Step 3. Heat at 1300 deg F for 1 hour
Step 4. Heat at 1400 deg F for 1 hour
Step 5. Heat at 1500 deg F for 1 hour
Step 6. Heat at 1600 deg F for 1 hour
Step 7. Heat at 1700 deg F for 1 hour.....done
I was really concerned about cracked bricks and the heating elements coming loose during the break-in. No problems were noted.


I did the break-in yesterday and shut the oven down around 7 PM. It was still warm this morning when I installed the top insulation and screw-on panels.
-Joe
- Joined
- Mar 19, 2014
- Messages
- 2,681
Hi neighbor, you did GOOD! Any idea on the amp draw? And could you tell me the gauge/diameter of the Kanthal wire…Dave.
Here's the spec on heating element:Hi neighbor, you did GOOD! Any idea on the amp draw? And could you tell me the gauge/diameter of the Kanthal wire…Dave.
http://www.budgetcastingsupply.com/product-p/7101-002.htm
Hey neighbor,
I am guessing two elements are burning around 3100W. The website is saying the wire is .o56".
-Joe


