Dro Probes

The easiest thing to do is use a wiggler/edge-finder then reset the DRO to zero. A little practice and you will not want anything else. Done it for years.
Don't you set the DRO zero to an offset of the radius of the wiggler/edge finder?

Ken
 
I emailed Wildhorse Innovations in the compatibility of the Enviro probe they have.
Gary's reply was very informative and I thought worth sharing.

"The main determining factor for compatibility is how the DRO allows configuration of a probe.
There are two main versions of "probes". The first is the tool height setter. In this application there is a touch plate somewhere on the mill, router, etc. This plate is conductive and electrically connected to one side of the sensing circuit of the DRO. The other side of the sensing circuit is connected to the (conductive) cutting tool.
When the machine is setting the offset for tool height the cutting tool and the touch plate are brought into contact with each other. When they touch the electrical circuit through the DRO is completed.
This type if probe is a "normally open" probe. The circuit is open until the "touch" occurs, at which time the circuit is "closed" (completed).
This is of course not a true probe in that it serves only one narrow purpose, that being the determination of tool height offset values.
The second type is the true 3D probe, such as the Econo-Probe. In this situation one side of the circuitry of the probe is connected to one side of the sensing circuit and the remaining two sides also connected together.
The circuit through the probe is "normally closed" (circuit completed) until a "touch" occurs, at which time the circuit is "opened" or broken.
As you can see the DRO needs to be able to be configured for the particular style of probe being used. Historically, 3D probes have been to expensive for the home hobbyist or small machine shop. 3D probes were generally produced by the manufacturer of the CNC controller. 3D probes were almost never attached to DROs.
This left only the tool height type of probe for the DRO user. Because of this most DROs were configured for use with a tool height type probe, or a normally open probe.
As 3D probes became more affordable, some manufacturers recognized the need for a dual purpose probe input for DROs. By this time (historically speaking) DROs were being manufactured using embedded processors (think about a DRO based upon the Arduino). This made the problem of a dual purpose probe input much easier to solve. All that was needed was to add a configuration setting telling the DRO whether to expect a normally open or normally closed input at the probe input.
Unfortunately not all DRO manufacturers took advantage of the flexibility of modern DROs with embedded processors. The main roadblock to moving forward on this issue is the separation of "US manufacturer" and the actual manufacturer, which is usually in China. Rather than developing their own DRO system, many US manufacturers merely shop for a Chinese DRO which can be private labeled for their brand.
Several years ago I worked very closely with DRO Pros to determine how to make the Econo-Probe work with the DRO Pros units. At that time the software supported only the tool height setter function. I developed a very easy hardware solution to this problem that DRO Pros could use while the existing inventory was depleted, at which time they would have units available with new software able to support either type of probe.
I have not heard from DRO Pros as to the status of their software.
There is absolutely no reason for DRO manufacturers to not offer configurable inputs for probes. It adds NOTHING to the cost to produce the unit. If implemented in the original software design, the cost to develop is virtually nothing. If the issue is an existing unit, the programming changes are quite minor (I speak from many years experience as a system designer and programmer). Properly designed units should be field programmable to accept new releases of their software.
Hope this helps with your decision process.
As a last note, if you select a DRO that does not support normally closed probes, we can provide a very inexpensive circuit to adapt the Econo-Probe to a non-configurable DRO."

Going through the posts I see that this is basically the same as what Jim said.
 
Last edited:
I normally open to normally closed can be inverted with two resistors and a transistor normally. sort of depends upon system voltage etc.

Stuart
 
On the height setting issue I think all them CNC types have have tool changers set to a specific depth. If you did the quill touch off with a probe then swaped out the probe for an end mill or drill bit , how do you then know you have that at the correct height ? you would end up having to measure the tools in each time.

if your buying measuring stuff with batteries the mititoyo stuff has legendary battery life.

Stuart
 
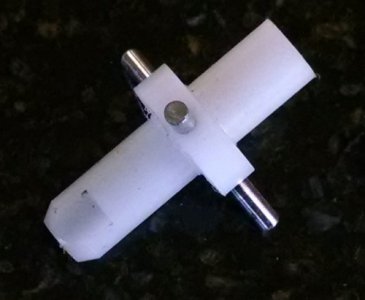
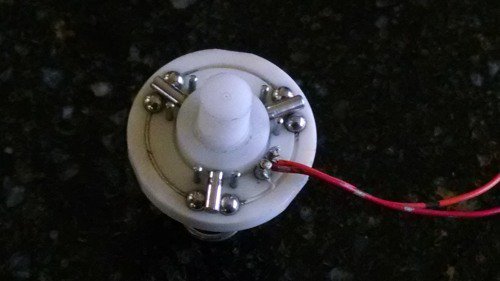
There are two types of touch probes or tasters, passive and active. The passive probes have three electrically conductive fingers 120 deg. apart in a horizontal plane. The end of each finger is nested between two ball bearings. The adjacent ball bearings between two fingers are electrically connected and the remaining two ball bearings are connected to external wires. An external probe is mounted at the intersection of the three fingers and perpendicular to the plane they lie in. A spring holds the fingers in contact

When each finger is properly nested, it makes an electrical connection to its ball bearings so the entire arrangement makes a complete circuit. As Jim said, normally closed. A displacement in any direction will break the electrical connection and signal the contact with the work. At that point, the probe is a distance equal to 1/2 the probe tip diameter from the touch point.

I have been working on making a passive touch probe. Here are some pictures of the the work so far. It should give you and idea of the construction.
Touch Probe 1 .JPG Touch Probe 2 .JPG

It is my understanding that active probes have a normally open configuration and use servo mechanisms instead of the spring, hence active. They are purportedly more sensitive to a displacement because the restoring force is much lower. Supposedly, they will repeatedly mark a position to .0001". As might be expected, the internal mechanism is considerably more complicated.

The $19.95 type probes have insulated tips and light up when the tip makes contact with the electrically conductive work. Some are spring loaded so they can can travel past the contact point. Others are rigid. They usually don't detect a vertical deflection although there is no reason that one could not be built to do so.

Bob
 
On the height setting issue I think all them CNC types have have tool changers set to a specific depth. If you did the quill touch off with a probe then swaped out the probe for an end mill or drill bit , how do you then know you have that at the correct height ? you would end up having to measure the tools in each time.

if your buying measuring stuff with batteries the mititoyo stuff has legendary battery life.

Stuart
Take a look at the white papers on the Tormach site regarding their TTS system. It uses a combination of pre-mounted tools and a tool offset measurement system using a height gage. My reference "tool" is a digital dial indicator which is zeroed in my work datum and then is used to zero the height gage. All subsequent tools are referenced to the height gage and the offsets entered into my tool offset table. The principles involved can be used with other measurement systems with a little thought.

FWIW, I got the full TTS system when I got my mill and would give up a lot of other tools before I would part with it. I also modified my old mill drill to use TTS. All it entailed in that case was grind the face of a 3/4" R8 collet for clearance. I have fifteen or twenty of their ER20 Adapters along with a full set of collets and multiples of the 1/8", 3/16", 1/4", 5/16", 3/8", and 1/2" collets which gives me the ability to pre-mount and zero all the tools that I will need for a job. Tormach has a n app note on setting a mill up to use their TTS system.

Some twelve years ago, I was making a miniature flow cell for our business and was working with drills a small as .008" diameter. I had set my work up on a vertical rotary table so I could machine four sides without changing the setup. I devised a sensitive touch point on the milling table using a silver contact from a relay. The spring bronze finger of the contact allowed me to touch off a .008" drill without fear of breaking it. My vertical datum was the rotational axis of the RT which could be determined accurately by milling two flats. The distance between the flats was miked and half that distance was the RT axis. The end mill was then brought into contact with the touch point and the touch point zeroed for that tool. Each new tool was zeroed on the touch point sub-datum which then meant it was now zeroed on my work datum. The system works best when you are using a DRO with sub-datum capability but would also work with a simple DRO or the dials, although the housekeeping would be somewhat tedious.

Bob
 
=FWIW, I got the full TTS system when I got my mill and would give up a lot of other tools before I would part with it. I also modified my old mill drill to use TTS. All it entailed in that case was grind the face of a 3/4" R8 collet for clearance. I have fifteen or twenty of their ER20 Adapters along with a full set of collets and multiples of the 1/8", 3/16", 1/4", 5/16", 3/8", and 1/2" collets which gives me the ability to pre-mount and zero all the tools that I will need for a job. Tormach has a n app note on setting a mill up to use their TTS system.

Yeah that would make life easier, I didn't realize the indexed tool holding systems were that popular on the manual mills.

Anything that can speed up tool changes definitely helps a lot. When I got a simple collet chuck for my bench mill it made a lot of difference.

Stuart
 
Not intended to offend in any way, but there are many inexpensive methods of determining position on a manual mill, if your goal is to make parts as fast as possible then by all means have at it. If on the other hand ones goal is to make reasonably nice parts as a hobby and your budget for tooling is limited then buying the best tools that you are willing to pay for will be more useful then a "Probe"

On your second point, yes it is entirely possible to probe a 3D solid with a DRO, however this would be extremely time consuming in practice, this is what a Coordinate Measuring Machine or CMM does by design.
Wreck-wreck
Question: if I was only dealing with a part where beside des the thickness of the stock I was dealing primarily with x,y sub datum, such as hole placement and diameter, and perhaps a section of the piece that is to be machined out. What is the difference between using a modern DRO that has the features to "map" it out, and a CMM?

Nothing, if your goal is making parts of your own design put the features where you want them or need them to be. if you are measuring existing parts in 3 Axes using a milling machine that can actually make parts simply as a measuring device then that is overkill, a CMM is simply a measuring device as it will not do anything else.
Therefore it "should" be less expensive then a milling machine of comparable travel and accuracy since it does not require a rotating power spindle or coolant containment nor enough axis power to push a tool through the material as all that it will do is carry the probe around.

My original comment about probes interfaced with DRO's was not about telling you what to do but to point out there are perfectly reliable and accurate methods of finding your zero point in 3 Axes without the expense of a probe, with these funds then spent on more accurate and longer lasting tooling, I also mentioned that if your goal is to change jobs as fast a possible then by all means spend whatever it takes.

You have also failed to mention if you want live probing or static probing, live probing is not applicable to manual machines however.

If your requirements are very high accuracy and repeatability then look into Renishaw products here. http://www.renishaw.com/en/machine-tool-probes-and-software--6073
 
WW,
Thanks for the reply. An electronic edge finder will cost me $35, and a touch probe that interfaces with my DRO $89, so cost isn't much of an issue.
 
Back
Top