Dumore Series 11 Model 8119 Tool Post Grinder Wheel Guard

danjp

H-M Supporter - Silver Member
Joined
Aug 13, 2023
Messages
9
I recently purchased a Dumore Series 11 tool post grinder for use with my South Bend 9" lathe. The grinder was a very good price and is in excellent shape. All the bearings are very quiet and the brushes look like the motor was not used much at all.

But, the grinder did not come with a wheel guard or the small chuck for internal grinding.
I downloaded the manual that was available in the downloads section and upon reviewing it there is no listing for a wheel guard which seems odd.

Can anyone with a Series 11 grinder confirm that this model did not come with a wheel guard or if it did, can you tell me what the part number is?

I do have an email into Dumore but have not heard back as of yet.

Thanks, Dan
 
Trying to find an original guard is going to be like looking for hens teeth. It will be less work to just make one. That is why we have other machines for. It is a good tool post grinder. Good luck.
 
I recently purchased a Dumore Series 11 tool post grinder for use with my South Bend 9" lathe. The grinder was a very good price and is in excellent shape. All the bearings are very quiet and the brushes look like the motor was not used much at all.

But, the grinder did not come with a wheel guard or the small chuck for internal grinding.
I downloaded the manual that was available in the downloads section and upon reviewing it there is no listing for a wheel guard which seems odd.

Can anyone with a Series 11 grinder confirm that this model did not come with a wheel guard or if it did, can you tell me what the part number is?

I do have an email into Dumore but have not heard back as of yet.

Thanks, Dan
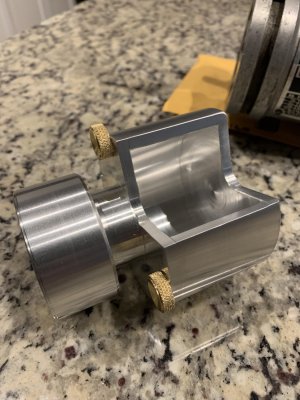
I found myself in a similar situation. I purchased a “TheMac” that did not have a cover. Mine had no cover because it was an ID grinder which by nature negates the need for a wheel guard. I adapted mine to an OD grinder. You might suffer some sticker shock if Dumore responds. Mine was $155+. I made one out of aluminum. 064C69C0-085A-4BB9-9CED-F2842D3A5E41.jpegI did look long and hard at wheel covers that are used on 4” angle grinders like those sold at Harbor Freight. It would seem that one of those covers could be modified with a little thought.
 
Thanks for all the suggestions.

I did contact Sopko and ask about a wheel guard. They said that the original Serial 11 Model 8119 did not come with one as it was pre OSHA requirement which explains why it was not listed on the part list. It was not added until their later Series 11 model 8386 and of course is no longer available.

So it looks like I will have to make one myself or just use it without one. The wheels are only 2" max for this grinder so not exactly the same safety issue as having a large wheel spinning at high speeds I would think.

Also, has anyone found another source for the screw on chuck?
The one for this grinder (487-0016) is still available from Dumore but the price is a lot at ~$80.
Just wondering if one for a Dremel can be made to fit. Has anyone done a DIY chuck for a Tool Post Grinder?
 
The Dumore arbor will work better than any Dremel. If it was me I would pay the 80 dollars or make the arbor. The Dumore was a good find.
 
No way I would try to use a Dremel chuck on a TPG. At $80 it's worth every penny. For most folks, breaking out the TPG means it's either something challenging to turn, or they want real precision, and a Dremel chuck doesn't really fit those scenarios ;)
 
Thanks everyone for your replies regarding the chuck. That is what I kinda thought but it was worth asking.

A little background on my project.

I am attempting to make a precision shaft out of 303 stainless. It needs to be non magnetic. This shaft is used as a capstan/motor shaft for an Ampex reel to reel Servo Motor to replace a worn one. This shaft supports 2 bearings with a 0.375 center diameter using a slip fit. At one end is a precision section that contacts the tape and pinch roller. The other end supports a fly wheel mounted about 1/3 of the way in with the pancake motor armature on the end. So not a straight shaft but one with specific sections of different diameters. Overall not really difficult to cut on the lathe but it's the precision needed that is challenging.

When mounted, the runout of the capstan section needs to be a small as possible to prevent wow and flutter and it's diameter needs to be within -0, +0.5 thou. The other end of the shaft also needs to have minimal runout so the fly wheel does not generate any vibrations when rotating. The original shaft has a total runout of less than .25 thou. at the capstan section when installed in the motor. This is why I was going to use the TP grinder to see if I can get close to that runout. This means that the bearing mounting locations relative to the capstan section needs to be dead on to get close to that installed runout. This has really been challenging so far. The shaft is about 6" long and only .312" at its smallest so a thin shaft making it doubly difficult. It also has a 0.25" section of 3/8-24 threads about 1/3 the way from the end that accepts a nut used to hold the bearing in place between spring washers. So it's basically a sandwich arraignment within the motor housing.

The first thing I found was that I really need to get a follower rest as I was getting a lot of bow and chatter/squeals during the turning.
I did manage to get it within a few thou of the original and thought I could take off the rest with the TP grinder. I did this by turning the shaft between centers using new ground carbide inserts for stainless and going very slowly with very light feeds. This minimized the squeel but did not elminate it. I was also hoping that the TP grinder would not chatter as I would only be taking very light passes. The grinding worked well on the ends with minimal issues but when I went to do the last bearing mount it chattered and that was the end of the shaft as it ended up over cutting the surface ruining the shaft.

So why I am stating all of this. I was thinking that the follower rest would solve the issue during turning but I am not sure that it will work during the grinding part. The grinding wheel would end up being around 3-4 inches away from the follower rest so I am not sure it would prevent the chatter.

So my question is, has anyone that used a TP grinder on a South Bend 9" lathe when grinding long thin shafts come up with a good way to support the shaft to prevent it from chattering?
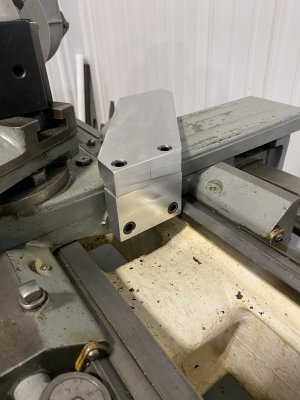
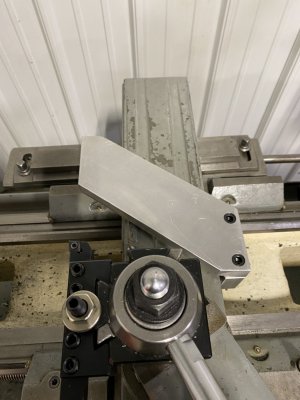
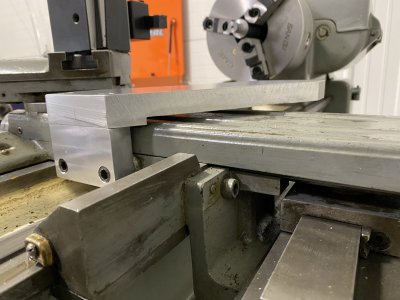
I'm far from an expert on the topic, but I am in the middle of making what I'm calling an offset follow rest for my Sheldon lathe for a similar reason. After doing daily searches on eBay I still haven't found an original follower for it, but even more important is that the shape/geometry of the original followers put them where they don't often line up nicely when using a modern QCTP. The QCTP puts the tool much closer to the chuck so the follower isn't terribly close to where the tool is putting pressure on the work. So, I'm making one that mounts to the original holes, but arches forward over the cross-slide. Reminds me, I need to finish it soon!

I don't know if you've seen it, but Joe Pie does a nice video on making a follower out of some kind of phenolic/Micarta material that worked really well. You might be able to adapt that concept. I suspect with the light cuts of a TPG it might work perfectly.

 
I was not aware of that video so thanks for sharing. He does have a lot of great videos as I have seen quite a few of his. It is an interesting idea.

To use something like this will mean I need to add mounting holes on the head stock side of the saddle since the ones on the lathe are on the tail stock side.

Since I use a QCTP I would need to do this even if I use a stock SB follow rest. Will need to think about how to get the follower over a few inches though to line up with the grinding wheel.

My Sheldon has the mounting holes on the tailstock side as well. I made a short vertical piece then an angled horizontal piece to be able to put the upright towards the headstock. I'm using fairly thick aluminum, so I think it will be okay...certainly seems dead solid when I try making it move. I stopped working on it because I ran out of the aluminum (started with just what I had on hand) but bought more so I need to get back to it. It'll have typical vertical and horizontal sections with bronze fingers eventually. I'm still debating exactly where I want the fingers to be located...I can put them on either side and I'm not sure if having it just forward or just aft of the tool makes the most sense. I had the tool in place for the one picture to get an idea how things would line up.

The plan is weld the sections together once completed assuming I like how it's working. I'll keep the bolts as well, but I figure running a nice TIG bead where the sections join should help with rigidity.

IMG_3684.JPGIMG_3685.JPGIMG_3686.JPG
 
Back
Top