Erich's Steam Plant Build

This copper looks good and annealed :) took closer 90 minutes, but they had a nice glow all on their own! Way easier than using my torch!
 

Attachments

  • PXL_20220402_000318550.jpg
    PXL_20220402_000318550.jpg
    68.2 KB · Views: 24
A bit more work.

First, I finally got the hand pump back together after paint: PXL_20220404_204416802.jpg

Next, after annealing the fire tubes, they needed cleaning up! So here that is, 1/2 way done!
PXL_20220405_214040848.jpg

The tank endcaps needed the od turned down a little:
PXL_20220405_220638396.jpg
And one of them needs a drain hole:
PXL_20220405_221726861.jpg

Finally, today, I cleaned up and drilled all the holes in the steam dome. Frankly, I did a pretty bad job getting them evenly spaced, I had to do this freehand, and though my layout lines ended up ok, the drill walked a bunch off my marks. Plus, I misinterpreted a scratch as a mark and didn't figure it out until too late :/

I'm hopeful that after solder and paint this won't look too obvious. Some day a Kieth Appleton type in the future will lambast me for it, but hopefully I'll be long dead by then :)
 

Attachments

  • PXL_20220405_231108467.jpg
    PXL_20220405_231108467.jpg
    145.7 KB · Views: 10
Another thing I tried to work on today: making the rivet tools! I got the first one in the mill and centered, then set the depth correctly with the knee and depth stop.

PXL_20220405_211255953.jpg

I set up to make the 7/64th radius divot. I carefully and lightly made the hole with the 7/64th ball nose end mill, and didn't end up breaking it!

I cleaned it off and something seemed wrong. If you carefully read the above paragraph you already know the problem :) the hole was too small; a 7/64th end mill cuts a 7/64th DIAMETER hole, not a 7/64th RADIUS:) looks like I have to wait a bit longer for a 7/32 endmill to ship.
 
Looks great, you are getting your moneys worth of experience out of this kit!
 
Looks great, you are getting your moneys worth of experience out of this kit!
Hah, that's the truth! This whole project was an education so far! The steam engine was probably my biggest "level up" so far, and this is challenging me further!

Today I finished 2 parts, the main sheet metal bodies of the boiler frame. The inner just requires cutting out a spot for the fire to get in :)
PXL_20220406_204149119.jpgPXL_20220406_205913264.jpg

The outer requires just making some mounting holes, which I didn't snap pictures of.

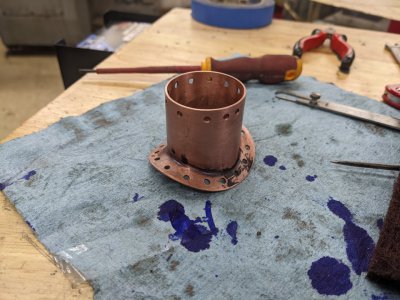
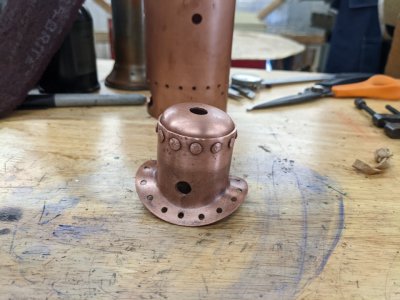
Next, I needed to work on the chimney casting. There are two parts to machine on this casting. First I did the bore for the chimney itself. I tried doing this on the mill, and using the boring head, but I couldn't get it to stay still during the cut. SOO I did a better thing and made a holding ring for the lathe out of some aluminum:

PXL_20220406_220811553.jpgPXL_20220406_221740670.jpg

After using a big drill bit, a boring bar, and a band saw, the jig was ready.

Then I clamped the casting inside of this in the 6 jaw, and bored until the copper chimney tube fit:PXL_20220406_223939655.jpg

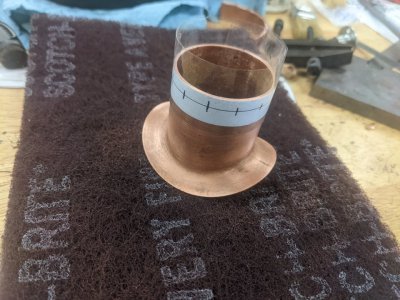
Next I had to machine the "bottom" of the casting to fit the OD of the tank. I've seen a few others do this with much more care and grace, but I tried the easy way. I used the now close fit chimney to line it up against my vise, and ballparked the boring head with a ruler. I then cut, tried it against the tank, then made it bigger over and over until it fit right.

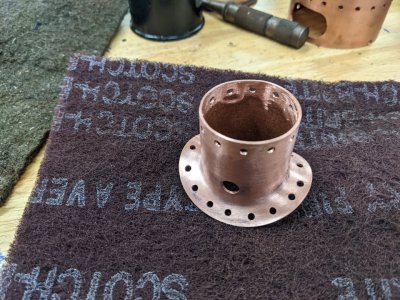
I had ONE oopsie (see the spot the boring head nicked on top of the casting in the first pic), but I suspect some time with a Dremel and files will clean that up:
PXL_20220406_225930611.jpg

I'm the end after about a dozen adjustments, perfect fit!
PXL_20220406_231702511.jpg

I still have to drill mounting holes, but I ran out of time today.
 
Gorgeous day out today in the PacNW so only did a little work. I drilled those two chimney mounting holes off camera and got the ball nose endmill in today, so I did the rivet tools.

PXL_20220407_211129995.jpgPXL_20220407_211739214.jpg

Each got the coax indicator treatment, then 2 got the ball nose endmill, and 1 got a 1/8" endmill. All got a generous chamfer.

After machining:
PXL_20220407_214925158.jpg

I hardened them to cherry red with a torch then water quenched.
PXL_20220407_220021930.jpg

Then came tempering. I had a hard time getting them to "stop" at straw, I went until they just looked like they had ANY color change, then put them aside. They seemed to soak to blue!

Not sure what to do with this, what would y'all do? A part of me wants to live with it, these are going to be for squishing copper, so I suspect hardness matters little, but I also don't want to shortcut too much? I think I could re-harden and try re tempering (perhaps in the heat treat oven?), If that ends up being worth it... PXL_20220407_221327664.jpg
 
I worked a bit more today, first step was to get the steam dome match drilled and rivetted:
PXL_20220408_215916250.jpg

BUT, I hate it. A bunch of the rivets only got 1/2 of the cap, the spacing looks awful, and the rivets themselves look kinda meh! I think I'm going to reorder the two pieces plus more rivets and try again.

I moved into the boiler body. The kit comes with a drill template, which I used and did all the fixtures required. This went quickly and neatly!


PXL_20220408_221956098.jpgPXL_20220408_230452863.jpgPXL_20220408_232444605.jpg

While I wait for the replacement dome parts, there are some castings I can now fit to this , so I'll probably do that.
 
Redid the steam dome today. The rivet tools that they have you make aren't particularly consistent, so I decided to use a ball peen hammer look instead. I used a template for the rivet holes this time, which were much more consistent.

I ended up also doing all the shaping/drilling on the boiler tube itself, but found that the template is actually the wrong size! I didn't think much at the time, but it being about 100 thou short threw off a bunch of the other stuff which is a little concerning. I spent some time on the castings and think I can get the holes at least in the tabs in the casting, except for 1 of them. So I'm trying to use jbweld to build it up.

I ended up getting the front casting almost done, but one of the tabs broke off thanks to me not being careful enough drilling near the edge :/ oh well, new parts ordered for it!
 

Attachments

  • PXL_20220414_214859680.jpg
    PXL_20220414_214859680.jpg
    152.3 KB · Views: 13
  • PXL_20220414_224026770.jpg
    PXL_20220414_224026770.jpg
    204.4 KB · Views: 13
  • PXL_20220414_232758603.jpg
    PXL_20220414_232758603.jpg
    116.8 KB · Views: 15
Not much work lately, I was going to start getting the boiler put together, but discovered that there is a problem with the plans that caused issues, so waiting on replacement parts (and for PM to fix the plans!).
 
Finally got the replacement parts in, so I was able to get more work done!

First step was to drill the main tube, now that I have the correct drill template.
PXL_20220429_210521696.jpg
Drill setup was easy, I just made sure it was reasonably centered in the vise and could just twist the copper to line up the center pinched holes.

PXL_20220429_210859893.jpg

I also spent a while cutting out the chimney hole, so grinding the shape right.
PXL_20220429_212015013.jpg
After that I spent a while filing all the castings that connect to the tube, and then lined them up in final setup!
PXL_20220429_225314838.jpgPXL_20220429_225320165.jpg

I marked and punched all the parts, drilled and tapped:
PXL_20220429_232142487.jpg

And reassembled! This will come apart a few more times, so this is just to have it mocked up.
PXL_20220429_233255066.jpg
 
Back
Top