- Joined
- Sep 5, 2020
- Messages
- 43
I have a craftsman 6" 101.07301 that i tore down cleaned up and rebuilt. I finally have it running. I also ground my first tool today (that you Mikey for your write-ups, it was much easier than I thought).
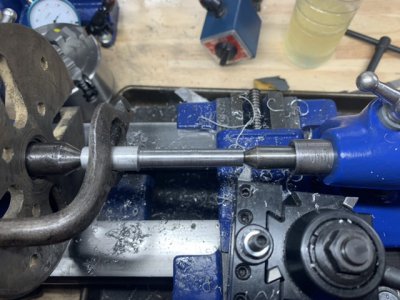
I was turning a 1/2" aluminum bar I have to see how it would go.
with a little adjustment to the lead angles, I got curly ribbons of AL, just like on many YT videos.
The surface was very rough, my guess is Im running too slow, have too much of a point and the lead screw is geared too fast. Bay hand I could get inconsistent surface finish. On the screw I got a 'fuzzy" surface. It polished up quite easily with some sandpaper.
I was turning in an independent 4 jaw chuck, that had centered out pretty well. Jaws 1-3 had 0.000 and jaws 2-4 i had 0.0015 difference.
I had the bar sticking out about 2" and cut from the end toward the headstock about 1" and took off .100 in 3 main passes. (through there were numerous skim cuts in the middle of that while I fussed with things).
So then I took my 1" micrometer and check the diameter. Near the headstock I was 0.400/0.4015 (slightly different on the horizontal vs the vertical). At the other end closer to the tailstock I was 0.405 - 0.4065 (same vertical vs horizontal variance).
0.005 over 1" seems like a lot, but it was not between centers.
I check the bed for level/twist with a machinists level. it was super close. At the tail stock end the backside was minutely higher than it was at the headstock. less than 5% of a bubble difference, just enough to say its a hair different.
1. can this just be deflection and I need to put things between centers?
2. I doubt it is twist.
3. how do I get the finish to clean up. ( attached a pic - I can take a better one, I was excited that it worked and sent a quick pic to my brother) I know this is a nebulous question that will get to how is the tool ground, speeds DOC ect. I found that as I turned the tool post clockwise and open the lead angle, it cut better and got cleaner, but not clean.