First Project on my Bridgeport

Charley Davidson

Active User
Registered
Joined
Nov 8, 2011
Messages
1,678
AKA the tool that made itself :lmao: I seen a tramming tool/fixture on HSM so I thought I'd try my hand at one. Benny was going through some of my treasures from the scrap yard and found an aluminum bar that in another life was an air manifold of some type and had 3 equally spaced holes in one face centered to the part in all directions and drilled and tapped on both ends for grub screws. All I had to do was buy one more dial indicator and open the holes to the proper size. The shaft that mounts it to the mill was basically a finished product also just had to change the bolt in the end of it. That shaft needs to be turned on my lathe to standard sizes as it is metric right now.

I'm gonna take it to where I used to work and use a V block and height gauge to set the indicators equally.
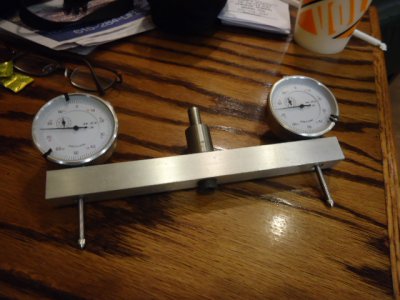
Tramming Tool.JPG
 
Nice Charley, And its better when you already have the stuff in the scrap bin.

Paul
 
Nice job CD! Ben meaning to make one of these myself, and I have even got 2 HF dial indicators stashed for it. As far as zeroing, I saw a writeup somebody did on making one of these. The method they used to true things was to chuck the shank in the lathe, and then true the bottom up so that it is dead perpendicular to the shank. To zero, you place it on top of a surface plate, and then zero the dials. I think this is the page I was looking at

http://bbs.homeshopmachinist.net/showthread.php?t=53203
 
Charley, great job on the tramming tool; sounded like an easy conversion. I like it!!! What is the distance between indicators?
Bob
 
Nice job. Can you enplane more about setting up the indicators? Looks like a good project to add to my short list.

Thanks for the post.

Jeff
 
Nice job CD! Ben meaning to make one of these myself, and I have even got 2 HF dial indicators stashed for it. As far as zeroing, I saw a writeup somebody did on making one of these. The method they used to true things was to chuck the shank in the lathe, and then true the bottom up so that it is dead perpendicular to the shank. To zero, you place it on top of a surface plate, and then zero the dials. I think this is the page I was looking at

http://bbs.homeshopmachinist.net/showthread.php?t=53203

You can mount it in your mill then zero one, mark the spot where you zero it & rotate the other one to the same spot and zero it, I believe this will work.

Thinking about an improvement to the design by mounting the indicators on bearings so they can face you at all times
 
Back
Top