Four Jaw Indicating Aide

Doug Gray

H-M Supporter - Commercial Member
Joined
Oct 28, 2020
Messages
528
Hey Guys

I just wanted to share an aide I made up, (threw together super quick), to help indicating in the four jaw chuck. a difficult situation comes up when trying to cross drill cylindrical parts in the four jew. (for our discussion suppose that a mill in not available ). 20210206_195443.jpg
with a cylindrical part in the four jaw, the jaws themselves are the only place to indicate.. the traditional method is to use an arm on a magnetic base, then the plunger on the indicator is pulled up out of harms way as the next jaw is rotated under the indicator. I'm allways fearful of whacking the indicator stem with a jay as it comes around.
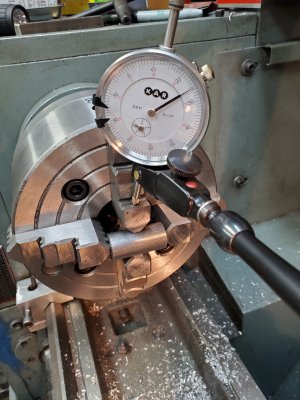
20210206_185734.jpg

The situation is a pain ... so i threw together an indicator holder that can be remove completley when rotating the chuck and adjusting the jaws
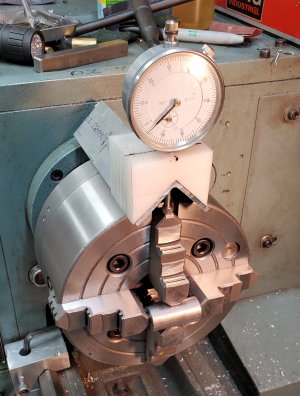
20210206_191200.jpg

the angle sits on the chuck and has a stop on the back side that rest up against the head-stock. when rotating to the next jaw the indicator and holder are simple lifted away no risk of wacking the plunger. I did a super fast throw together on the holder. the indicator is a nice tight friction fit in the UHMW. The UHMW is pop riveted to the angle. the repatability may not be aerospace rated but for my basement shop it works well. Just like the magnetic arm the "sweet" spot in the grind of the jaws must be found to get an accurate reading.
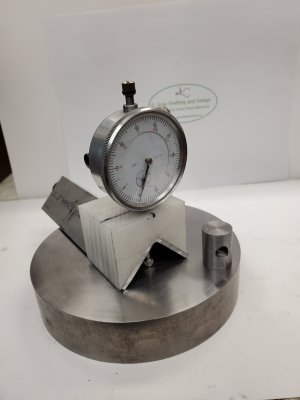
20210206_185828.jpg

Thanks for looking.
I made a quick video on this interesting problem and solution.
 
Clever thinking! Forgive my ignorance please but are the lengths of the jaws always going to be (on any given chuck) close enough to mic against the outside of the jaws?
 
That would be the first thing to check out for each individual chuck. Not something to assume up front.
 
The way I've been doing it is to locate where I want the hole & hit it with a center punch then put a dead center between that punch mark and a center in the tailstock. once you do all that you can indicate off the dead center to get your location. And without worrying about the indicator getting whacked by a jaw or any other feature for that matter.
Sorry, no pics, it's cold out there in the shop!
 
Clever thinking! Forgive my ignorance please but are the lengths of the jaws always going to be (on any given chuck) close enough to mic against the outside of the jaws?
Yes, regardless of how the indicator is held, in this situation the the jaws must be "mapped" and any discrepancies dealt with. Also maybe an offset is desired. On my very Asian chuck shown here the jaw grind was plus or minus 0.008"
 
The way I've been doing it is to locate where I want the hole & hit it with a center punch then put a dead center between that punch mark and a center in the tailstock. once you do all that you can indicate off the dead center to get your location. And without worrying about the indicator getting whacked by a jaw or any other feature for that matter.
Sorry, no pics, it's cold out there in the shop!
Hey Joeman
Thanks for replying I knowjust what you mean about with the double centre method. But in this case when the work is first positioned in the chuck there is no way to tell if the punch mark is aliened with the tail stock. The cylinder could be rotated say just 2 degrees then the dead centre can't be relied on.

Its a little nippy up here as well
 

Attachments

  • 1612707929292.png
    1612707929292.png
    328.5 KB · Views: 7
Hey Joeman
Thanks for replying I knowjust what you mean about with the double centre method. But in this case when the work is first positioned in the chuck there is no way to tell if the punch mark is aliened with the tail stock. The cylinder could be rotated say just 2 degrees then the dead centre can't be relied on.

Its a little nippy up here as well
That's true a little twist will really fowl things up! I try to lay straightedge & some parallels across the jaws to get as close as I can, but you're right a bit of twist & I've turned a nice piece into a scrap turd a few times. Lol

And I'd say your idea of a "Little Nippy" and mine differ considerably, it's just plain cold up there! And to think I was whining about -9 degrees on the Fahrenheit , thanks for putting some perspective in things for me!
 
What about sticking 4 brass pads between the jaws and the stock, so that they extend slightly beyond the face of the jaws and /or the stock? Then indicate the "OD" or "ID" of those 4 pads?

I recall seeing Abom79 show a similar approach with square stock to create an "ID" to mic vs the outside.

Yes, this may not really address the "have to pull the indicator arm back" but might at least give a smooth surface to indicate on that is true with the dimensions of the part (in case the jaws are not all identical).
Hey American

yes packing around the work would give the indicator tip a place to land. During initial "dialing in" the four jaws need to be left a little loose.....all a person needs really is six arms. I wonder if (crazy thought) a person could hot melt glue the pads to the jaws. Cross drilling, tapping, boring (tail stock work) are one thing but sometimes a facing operation is required as well this would mean facing thru the sacrificial pads.
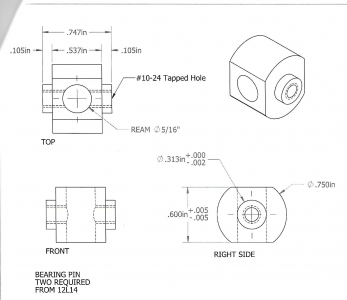
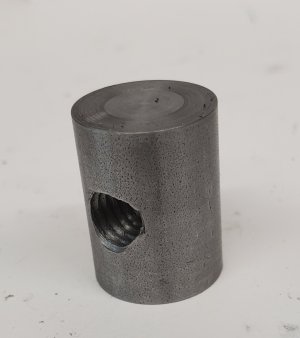
Here is the "bearing pin" from my 3" machinist clamp kit, a good example of what i'm talking about. In any case it's a good head scratcher:)

1612717874049.png
 
Back
Top