Funky Hole Location Problem

NoShopSkills

Active User
Registered
Joined
Oct 27, 2013
Messages
124
Hi Folks!

I have an interesting hole locating task ahead. A buddy damaged a strut on his 1929 design homebuilt experimental parasol aircraft.
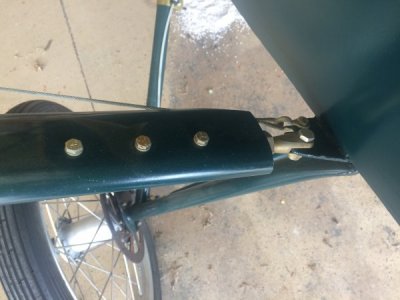
strut1.JPGStrut2.jpg
Originally it looks like the inch plus thick fittings were match drilled with the thin 4130 steel struts that sleeve over the top of the fittings. Although the replacement strut material' inside dimension isn't an exact match with the original nor the fittings, we don't want to have to completely re-machine the fittings. So we just plan a surface skim in the mill until the old fittings can be sleeved by the new, slightly narrower (.020?) strut material. We'll block and shim the wing into the same incidence and sweep location relative to the fuselage that it originally occupied, but how do we then locate and use the existing holes in the fittings and transfer those holes to the new strut tube ends? Keep in mind the aerodynamically oblong shape of the strut material. There is not really any way to reference much other than widest and narrowest points, so measuring and laying out center points is a guess at best, but may be our only option. Is there a better way?
 
Hi Folks!

I have an interesting hole locating task ahead. A buddy damaged a strut on his 1929 design homebuilt experimental parasol aircraft.
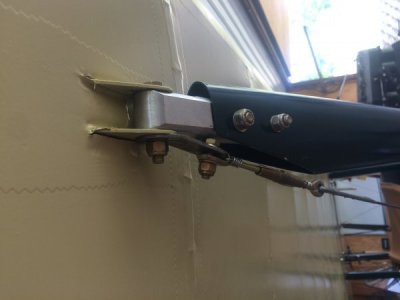
View attachment 129344View attachment 129345
Originally it looks like the inch plus thick fittings were match drilled with the thin 4130 steel struts that sleeve over the top of the fittings. Although the replacement strut material' inside dimension isn't an exact match with the original nor the fittings, we don't want to have to completely re-machine the fittings. So we just plan a surface skim in the mill until the old fittings can be sleeved by the new, slightly narrower (.020?) strut material. We'll block and shim the wing into the same incidence and sweep location relative to the fuselage that it originally occupied, but how do we then locate and use the existing holes in the fittings and transfer those holes to the new strut tube ends? Keep in mind the aerodynamically oblong shape of the strut material. There is not really any way to reference much other than widest and narrowest points, so measuring and laying out center points is a guess at best, but may be our only option. Is there a better way?

It shouldn't be too difficult. I would make careful measurements of the hole spacing on the original strut. If the original strut is damaged too badly, I would use the opposite strut for a pattern. Having determined the spacing as best I could, I would set the strut up in a milling vise and determine the center line from the separation between the vise jaws. It should be possible to get within ten or twenty thousandths. I would drill the holes undersized and use the fitting holes as a guide to ream the holes to final size. I would fit the first hole and bolt it up to prevent any movement of the strut while fitting the rest of the holes.
 
Thanks RJ, I thought about this some too and here's what I proposed to my aircraft damaging friend:


I thought this over a bit. This method will require a few trips back and forth from our houses, but it will give us the correct solution.

1) we’ll take the strut fittings off and put them in the mill. We’ll both shave them down so they fit the new internal strut material and record dimensions of the exact current hole locations relative to an edge or two using my mill’s digital read out capability.

2) back at your hangar we’ll install the new struts sleeving the old fittings, install them on the aircraft and do all of the wing setting, dihedral, sweep angle of incidence blocking etc… to make sure the wing is in the right location.

3) We’ll clamp each end of the new strut in a way that the strut captures the fitting but still allows us to reference the edges that we measured hole locations from when we did the machining and gives us room to drill.

4) We’ll remove the strut, and the fittings clamped sandwich style in the ends as one piece and head back to my house and the lonely milling machine.

5) we’ll clamp up and reestablish those datums. Referencing the notes we’d taken, we can manipulate the mill into duplicating the holes in the new strut material exactly where the unseen underlying holes are.

Sound plausible?
 
I would remake the upper fitting as it appears to have short ed on the outboard bolt. As those appear to be aluminum, you should be able to machine new ones faster than setting up to match drill. If you guys are set on match drilling, simply cut one side of the spar off to use as a drill plate.
 
You seem to be on the right track. You can make the holes undersized and check their locations before opening them up to final size.
 
Make sure you guys check that edge distance on the one fitting before you commit to drilling. Unless it's an optical illusion from being photographed, I'll bet it's not above the minimum of 1.5D from the hole center to the edge of the part.
 
Back
Top