G0709 gearbox maintenance

mcdanlj

Registered
Registered
Joined
Aug 24, 2018
Messages
321
I'm trying to put the clough42 ELS on my G0709, using a servo drive. The servo can run the leadscrew fine, and when I have tested it can move the carriage very fast.

However, the feed bar is much stiffer. Of course I've never noticed that when running the change gears, but when I hook up the servo, any gearbox setting that engages the feed bar causes the servo to overcurrent and stop.

Hand-turning the gearbox input, I can tell that the feed screw does not turn freely.

What is the procedure for removing the gearbox to clean it out?

It wasn't that hard to mostly disassemble the headstock when I replaced the main spindle bearings, but the drawings don't give me a good sense of how the gearbox goes together.

I guess ultimately I could instead remove the gearbox and replace it with a custom mount for the ELS, but that's not where I want to start. ☺

Thanks!
 
I used a custom ELS designed by wobblyhand and ran into a similar issue. Your machine, like mine, has two shafts, one for threading, one for feeding. These ELS projects were designed for machines with only a single shaft and use the half nuts for both feeding and threading. I discovered that there was quite a bit more resistance to the system going through the drive train vs the threading lead screw. Ultimately i ended up gearing down my stepper motor 2:1 to increase the torque which seems to have resolved the issue.

I have had the gearbox apart on my machine and the spur gears leave a lot to be desired and i'm running gear oil in there which also adds additional drag. The original gear train has a lot more torque than the 4 Nm stepper motor i'm using on my ELS.

I think the choices are likely -
  • Bigger stepper motor
  • Change the stepper gearing to increase torque (careful torque falls off at higher speeds)
  • Try to use only the half nut and leadscrew for all operations
 
I'm already using a 180W servo, not a stepper. And using only the leadscrew won't give me crossfeed, so that's a non-starter.

The resistance on the feed bar is inconsistent and very stiff, so I think there might be a bad seal.

That's why I'm asking for experience removing the gearbox to clean it. I do hope not to completely disassemble it because that would be a pain, but cleaning it seems like a reasonable next step before designing and building a replacement for the entire gearbox (also an option).

Yes, I could redesign to put a 4:1 (or something) reduction. The servo can run up to 3K RPM continuous, 4K RPM peak, so I could probably reasonably run it 10:1, but given the chips I found in the headstock I'd like to start by cleaning out the gearbox and checking the seals.

So, has anyone here who has a G0709 taken off the gearbox?
 
I have been through my Jet's gear box to repair a bent shaft. It's not identical but similar and it's not as intimating as it looks. You may want to peel the labels off of the knobs to access the setscrews for the ball detents, it makes assembly much easier. Drain it, put all the gear shifters in the center position and remove the knobs. Remove the front label and unbolt the cover, slowly pull the cover off ( pay attention to the shift forks). Once I saw the work needed, I did remove the box from the lathe. You don't need to pull it for a cleaning.

https://www.manualslib.com/manual/62897/Grizzly-G0709.html?page=89#manual
 
Super helpful! I had been assuming leaving the front on and pulling the whole box off, not thinking about pulling the front off and leaving the box connected to the headstock. I was worried that the shift forks might be hard to get back into position, among other concerns.

I might still end up deciding to pull the box and measure the locations of the holes, just in case I decide to replace the gearbox itself with a servo drive unit instead of the servo driving through the gearbox, but I can hold that decision until I am confident I understand exactly how it goes together.

Many thanks!
 
You don't even need to remove the feed rod/screw to pull the cover! Your extra friction could be a simple chip or 1 of a dozen bearings. Mine POS still had casting sand in there!
 
@mcdanlj - i have a Weiss lathe that is similar if not a clone of a PM 1127 which also has power cross feed in addition to the power feed. Not wanting to lose that functionality i chose to gear down the motor powering the gearbox. Prior to converting mine to an ELS i crashed the lathe and bent the shaft inside - so i've had the front cover off. I did find some machining/assembly leftovers in there so it's a good idea to clean it out.

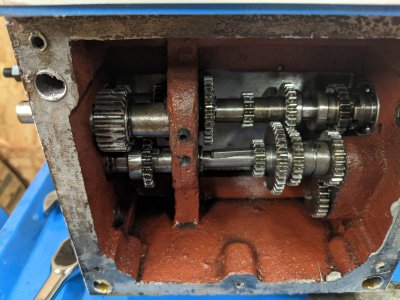
Your machine is certainly more complicated in there being a quick change gearbox but here's a pic with the front cover off. Lining up the shifting forks took a few minutes but it wasn't too bad.

PXL_20211205_143351030(1).jpg
 
Thanks! Yeah, a few more gears in this one!

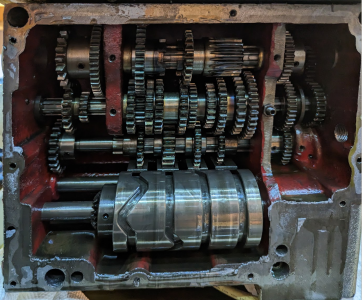
Pouring oil through clearly wasn't a meaningful way to clean this out; it was filthy.

In case it's helpful to some future G0709 owner, this picture was taken right after removing the front plate with all three upper knobs in the middle (straight up and down) position and the 1-8 cam knob in position 1.

1684976230930.png


That sludge at the bottom was original equipment, I think.

I slowly experimented with the gears to understand more about their relationship. I don't really want to move the cam at the bottom because I would like to not lose that index, but sliding the gears around that the forks move helped me isolate different shafts, and yeah, only the feed screw axis (which is also the1-8 gear axis on which are, I think, three independent splined shafts in series) is actually below full oil level, and it is by far the stiffest. Everything else turns pretty freely.

I clearly want to add some magnets in the sump(s) to collect chips; probably one by the drain, one in each half of the sump under the cams, and one in the sump above the run switch on the right.

Based on what I see here, my current plan is to move from direct drive to belt or gear drive (possibly mounting the motor on the banjo). I'll clean out that sump until it is dry, put it all together with silicone gasket sealant (they used plenty putting it together in the first place), and keep it in place.

I could imagine someday removing that entirely and replacing it with a new box or bracket that just holds a servo and drives both the lead screw and feed rod, but that's a lot of work for not a lot of obvious return.

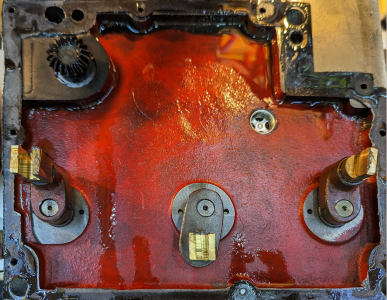
Here's the inside of the front cover, shown with the three three-position knobs. The 1-8 selector drives the bevel gear. The three other gears drive the shifting forks. It was not necessary to remove the knobs at all.

1684977946141.png
 
Last edited:
I couldn't get the front plate back on with all knobs in the middle settings. I ended up setting the knobs to CSW and moving their respective gears to those limits, and it was a lot easier.

I cleaned off the bare metal faces with acetone, then superglued a washer sticking out from each corner, just enough to act as a temporary spacer. I spread a thick bead of Permatex 82180 Ultra Black Maximum Oil Resistance RTV Silicone Gasket Maker on the box. I made a parchment paper "gasket" that fit the cover so that the Permatex can stay semi-permanently on the box and still allow me to remove the cover, and then installed the cover and screwed it down to the washers.

Now I'm letting it cure for a day or so.

My plan is to remove the cover trim the overage on the permatex, add some chip-collecting magnets to the bottom, remove the parchment paper from the cover, and screw it on, hoping that the ~1mm of gasket being pressed makes a good seal.

I'll post pictures when done, either as a "this worked great" or "don't do what I did"

:D
 
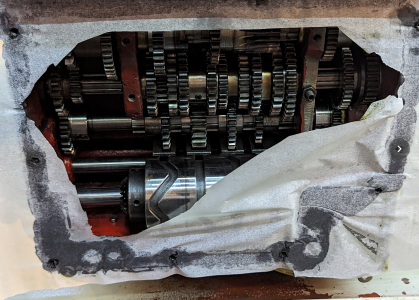
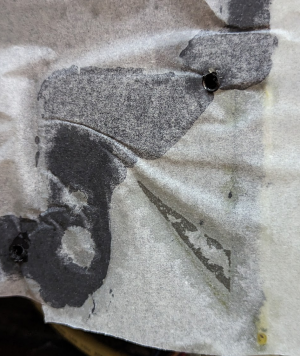
The parchment paper wrinkled, so it didn't create a flat surface, and while the Permatex 82180 stuck quite firmly to the acetone-cleaned cast iron, it stuck even more firmly to the parchment paper.

1687832703215.png


1687832674819.png

This was a failure, back to square one.

Except that I think that the washers as spacers worked pretty well, so I'll keep that part.

I think that next time, I'll use a very light coat of oil as a release agent on one side.
 
Last edited:
Back
Top