Have many people done this? Squaring a vise quick and easy

Inferno

Registered
Registered
Joined
Feb 24, 2019
Messages
925
I have a small lathe/mill combo and one of the things I hate most is switching from the lathe cutting head to the vise for milling.
Getting the vise straight is always a chore. I got it so I could do it in 5 minutes or so but that wasn't good enough.
Originally I thought of adding location points to the vise but that was going to be more work than it was worth.
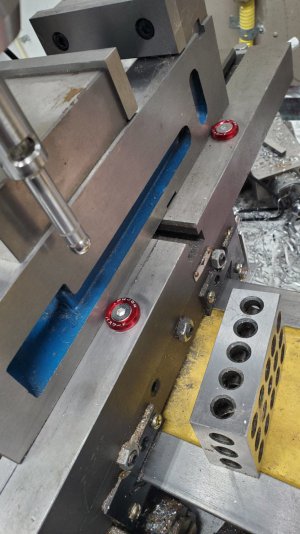
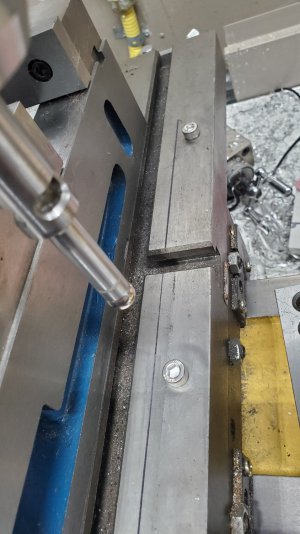
What I did was to just use the Y-axis slide to locate a straight line. Using it to drill two holes spaced around 6 inches apart. Since I was using the actual path of the table, I know they are perfectly square.
Then I tapped the holes with a M6x.75 tap and threaded a matched pair of SS cap screws. If I ever put on my big vise, I can just take them out and the table has nothing impairing the surface plane.
Wen I put on the normal vise, I just slide it up to the two cap screws and it's set.
I checked with the edge finder and it's within 0.02mm which is less than 0.001". The repeatability at that tolerance is about 80%. The other 20% came within 0.0015 which is far more precise than anything I need.

Wondering if anyone else has done this trick/shortcut.

Next thing is to drill the vise to bolt down from the top as opposed to clamping down from the sides.
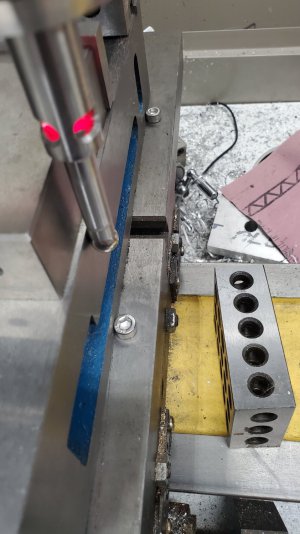
1.jpg2.jpg
 
Can't argue with the repeatability that you are getting. I have seen several types of "Keying" for vises and it seems to work for many. I personally don't mind spending 3-5 minutes to tram the vise. My personality would be that if I had a "Keying" system I would still want to check the tram "Just to be sure" and then that would defeat any time I saved. Of course I am retired and any work on the Mill is just for fun, so my time is pretty cheap.
 
Can't argue with the repeatability that you are getting. I have seen several types of "Keying" for vises and it seems to work for many. I personally don't mind spending 3-5 minutes to tram the vise. My personality would be that if I had a "Keying" system I would still want to check the tram "Just to be sure" and then that would defeat any time I saved. Of course I am retired and any work on the Mill is just for fun, so my time is pretty cheap.
I'll check it whenever the tolerance is necessary. It's hardly ever that necessary.
 
Machine screw heads are not vey round or concentric. You may want to machine them in the lathe. Great idea. Most of us do not have a testosterone level that would permit us to drill holes in a mill table!
 
Machine screw heads are not vey round or concentric. You may want to machine them in the lathe. Great idea. Most of us do not have a testosterone level that would permit us to drill holes in a mill table!
That's why I matched them but now I'm going a little different, but same concept. It centers the vise more on the mill table. They came out with the same tolerances (maybe a shade tighter) so no big deal.

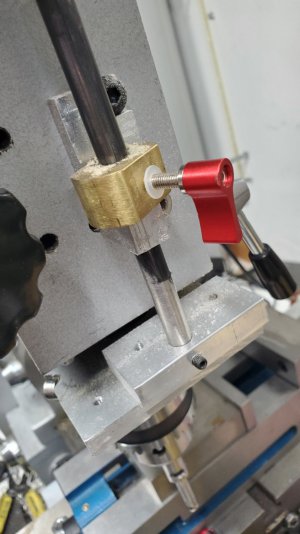
I blinged it up a little to match the depth stop I have for drilling.

The idea is I will hardly ever have to remove these once I make sure the mill sits true. The only time I should have to remove them is if I put on the big vise. They're out of the way for everything else I have.

3.jpg

4.jpg
 
I use a machinist's square in the first step to line up my vise. On my mill I've found that the front edge of the table is almost exactly parallel to the X axis path (but YMMV). I just line up the left (or right) edge of the vise against the square and tighten down the vise with the vise hold downs. That usually gets me within a few thou right away. Sometimes I don't have to do anything more. I use a .0005 DTI to refine the tram, and that usually just takes one or two passes. It's easier if you slightly loosen one of the hold downs and start from the opposite side, on the theory that the vise will rotate around that. Start there, zero the DTI and then move across the fixed jaw. The closer you can get to the center of rotation, the easier it is to tram the vise because the origin moves less. Worst-case is to start from the other side. That would be pretty much an exercise in frustration.

The main thing about taking this approach is to make sure that your square and side of the vise are swarf-free so you have a real right angle situation.
 
Could you drill into the edge of the slide and fit stops that protrude above to set the vice against. This would give two points that project this datum edge above the clamping face. They could be small bars that pivot out of the way when not in use.

If you don't want to drill into your machine, fit a tee nut on its side at the tee slot intersection. Have the tapped hole horizontal and aligned with the shortest tee slot. Use the tapped hole to clamp a 6" long datum plate against the reference edge.
 
Last edited:
Machine screw heads are not vey round or concentric. You may want to machine them in the lathe. Great idea.
Cap screw are notoriously not concentric to any degree of precision and screw threads are not a good reference datum for precision alignment. Since the screws are semi-permanently installed, a small washer with slightly eccentric center hole could be placed under one screw head and indicated with a dial test indicator. The other screw would have a similar washer but with a concentric center hole. Make the holes for a close fit for the screw threads to prevent any wobble when tightening. If the eccentricity of the hole in the first washer is on the order of a few thousandths, it will provide a very fine adjustment for alignment. It should be possible to tram the vise to a few tenths.

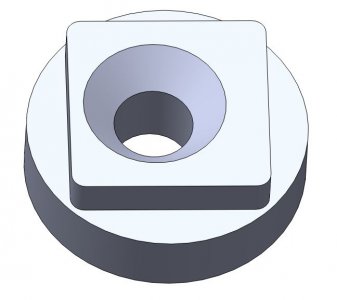
To make the washer, I would turn the outside diameter and the put a shim under one jaw to drill the second hole. For a 1" diameter washer, a .0075 shim under one jaw would provide .010" of adjustment. If I were really getting fancy, I would use a flat head screw and countersink the holes. This will provide better alignment than the threads. I would also machine flats for a wrench on the top for a wrench to make the adjustment. Here is a concept model. The eccentricity is exaggerated for effect.
Eccentric Washer.JPG
 
I find that squaring up a vise is a quick process, not needing any permanent fixturing. I use Kwik Switch tooling on the mill with a dial indicator mounted on a Noga arm in a Kwik Switch plug in. in just a few seconds I can pop in the indicator, position the arm and tap the vise while I'm slow power feeding the table X axis. Really in a few taps to stop the needle motion, it can be dialed in to less than 0.001 across the 6" width. I would no doubt want to run an indicator across the vise even if I had keys or stops, in any event.
 
My machinist's vise came with removable locating lugs for the bottom of the vise. I use them for quick and dirty setups where I don't need precision alignment. Mounting the vise takes less than a minute. For precise work, I sweep the vise jaws with an indicator.

Perhaps I'm just lazy, but having a quick on/off setup makes it less likely that I will "make do" with a less than ideal part fixture. The lugs also ensure that I'm within a thou or so of precise alignment which make the precision alignment much faster. The lugs are narrower than the tee slots and I use the front edge of the slot as my datum. I press the vise lugs into close contact with that edge by using a block of wood between the rear of the vise and the column to prevent it walking when I tighten the mounting bolts.
 
Back
Top