How Do I Adjust My Centering Microscope?

As a related aside, I have a Skoal Centering Scope but cannot find the calibration instructions. There are several brands that look identical, but none publish the instructions. I finally found a fuzzy Google image for a HECO scope calibration sheet. After enlarging it and reading around the fuzz, I was able to go through calibration steps that worked. This is what I came up with:

1. Mark out your work piece with scribed lines where you want a hole or whatever you are trying to locate. You will need to make two lines crossing at 90°. One parallel to the X axis and one parallel to the Y axis

2. Chuck the scope in the vertical mill using either a drill chuck or collet (preferred).

3. Focus on the work surface. About 1" above the surface.

4. Turn the eyepiece to the right, parallel to the Y axis.

5. Move the table's X axis until the crosshair is cantered on the scribed line.

6. Turn the eyepiece 180° to the left and see if the crosshair still centers on the scribed line.

7. If it is, it's calibrated.

8. If it is not, turn the knurled calibration knob to move the crosshair half way toward the scribed line.

9. Move the table's X axis until the crosshair is over the scribed line.

10. Repeat swinging the scope left and right and adjusting until the crosshair is on the scribed line.

11. Now the scope is calibrated.

12. Turn the scope so the eyepiece is facing forward and move the table's Y axis to line the crosshair up with the other scribed line.

13. Zero the X and Y hand wheel dials or DRO
 
So I decided to check how accurate the scope is. My mill's DRO is accurate to +/- 0.0001 Rather than use X-Y scribed lines, I used a 000 center drill. Any run out leaves an obvious spindle center spot. The calibration procedure only adjusts the final Y axis position. And, it was easy to center the that crosshair over the spot's center. But...after rotating the scope to the final position, the fixed X crosshair was 0.0058" to the left of the spindle center. I then tried adjusting the scope in a ER32 collet (TIR 0.00025). Dead on visual center. I went back and checked my three drill chucks for TIR:
3/4" drill chuck #1 (the one I used first): 0.0055"
3/4" drill chuck #2: 0.0025"
1/2"" drill chuck #3: 0.0015"
In conclusion: Don't use drill chucks!
 
As a related aside, I have a Skoal Centering Scope but cannot find the calibration instructions. There are several brands that look identical, but none publish the instructions. I finally found a fuzzy Google image for a HECO scope calibration sheet. After enlarging it and reading around the fuzz, I was able to go through calibration steps that worked. This is what I came up with:

1. Mark out your work piece with scribed lines where you want a hole or whatever you are trying to locate. You will need to make two lines crossing at 90°. One parallel to the X axis and one parallel to the Y axis

2. Chuck the scope in the vertical mill using either a drill chuck or collet (preferred).

3. Focus on the work surface. About 1" above the surface.

4. Turn the eyepiece to the right, parallel to the Y axis.

5. Move the table's X axis until the crosshair is cantered on the scribed line.

6. Turn the eyepiece 180° to the left and see if the crosshair still centers on the scribed line.

7. If it is, it's calibrated.

8. If it is not, turn the knurled calibration knob to move the crosshair half way toward the scribed line.

9. Move the table's X axis until the crosshair is over the scribed line.

10. Repeat swinging the scope left and right and adjusting until the crosshair is on the scribed line.

11. Now the scope is calibrated.

12. Turn the scope so the eyepiece is facing forward and move the table's Y axis to line the crosshair up with the other scribed line.

13. Zero the X and Y hand wheel dials or DRO
Old thread, but thanks for the info: I just bought a like new Shoal on eBay and never would have guessed what I assumed to be a focus adjustment was to adjust the cross-hairs!
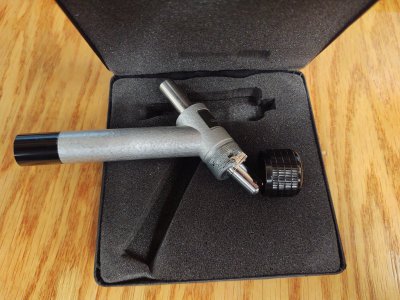
 
Old thread, but thanks for the info: I just bought a like new Shoal on eBay and never would have guessed what I assumed to be a focus adjustment was to adjust the cross-hairs!

Does it look like this one?

Skoal.jpg

I know exactly what's inside of them...


I also know that Mach3 with a smooth stepper board has a bug, that if you accidentally let go of the shift key before the down arrow key, it never stops going down. Even with no hands on the keyboard. Once at that point, it smashes the Z axis all the way down.

That was the first day I hated Mach3, and I've learned to hate it even more ever since.
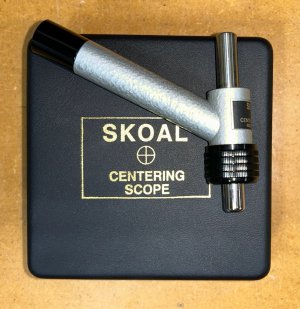
 
Does it look like this one?

View attachment 440490

I know exactly what's inside of them...


I also know that Mach3 with a smooth stepper board has a bug, that if you accidentally let go of the shift key before the down arrow key, it never stops going down. Even with no hands on the keyboard. Once at that point, it smashes the Z axis all the way down.

That was the first day I hated Mach3, and I've learned to hate it even more ever since.

Exactly like that one, although I haven't taken the "calibration knob" cover off:

Scoal Centering Scope.jpeg

What does the inside look like?
 
What does the inside look like?
Look at the posted image. There's not much more in there that what you see.

The objective lens pivots on two pointed screws, a spring pushes it down, and the adjustment nut pushes up against the spring on the little protruding ball. There's a mirror or prism to make the 45 degree corner.

I keep threatening to put this one back together with more adjustment. Bought a replacement the week this one was smashed. That one gets used about once a decade. (Super handy when you need it, otherwise is just collects dust!)

I also keep threatening to put a camera on these. That never seems to happen either! lol.
 
Back
Top