How does on press in small pins straight?

I have drilled clearance or slip fit starter holes for press fitting small pins. I drill them a few mm deep which is enough to ensure the pin starting straight. For a small pin like you are using, I would make a tool with a socket to retain the pin, leaving maybe four mm exposed. Then I would center the pin on the hole and press in with the tool as far as I could, then remove the tool and press in to the required depth. The tool will keep the pin straight as you press until it is seated deep enough to remain true.

For small holes, my go to drills are carbide p.c. drills. They only have around 3/8" working length but is enough to start a straight hole. Then I will follow with a HSS drill to required depth.
Good idea on the carbide PCB drills, as well as the little guides. Working with this small stuff is a teaching moment. The errors allowed shrink with the size of the part, so what works at 10x the size just doesn't cut it at these small sizes. I'll try making some drill guides. That will fun.
 
one thing to consider, you can take an X acto knife and put a slight score inside the hole.. yes it will raise a burr, but it will easily go to the bottom of the hole, but it will allow the air to escape. And it will allow loctite to wick in.

And @RJSakowski thanks for re-enforcing my idea from an earlier post.. great minds think alike :)
 
one thing to consider, you can take an X acto knife and put a slight score inside the hole..
That's a skinny blade! I'd have to grind it that small, and it wouldn't be all that strong if it was 1.5mm wide. The hole is 2mm in diameter and 8mm deep! Think it will be easier to grind a slight flat on the dowel against a stone. Your idea will work great for a big hole, pretty hard to do on such a tiny one. But maybe if it is just a little wider than the hole and pressed in? (Like 2.1mm wide? This is getting into watch making skills, which is far from my experience. Or I could grind some 3mm HSS stock so the corners were 2.1mm across? Then round off three of the corners and make a vee shaped keyway?
 
Hmm, usually I try for about 0.0005-0.001 interference. What if I get some 1/16" pins (0.0625") and find a 1.55mm drill (0.0610")? That's 0.0015" interference.

Even better might be a 1.60mm pin (0.0630") and a 1/16" hole (0.0625"). Aliexpress has the 1.6mm x 8mm pins, but who knows what their tolerance is... They could be here as soon as Halloween. The smaller pins ("chrome steel") would maybe give me a little relaxation on the hexagonal location. Would cost me $9.08 for 150 of them including shipping. Might be worth a chance if I can't get the current pins to work.
 
That's a skinny blade! I'd have to grind it that small, and it wouldn't be all that strong if it was 1.5mm wide. The hole is 2mm in diameter and 8mm deep! Think it will be easier to grind a slight flat on the dowel against a stone. Your idea will work great for a big hole, pretty hard to do on such a tiny one. But maybe if it is just a little wider than the hole and pressed in? (Like 2.1mm wide? This is getting into watch making skills, which is far from my experience. Or I could grind some 3mm HSS stock so the corners were 2.1mm across? Then round off three of the corners and make a vee shaped keyway?
so think take a pin and bend the point.. you only need a slight score, nothing much... remember it's small, there's not a lot of volume.
 
So I got it done, although nothing was quite to plan. The 1.95mm drill in my chuck drilled oversize to a loose fit on the pin. I cut of 10mm of 1" stock. Faced it off then put it in the mill and drilled the hole pattern all the way through pecking. Thought I'd at least check the pin circle was right. Looked ok. Then I was going to press the pins, rather two of them, at the bolt circle diameter. But they slid through and fell on the floor. Good thing I have another 80 left!

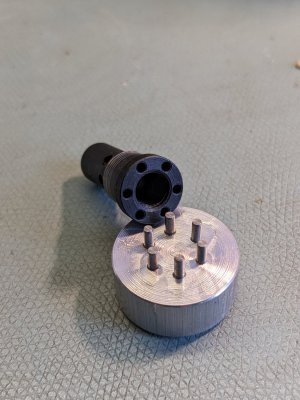
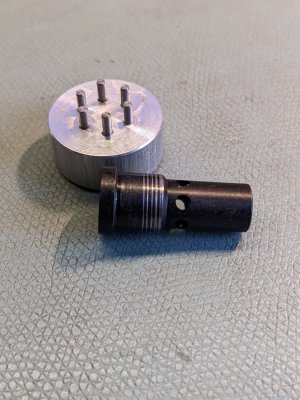
Then I thought, screw this, just glue them in place. I stacked two dowels so that about 4mm stuck out. And I superglued them in place. After drying and cleaning up the excess, I did a fit check and the pins fit the nut. Then I decided this was a throw away piece, so I would go ahead and do the rest of the pins. Then another fit check, hah! I can get all the pins in the holes of the barrel nut! Then the wheels turned and I thought, hmm, could I turn this? Since I didn't have any other way to grasp the 1" round, I grabbed a very small pipe wrench. Well, it wasn't elegant, but I was able to twist off the loctited barrel nut off the airgun. No damage to the nut or to the shroud.
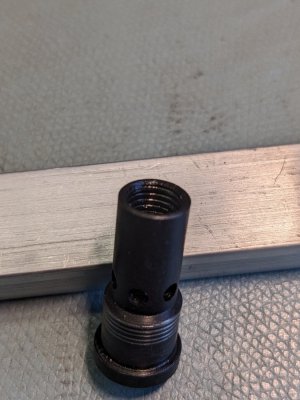
PXL_20231011_201108816.jpgPXL_20231011_201151980.jpgPXL_20231011_201229053.jpg
The inside of the nut is threaded to the barrel. It tensions the barrel, because the shroud is between the barrel nut and receiver. I need to know the thread pitch so I can make my own adapter. So I will measure it. Overall length of this barrel nut for scale is 30mm.

So not pretty, but this job is done. Now onto the barrel adapter, which is a different adventure.
 
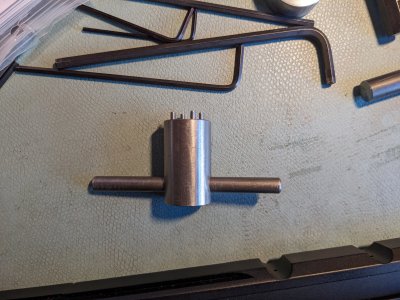
After about half a dozen uses of the wrench, the super glue failed and a pin fell out. I did get a quality 1.95mm drill bit and, lo and behold, the hole is now smaller than the pin. I redesigned the wrench and it's now made from 3/4" 303 stainless rod. I plan to drill through the cylindrical side for the vent holes. This should make the cross drill hole about 4mm deep. Like an anxious kid, I removed the piece from the vise too soon, so I'll have to reindicate it.

This particular airgun uses quite a few pin spanner nuts I had to make a 4 pin spanner with a 12mm diameter to pull the valve. I expect the pins will fall out due to glue failure some time. The original drill bit drilled oversized. Eventually, I'll get good at making these wrenches...
PXL_20231016_210233615.jpg
 
After about half a dozen uses of the wrench, the super glue failed and a pin fell out. I did get a quality 1.95mm drill bit and, lo and behold, the hole is now smaller than the pin. I redesigned the wrench and it's now made from 3/4" 303 stainless rod. I plan to drill through the cylindrical side for the vent holes. This should make the cross drill hole about 4mm deep. Like an anxious kid, I removed the piece from the vise too soon, so I'll have to reindicate it.

This particular airgun uses quite a few pin spanner nuts I had to make a 4 pin spanner with a 12mm diameter to pull the valve. I expect the pins will fall out due to glue failure some time. The original drill bit drilled oversized. Eventually, I'll get good at making these wrenches...
View attachment 462884
I would not have used superglue... it's too brittle. I would have used loctite retaining compound.
Through holes on that might be difficult. that's a long hole and stainless may not be the best choice. A free machining metal might be better.
 
I would not have used superglue... it's too brittle. I would have used loctite retaining compound.
Through holes on that might be difficult. that's a long hole and stainless may not be the best choice. A free machining metal might be better.
Don't have any loctite retaining compound, so I used some super glue. I'd rather have an interference fit. I was thinking of drilling through the sides to vent the dowel pin holes. Could use a hex collet block to rotate the piece, with the cylindrical axis horizontal. Still, it's kind of tricky, at least for me. Rather, it is a lot of work for a dumb spanner wrench. But it bugs me, so I will figure out a way that is compatible with my skill set.

I just cut off a piece of 12L14 instead, no need to make this any harder than it needs to be!

That "303" I was using is a little suspect, it doesn't machine like 303 that I have had in the past. 303 is nice to machine. It doesn't machine like 304 either, not sure what it is really. The chips are different than what I remember. Oh well, will use the 12L14 now.
 
Back
Top