How to mount a gear on a shaft - minimal wobble and maximum concentric

dansawyer

Registered
Registered
Joined
Jun 13, 2018
Messages
442
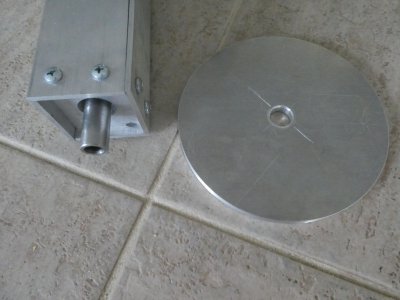
The project is to mount the disc square on the shaft with the hole in the center. The shaft is mounted via bearings to the box on the left. It will carry a camera to take astrophotography.
The plan is to turn a collar on a lathe. the collar will machined square on one end, the disc will be mounted square to the collar. The collar will be bored to slip fit to the shaft and set screws to a fix the collar to the shaft.

How is the hole in the disc best bored as close to the center as possible? The objective is one thousands or less.
How is the collar best machined to have a square end to mount the disc square to the bore?
How is the disc mounted on the collar to be center, concentric to the shaft?

I have a SB 9 twith a 4 jar chuck and an RF 30 mill / drill. Both are in good condtion.
I have tried similar tasks in the past and the results only barely passable. I think I have removed and remounted the parts too many times.
Is there an order of machining that would minimize remounts?
 

Attachments

  • P1020521.JPG
    P1020521.JPG
    7.4 MB · Views: 34
I'm sure there are several ways to do this but off the top of my head, this is what I would do:
  • Make sure the lathe is level and then ensure the tailstock is aligned with the spindle. Leveling is not so much to avoid a taper but to allow you to accurately align the tailstock.
  • Make sure the drill chuck arbor fits clean in the tailstock ram so it drills straight.
  • I would turn the collar first. Indicate it to zero in the 4JC and then face it clean. Then spot, drill and then bore the hole to the exact diameter of the shaft. You cannot slip fit the collar and attach it with set screws and expect the collar not to run out. It has to have some room to slip on and the set screw will push it off center. The only way to get it to not run out (other than a press fit) is to bore it to the same diameter as the shaft, then split the collar radially and install a screw to tighten the slot, thereby locking the collar to the shaft without any run out.
  • Do the same with the plate. Zero it accurately in the 4JC and get it square. On a thin plate, use a parallel behind the work and between the jaws to square the part in the chuck and lightly lock the jaws down, then indicate the part to zero run out. Be sure to remove the parallel before you turn the lathe on. Face the part accurately, then drill and bore the hole to the shaft OD + maybe a few tenths to allow a slip fit. Then remove the plate, flip it and face the other side and chamfer/finish the edges.
  • Drill whatever hole pattern you need to attach the plate to the collar, lock the collar on and slip the plate on the shaft. Then transfer the hole locations, remove the plate and collar, drill and tap the holes in the collar, countersink the holes in the plate and screw the whole thing together.
This should get you well inside your 0.001" TIR.
 
Machine tapers and secure with an axial nut or bolt. Think morse taper. They will go together on a common axis with no slop or wobble. Only thing that is hard to control is precise axial location. But in this instance I don't think that is a concern.
 
Thank you. I have an additional question:
I have the option of creating a disc mounting surface on the collar and mounting the disc fully on the collar. That would mean the collar was machined to have both mounting points for the disc, the concentric disc mounting surface and the squaring surface. This would mean the order of final parts would be shaft to collar to disc. This creates more options for the collar, i.e. longer. However is adds a additional machining accuracy dependency. The disc mounting surface must be both parallel to the shaft and concentric with it.

Or I can create a center bore in the disc matched to the shaft and mount the collar to the shaft. This is the original description.

My thought is if I bored the center hole in the collar and then mounted it in an arbor I could machine both the concentric mounting surface and the squaring disc surface in one mounting / machining operation. Does this compensate for the adding of the additional machining operations?

I will double check the lathe alignment.

Dan
 
If totally free to set order of operations, I would machine the o.d. of the collar and face it. I would fasten a disk blank to the collar and mount the assembly in the 4 jaw ( if outside concentricity of the collar isn't required, then a three jaw chuck could be used). I would then face both surfaces of the disk and turn to final diameter. Finally, I would drill an undersized hole through both the disk and collar and bore to final diameter. Since all these operations are carried out in a single setup, everything should be square and concentric.. Note that if screws are used to fasten the collar and disk, it would be wise to design it so it can only be assembled in one position; use dowel pin locating feature or an asymmetric hole pattern. I would also opt for flat head screws or shoulder bolts to maintain accurate positioning.

I wouldn't worry too much about set screws creating runout unless you are looking at TIR of a few tenths. End mill holders use a slip fit and set screws without creating significant runout.
 
Does it have to be a separate collar and disc? If you machine it all out of one piece then you do not have to worry about stack-up of tolerances. As mentioned above, a slip fit and a setscrew from the side will guarantee that it is off center by half of the clearance, when mounted on the shaft.

Even better yet is if you are also making the shaft, and it is feasabe with the rest of the unit ,make the whole shaft and disc all one piece and all machined in one setup. This will be the most accurate possible setup.

If it does have to be 2 pieces, then do as RJ said above.

I checked my one endmill holder and found that the hole is bored off center. But when an endmill is tightened in with the setscrew it is dead center, I just assumed that the offcenter was intentional to compensate for the slop in the slip fit.
 
When I absolutely need to have a disc, bushing, gear blank, ect run true to a shaft I make an arbor, attach the part in whatever manner the project calls for, mount it in a 4 jaw or collet, and then machine the part to final dimension.
 
That is where I a landing as well Unfortunately I machined the outer diameter of the disc early. I tried to mount that accurately, however apparently I was not precise. I now have a disc that measures circular and a center hole that measures about 5 thou of center. I suspect my setup was not up to the task. I am learning setup is critical. It is becoming obvious that recovery from sloppy setup is a royal pain.
To repeat there are three parts here, a shaft, a collar, and a disc. The shaft itself measures within tolerance. I placed it in a collet and held the other end secure in a dead center. I then measured the runout with an indicator on the lathe apron.
I carefully bored the collar and drilled an tapped a retaining hole for a set screw. (should I retain the collar with 1, 2 or 4 set screws). I then mounted the collar on the shaft, in position. and am turning both the concentric diameter and shoulder on the collar to hold the disc.

Question: I am currently turning the concentric diameter on the collar. If I need to add additional set screws now would be the time to do it, before I finish the concentric diameter or the mounting shoulder.

Once that is done I will mount disc in s 4jc and carefully rebore the center. This will have to be a heavy lift for me because I will have to both center the hole as well as accurately bore its diameter.
I am confident this will all come together. If I were to do it all again I would change the order. I would machine the shaft as straight as I could, make and bore the collar, attach the collar to the shaft with set screws, turn the concentric diameter and shoulder, bore the disc center, mount the disc, and finally turn the disc diameter. Once the collar was mounted it would not be removed, ditto the disc. If the disc had extra thickness it could even be finished to remove wobble.
This was not all obvious when I started. :( Dan
 
Back
Top