- Joined
- Aug 22, 2012
- Messages
- 4,131
I’ve been cheesed off with the motion of the top slide from day one so decided to make some improvements.
First I spotted the sliding flats and scraped them as flat as I could. There was a considerable corner to corner high spot.
Next I replaced the oval iron gibb strip with a trapizoidal brass piece that almost fit all the space, drilled a couple of indents into it for the gibb screws.
Then I thought why not make a longer lead screw for more travel as I have to make a new end for some bearings to smooth out the movement so do it all at the same time.
Its M6x1 which until I stripped it down I didnt realise. That makes travel calcs easier, 1 turn = 1 mm. Why didnt they place 50 divisions instead of the 40 on the dial (future job)
I decided upon a thrust bearing at the slide end and a roller bearing at the handle end.
This meant I needed another 24 mm of shaft, as I didnt have anything that thick I used two pieces of 12mm ally plate.
I cut them out with an angle grinder and filed to shape.
Now for a change in arcane lore.
When I file aluminium I dont stuff the file with chalk according to accepted wisdom to stop it pinning as I find that doesnt do a damn thing.
I use a file with a straight cut blade and fill it with WD40.
![IMG20211031143834[1].jpg IMG20211031143834[1].jpg](https://www.hobby-machinist.com/data/attachments/341/341139-b091d6680f0b1b99cd8ca7b99f1c3214.jpg)
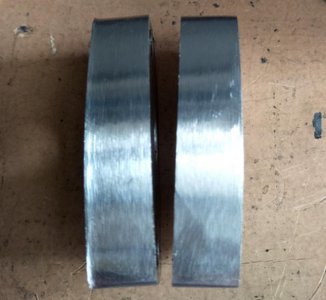
It gives an excellent finish and doesnt pin.
This is after a heap of filing, loads of filings and no pins.

Heres how the filed finish looks like with no buffing or sanding.

I set the leadscrew shaft into the tool holder and used a boring bar in the chuck to cut the key slot. I cocked up the woodruff slot a bit because as I was finishing its depth the cutter slid into the tool and its rear end took a slice of the top of the slot.
No problem as there is still enough metal to hold it.
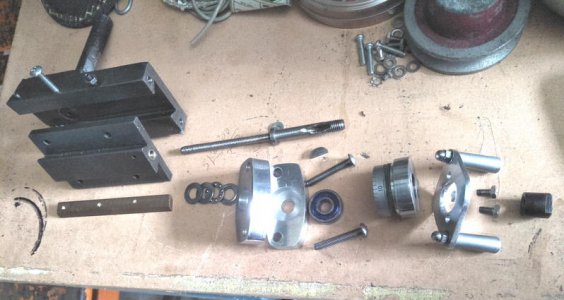
Heres all the parts in the order of assembly.

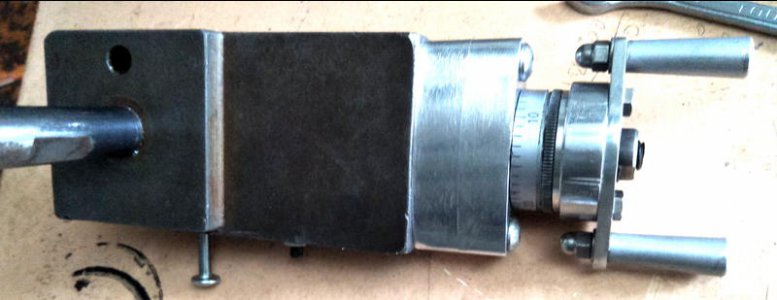
I also wanted the two handles further apart so knocked up a spreader plate.
I did it this way to double check clearances for a larger dial when I get that far.
All assembled with a quick buffing to the aluminium extension.

I am so impressed with how smooth the action is and how effortless turning the handles is.
I wish I had done this ages ago.
First I spotted the sliding flats and scraped them as flat as I could. There was a considerable corner to corner high spot.
Next I replaced the oval iron gibb strip with a trapizoidal brass piece that almost fit all the space, drilled a couple of indents into it for the gibb screws.
Then I thought why not make a longer lead screw for more travel as I have to make a new end for some bearings to smooth out the movement so do it all at the same time.
Its M6x1 which until I stripped it down I didnt realise. That makes travel calcs easier, 1 turn = 1 mm. Why didnt they place 50 divisions instead of the 40 on the dial (future job)
I decided upon a thrust bearing at the slide end and a roller bearing at the handle end.
This meant I needed another 24 mm of shaft, as I didnt have anything that thick I used two pieces of 12mm ally plate.
I cut them out with an angle grinder and filed to shape.
Now for a change in arcane lore.
When I file aluminium I dont stuff the file with chalk according to accepted wisdom to stop it pinning as I find that doesnt do a damn thing.
I use a file with a straight cut blade and fill it with WD40.
![IMG20211031143834[1].jpg IMG20211031143834[1].jpg](https://www.hobby-machinist.com/data/attachments/341/341139-b091d6680f0b1b99cd8ca7b99f1c3214.jpg)
It gives an excellent finish and doesnt pin.
This is after a heap of filing, loads of filings and no pins.

Heres how the filed finish looks like with no buffing or sanding.

I set the leadscrew shaft into the tool holder and used a boring bar in the chuck to cut the key slot. I cocked up the woodruff slot a bit because as I was finishing its depth the cutter slid into the tool and its rear end took a slice of the top of the slot.
No problem as there is still enough metal to hold it.
Heres all the parts in the order of assembly.

I also wanted the two handles further apart so knocked up a spreader plate.
I did it this way to double check clearances for a larger dial when I get that far.
All assembled with a quick buffing to the aluminium extension.

I am so impressed with how smooth the action is and how effortless turning the handles is.
I wish I had done this ages ago.

