Interesting Behavior While Using Fly Cutter

prasad

Active User
Registered
Joined
Jul 4, 2014
Messages
156
I bought a set of fly cutters for my mini-mill but never used them until today. Today I tried a test piece and I was very surprised by the finish I got. I am now hooked to fly cutters and I swear, I will never use an end mill if it can be done with a fly cutter.
20160118_163111.jpg

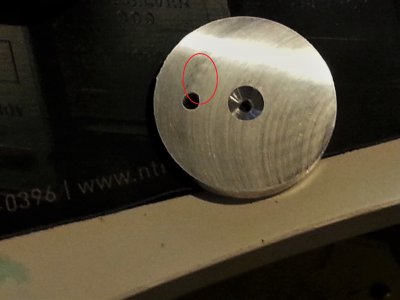
Having said that I want to share a picture of what I observed. I had my fly cutter set to about 2 inch diameter and running at about 2400 rpm. The test piece I picked up had two holes as you can see. After the run I noticed one pf the holes had a kind of a shadow in the direction the cutter moved. If you will please see the picture where I have drawn a red oval around this area. You will see a series of round shadows of the hole radiating in roughly 1 O'clock direction from the hole. These shadows are only visible in certain conditions of lighting. They are not felt when I touch the surface by finger. I do not see this pattern as a defect but I am curious what may have caused this. Is it due to the tool vibration? My machine was G8689 Grizzly Mini-mill, unmodified version.

I milled the other side of the same disk at lower speed and I got better finish and no shadows.

Thank you for your comments to help me understand
Prasad
 
I'd guess it's from the interrupted cut due to the hole. I've often see that facing disks that have holes in. The tool tip springs into the hole as cutting pressure is relieved and then the impact and deeper cut flex it back again.
 
RPM = SFM*4/Diameter
This would indicate your stock has an SFM of 1200...

might want to slow that puppy way down, as you already noticed it will improve your finish. 180 RPM would be a nice starting point for steel, and 600 for aluminum with a 2" cutter.
Harmonics are another issue that is often not discussed with flycutters. When run too fast, they will vibrate and reduce finish quality. This is especially true when they pass over a hole.

Also, it might be a trick of the light, but I am not seeing the cross hatch pattern typical of flycutting. To get the best finish, you should completely pass over the work from end to end.
 
Interrupted cut when passing over the holes, this will happen EVERY time you do such an operation whether with a mill or a lathe. If a uniform surface is required produce the holes after facing.
 
I bought a set of fly cutters for my mini-mill but never used them until today. Today I tried a test piece and I was very surprised by the finish I got. I am now hooked to fly cutters and I swear, I will never use an end mill if it can be done with a fly cutter.
View attachment 119634

Having said that I want to share a picture of what I observed. I had my fly cutter set to about 2 inch diameter and running at about 2400 rpm. The test piece I picked up had two holes as you can see. After the run I noticed one pf the holes had a kind of a shadow in the direction the cutter moved. If you will please see the picture where I have drawn a red oval around this area. You will see a series of round shadows of the hole radiating in roughly 1 O'clock direction from the hole. These shadows are only visible in certain conditions of lighting. They are not felt when I touch the surface by finger. I do not see this pattern as a defect but I am curious what may have caused this. Is it due to the tool vibration? My machine was G8689 Grizzly Mini-mill, unmodified version.

I milled the other side of the same disk at lower speed and I got better finish and no shadows.

Thank you for your comments to help me understand
Prasad

Did you grind your own bit? I've had my LMS fly cutter set for about six months but have not needed to use them yet. Next free time I have I'll grind a bit and try the fly cutter on my mini mill. You've inspired me. I assume the mini mill will require very small depth of cuts. It is not a very rigid machine.
 
Did you grind your own bit? I've had my LMS fly cutter set for about six months but have not needed to use them yet. Next free time I have I'll grind a bit and try the fly cutter on my mini mill. You've inspired me. I assume the mini mill will require very small depth of cuts. It is not a very rigid machine.
A single point flycutter will require small depths of cut regardless of the machine rigidity, heavy stock removal are what milti tooth face mills are designed for. A single point can only be expected to remove a small amount of material per revolution. A fly cutting OP is essentially a lathe OP with interrupted cuts, choose your feeds and speeds accordingly.
 
I bought fly cutter from KBC Tools. That was an year ago. Then I read somewhere on one of the forums that mini-mill is not suited for fly cutters. They were sitting in a corner unused. On Saturday I was at Cabin Fever Expo and there was a demo mill being run by a guy at LMS stall. I saw him using a fly cutter and I was impressed by the finish.

Yes, I ground the tool bit myself. Tool bit from Harbor Freight. I am a beginner and my grinding may not be any good. Yet I am happy with the finish. I know I have to reduce the cutting speed by reading proper speed from speed charts. Today's attempt was a test run. I am very pleased with fly cutters. Of course the cut depth is small.

Good luck to you
Prasad
 
RPM = SFM*4/Diameter
This would indicate your stock has an SFM of 1200...

might want to slow that puppy way down, as you already noticed it will improve your finish. 180 RPM would be a nice starting point for steel, and 600 for aluminum with a 2" cutter.
Harmonics are another issue that is often not discussed with flycutters. When run too fast, they will vibrate and reduce finish quality. This is especially true when they pass over a hole.

Also, it might be a trick of the light, but I am not seeing the cross hatch pattern typical of flycutting. To get the best finish, you should completely pass over the work from end to end.

I agree. I was doing a test run to get a feel. Previously I had read somewhere that fly cutter is not suited for mini-mill. On Saturday I saw a guy at LMS Stall at Cabin Fever Expo running a demo (demo of a DRO) with a fly cutter. He had kept speed quite high. So I tried using similar speeds. Now that I am able to get good finish with fly cutter I will start using proper speeds. Thanks

Prasad
 
:+1: RPM was way to fast. It also looks like your mill isn't trammed, You should get a cross hatch pattern as stated .

I agree, the speed was high. But my mill is trammed good. I did it just a few days before Christmas and I had not run it until today. What do you mean by cross hatch pattern?

Thanks
Prasad
 
Back
Top