Lathe alignment help...

56type

Registered
Registered
Joined
Aug 16, 2016
Messages
178
Finally have my Atlas 10100 Mk.2 sitting on the rolling tool storage cart that's going to be it's home and need some advice on how to get it to stop cutting a 0.001 per inch taper !! I have a Starrett 98 8" level that I'm trying to use in conjunction with the 2 collar cut test to get rid of the but it's driving me a bit nuts. As it sits right now... I have a 1" dia. X 5. 75 steel bar mounted in the 4-jaw that I dialed in to less than 0.001 with the DTI indicated in the middle of the 5" sticking out of the chuck, which seemed to average the run out at each end (measured with DTI at chuck jaws & far end of bar) to 0.005.

At this point the lathe has 2 1/64 auto body shims (measured 0.037) under the tailstock end front foot & mounting bolts are tightened down. I mark the test bar for 1" collars at each end of the 5 inch bar and dial in a 0.005 cut on the compound (compound set at 60 degrees) to cut the center of the bar down 0.030 to make the barbell shape that forms the collars. I make the cut, stop the lathe, take a measurement...the 3" section of the 0.005 cut I made has a taper of 0.003...the end sticking out farthest from the chuck measures 0.0032 taper coming in at 0.993 according to the 2 cheap mics I have. At the point closest to the chuck the measurement is spot on 0.990.

According to the level the tailstock end of the bed is one mark + higher than the headstock end on the front side. I've watched the YT vids explaining the effect of bed twist on how the cutting tool "sees" the work as it traverses the bed while cutting and I'm scratching my head thinking that with that much shim (0.037) under the tailstock front foot, that the cutting tool should be cutting into the work way more at the end farthest from the chuck ?????... In the videos the shim amount to address the taper is small and the effect fairly drastic/immediate in eliminating the taper.

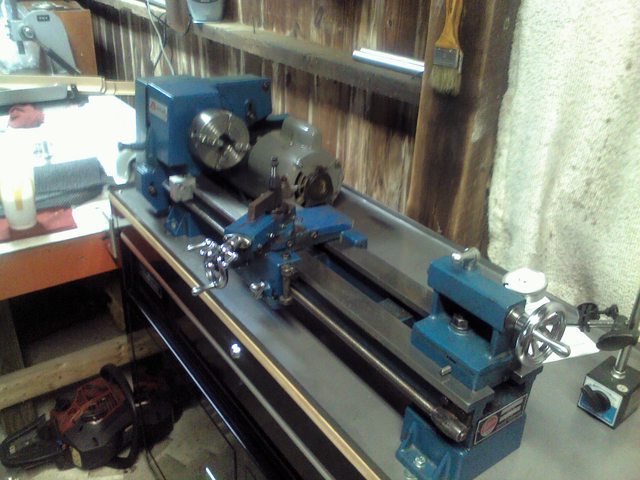
I also noticed in the manual for the lathe in the section on leveling it states not to swap the level end for end during the leveling process, Anyone know why that would be so ?? Shouldn't the level, if properly calibrated, read the same even if the ends were swapped during the leveling process ?? This is my first time trying to level a machine properly & the proof seems to be in the cut it makes, but I'm hesitant to add anymore shims under the tailstock front foot to address the taper fearing I'll induce cracking of the bed feet when tightened down due to the disparity of the surfaces. Here's a pic of how it's set up...

Z7tXju9l.jpg


Level reading at headstock...
eFFQN6Hl.jpg


Level reading at tailstock...
jgJFrzXl.jpg
 
How are you ever going to level anything on a rolling tool chest? All you are going to do is chase your tail. A lathe can be made to cut straight even if not level. Think of a lathe on a ship. It is not level ,but it can be made to cut straight. Think of a Hardinge lathe that the manufacturer says it doesn't need to be leveled. Use a two collar method and set it to where the lathe cuts both collars the same diameter. Quit beating yourself up and start making chips . Good luck with your lathe. It can make good parts.
 
If you don't flip the level end for end, you don't require a calibrated level. So the advice is conservative.
The amount of shims are irrelevant, all the error could be in the cabinet you are resting on.
Shim until the two collars cut the same diameter, done!
 
A #98 level is not sufficiently accurate to level a machine tool, it is .005 sensitivity, the level that is generally used for accurate leveling is .0005 sensitivity. I also agree that a rolling cabinet is never going to be level, and also the top of it being sheet metal, I assume is not sufficiently rigid to make any difference when shimming; another thing may be, how accurate were these machines as built; surely better than you are seeing, but not nearly as accurate as higher grade industrial machines.
I think a base of sufficient rigidity and the two collar method is the right direction.
 
As it sits right now... I have a 1" dia. X 5. 75 steel bar mounted in the 4-jaw that I dialed in to less than 0.001 with the DTI indicated in the middle of the 5" sticking out of the chuck, which seemed to average the run out at each end (measured with DTI at chuck jaws & far end of bar) to 0.005.

At this point the lathe has 2 1/64 auto body shims (measured 0.037) under the tailstock end front foot & mounting bolts are tightened down. I mark the test bar for 1" collars at each end of the 5 inch bar and dial in a 0.005 cut on the compound (compound set at 60 degrees) to cut the center of the bar down 0.030 to make the barbell shape that forms the collars. I make the cut, stop the lathe, take a measurement...the 3" section of the 0.005 cut I made has a taper of 0.003...the end sticking out farthest from the chuck measures 0.0032 taper coming in at 0.993 according to the 2 cheap mics I have. At the point closest to the chuck the measurement is spot on 0.990.

I agree that a more sensitive level would be faster but what you have will still work; it just takes longer to get there.

Before you try to level the lathe, check to see if the headstock is aligned with the ways. Chuck a 3-4" long piece of soft mild steel or aluminum in your 3 jaw and use a sharp HSS tool to take the skin off, then make a few light passes down the length of the bar. If the bar has a taper then your headstock is off; fix that first. These test cuts are done without tailstock support. Many problems encountered when leveling are compounded by a headstock that is out of alignment so please do not skip this step.

If I understand correctly, you formed the cut out between the two collars and got a taper on that center section, right? A taper in that center section doesn't matter; in fact, you expect it because the lathe isn't leveled yet. However, note that a 2 collar bar should be somewhere in the 10-12" long range for improved sensitivity and ideally around 1-2" OD; aluminum is fine. The reason for this size bar is to minimize deflection because your cuts are done without tailstock support. The other requirement is that you should use a sharp HSS tool for your tests; carbide inserts tend to deflect excessively at small depths of cut so that it is difficult to tell if the tool is deflecting or if the lathe is off level. If you do not have a sharp HSS tool then grind one or have one made for you.

When making your 2 collar bar a simple 3 jaw chuck is sufficient and you need to use a live center to support the tailstock end while you cut out that middle section. Once you hog out the center, remove the live center and you're ready to make cuts on those collars. Take a pass of about 0.010" deep on both collars, then repeat at 0.003" deep, then 0.001-0.002" and strive for a good finish. NOW measure the difference between the collars to see how much taper exists. Knowing the headstock is aligned with the ways and the test bar was made properly and the test cuts were done to minimize deflection, leveling will go a lot faster and more accurately.

Leveling a lathe is not difficult but it does require you to pay attention. I know this is your first go at it so be gentle with yourself and hang in there. It will come and it will be worth it.

Almost forgot. If this were my lathe, I would remove the shims under the tail end and let the machine rest for a few days to a week or two. Then I would lightly bolt the lathe down and align the headstock first, then I would proceed to try to level the lathe. I would use the 98-8 sitting on the cross slide bed, having first made sure the surface of the cross slide is clean and free from defects, debris and oil. I would use a square to align the 98-8 so it is parallel to the cross slide; then I would move the cross slide from the head to the tail end without disturbing the level to assess how off the lathe was. You can do this with the compound removed and do a preliminary leveling like this. Then replace the compound to do your final leveling with the 2 collar test.
 
Also, turn the lathe off after cutting the collar closest to the HS, retract back towards TS and cut again without moving the cross slide in to take all spring out. Like Mikey said the tool has to be very sharp.
 
I’m glad I found this thread. I was about to go down the lathe-leveling rabbit hole to get the ways aligned with respect to gravity (the garage floor is inclined along the y-axis) even though the lathe seems to turn accurately enough (0.0005” over 6”). Seems like it’s best to leave it alone!

Scott


Sent from my iPhone using Tapatalk
 
I agree that a more sensitive level would be faster but what you have will still work; it just takes longer to get there.

Before you try to level the lathe, check to see if the headstock is aligned with the ways. Chuck a 3-4" long piece of soft mild steel or aluminum in your 3 jaw and use a sharp HSS tool to take the skin off, then make a few light passes down the length of the bar. If the bar has a taper then your headstock is off; fix that first. These test cuts are done without tailstock support. Many problems encountered when leveling are compounded by a headstock that is out of alignment so please do not skip this step.

If I understand correctly, you formed the cut out between the two collars and got a taper on that center section, right? A taper in that center section doesn't matter; in fact, you expect it because the lathe isn't leveled yet. However, note that a 2 collar bar should be somewhere in the 10-12" long range for improved sensitivity and ideally around 1-2" OD; aluminum is fine. The reason for this size bar is to minimize deflection because your cuts are done without tailstock support. The other requirement is that you should use a sharp HSS tool for your tests; carbide inserts tend to deflect excessively at small depths of cut so that it is difficult to tell if the tool is deflecting or if the lathe is off level. If you do not have a sharp HSS tool then grind one or have one made for you.

When making your 2 collar bar a simple 3 jaw chuck is sufficient and you need to use a live center to support the tailstock end while you cut out that middle section. Once you hog out the center, remove the live center and you're ready to make cuts on those collars. Take a pass of about 0.010" deep on both collars, then repeat at 0.003" deep, then 0.001-0.002" and strive for a good finish. NOW measure the difference between the collars to see how much taper exists. Knowing the headstock is aligned with the ways and the test bar was made properly and the test cuts were done to minimize deflection, leveling will go a lot faster and more accurately.

Leveling a lathe is not difficult but it does require you to pay attention. I know this is your first go at it so be gentle with yourself and hang in there. It will come and it will be worth it.

This is an excellent description! Thank you.

There is YouTube video by "blondihacks" demonstrating this procedure exactly. I found it helpful. She also shows how to align the tailstock with the spindle once the ways are aligned.
 
I’m glad I found this thread. I was about to go down the lathe-leveling rabbit hole to get the ways aligned with respect to gravity (the garage floor is inclined along the y-axis) even though the lathe seems to turn accurately enough (0.0005” over 6”). Seems like it’s best to leave it alone!

Scott

Scott, it is possible to level the lathe to zero over a 10" length, even when the floor is not that level. Much depends on how the lathe is mounted and whether or not the cabinet or stand that the lathe sits on has leveling adjusters underneath it.

My Super 11 sits on the factory cabinet. There are levelers under the lathe itself so it can be adjusted/leveled independent of the cabinet. The cabinet itself also has adjustable leveling in each corner. My personal approach is to adjust the lathe on top of the cabinet with the adjusters under the lathe; I use a precision level sitting on the cross slide for this and get it as near zero as I can. Once that is done, I put the compound back on the cross slide and do a 2-collar test to fine tune the leveling but I use the levelers under the cabinet for this phase. Using those levelers, it is possible for me to adjust the lathe to zero taper over 10".

I suppose it depends on what amount of taper is acceptable for you. If you work with shorter work pieces and getting within a half-thou is okay then you're all good. However, if you someday have to turn a really precise work piece then you need to get it dialed in a bit better. I just wanted you to know that it is quite possible to go finer.
 
Back
Top