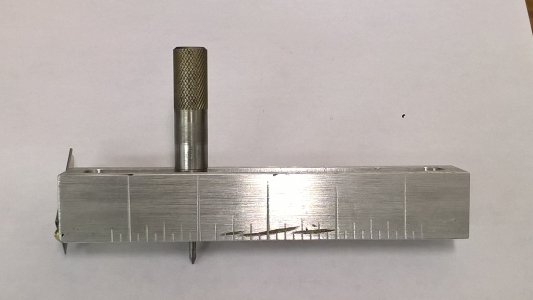
Line Scratching

Chewy

H-M Supporter - Diamond Member
H-M Lifetime Diamond Member
Joined
Feb 28, 2016
Messages
901
How do you do line scratching/etching/marking on steel? Round steel, by hand and on lathe & flat steel by hand and on mill. I wish to have professional thin lines like on a scale or gauge. Just saw the ball trammel post and that would make life easy for hole centers on vise jaws and work aids etc. Making it is not a big deal. I would like to put a scribe mark on the side to read with calipers. Also would like to put divisions on the round stock for quick reference. Currently just drag a scribe across the surface, but that sometimes leaves poor marks, not high quality ones. Want nice clean smooth ones I can fill in with paint or epoxy.
Trying to make my stuff look more professional and less amateur. Thanks. Charles
 
Most of those are etched (acid) using photolithography techniques.
 
I think we are referring to the same thing, but I have a scribe (Starret) with replaceable carbide tips. When marking out parts using layout fluid, this super sharp scribe makes much better marks than my junk drawer steel ones.
 
For work on the lathe, a sharp v-tool out of high speed steel works very well if you clamp it on its side in the tool holder. Using the carriage as pseudo-shaper you can make very crisp engraved lines. Not sure how that would work in a milling machine, but may something similar could be rigged up. I've always punched ruler type graduations using a broad chisel tool but the results are less than stellar.

-frank
 
For making lines using the mill I just used a round (as in a broken end mill) HSS tool ground to a sharp V point in a manner similar to how you would grind a single point threading tool for lathe use. Chuck it in the spindle, place the work on a rotary table (if necessary for the task at hand), lower the spindle or raise the knee to put the tool in contact with the work and operate the X and Y axes as needed to scribe your lines.

Ted
 
I've used the point of a very small center drill.

WP_20191116_12_36_17_Pro.jpg
It works better if the surface is actually flat.
 
Here is what I did.
For simple geometry like lines, the resist can be scribed to expose the steel without the need for the CNC laser.
 
MrWhoopee, how small a center drill? Are you dragging flat across the surface? Your first and last marks are exactly what I'm trying to achieve. They are smooth.

talvare, Never thought about using Z like a shaper. Only X & Y for accurate spacing. That would be doable but the setup would be critical, I think.

RJSakowski, The numbers on your blocks are perfect. Far better than I can currently do. What is the salt solution that you are using? From your link, would you reccomend the NEJE 7W laser? Is a car battery a good substitution for power supply? Where do recommend I go for references and to learn more about this.

20 Years ago I made PC boards this way using photoresist from a photo copier ironed onto the copper surface. Still have some of the etch around, I think. Charles
I didn't use any special formulation for the salt concentration. Probably around a teaspoon in a half pint of water. The requirement is that it be electrically conductive. If the chlorine generation is objectionable, I would think that washing soda (sodium carbonate) would be an acceptable substitute. The laser that I used was actually a 2.5W blue laser, hence the red resist. I tried some dry film resist on old circuit board with out success. I suspect that it failed because of the blue color.

Your laser should work fine. You may have to play around with scanning speed to determine the best results. Ran raqn swimple3 program that varied scanning speed to determine the best rate.

As stated above, your resist needs to be the right color to absorb the laser energy. At least. this is true for my 2.5W laser. Your laser may be sufficient to overcome this limitation though. Some experimenting will tell you.
 
Clickspring on Youtube
He uses a set of handheld engravers quite a bit.

Layout line visibility
 
Back
Top