Maintaining parallelism when facing both ends of a part

LVLAaron

Registered
Registered
Joined
Oct 4, 2020
Messages
484
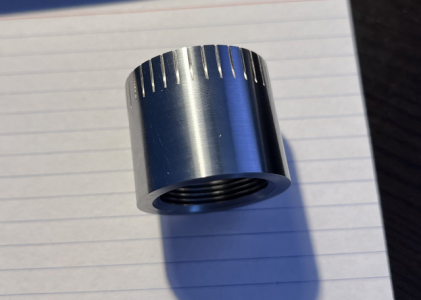
I need to make a couple of different parts like this. I need the faced ends to be as parallel as possible. I can get it it within a thou... maybe 1.5 thou. I also need the part to end up at a specific length. (Well, doesn't really matter what it is, as long as it's something easy to work with 1.2,1.3,1.4 inch)


My best results so far are 8 tenths variation. To get that, I will face one end. Mark where and how the part is inserted in the chuck. Flip it 180 to get the other face, and also turn the part 180 degrees in the chuck. (I think that's how I did it anyway)

Anyway, without a surface grinder... are there any lathe or mill tricks? I have a horizontal/vertical rotary table. Stones... and tons of material to play with.



1675909324473.png
 
OD is too large for any collet I'd have. It's 1.5"

The chuck I'm using is a brand new Buck 6 jaw. There's no wear or slop that I can measure. I'm wiping the part and jaws off between ops.
 
Would it be possible to mount a mandrel in the chuck, machine it in place and then perform the facing cuts on the part? I would think that this would give you tight tolerances as the mandrel was machined in place and not removed from the chuck.
 
Soft jaws.

What sort of chuck jaws do you have? If they are the standard 2 piece jaws, then pick up a set of soft jaws (just the top portion), scab up a loading ring & cut you jaws to the depth and diameter that you need. If have one piece jaws then the options are a bit more difficult: purchase a chuck with two piece jaws (see comments earlier), make some new jaws (per Harold Hall on cutting the scroll, it is not that difficult, I have done it), grind your jaws (per Robin Renzetti, you need to be very fussy).

Is your lathe cutting straight? You may need to tune it so the spindle axis is parallel to the lathe axis (ie level the lathe - or other approaches, or even shim the headstock slightly).

Have you seriously and carefully tuned you chuck (depends on the chuck and mounting arrangement)? If you have a D1 mount, have you made sure the back plate mounts up properly to the spindle (the face and the taper have to fit up together, in my experience the taper usually lands first and the face does not quite touch 100%), do you always put you chuck on the same orientation, have you skimmed the mounting plate using that orientation. The axis of the jaws should be parallel to the axis of the lathe, it is probably close, but not perfect - you may need to slightly shim the chuck.

You said you wanted the ends parallel, do they need to be square to the long axis of the part? That becomes a different challenge because then you need to be able to measure if it is square to a resolution that is better than the allowed tolerance. Probably a surface plate and a good square.


When you start chasing <0.001 it can get crazy. You need to pay attention to every little detail. What equipment / tools do you have to work with - just the lathe and a rotary table?
 
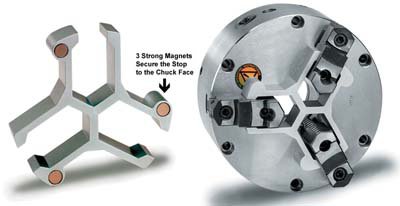
Are you using a chuck stop when seating the part for the second op? By "chuck stop" I'm referring to this type of setup:

RoyalChuckStops.jpg

I have a setup like that, and simply zero out the DRO against the face of the stop. But for really tight tolerance work, I also made a set of adjustable chuck stops that mount directly to the chuck. I documented that effort in this posting:

 
Would it be possible to mount a mandrel in the chuck, machine it in place and then perform the facing cuts on the part? I would think that this would give you tight tolerances as the mandrel was machined in place and not removed from the chuck.

No problem making a mandrel. Part is threaded so it's pretty easy to set up. The thread fit isn't even that important.. they have some slop by design.
So... I'd turn the threaded mandrel in situ... thread the part on... one face is tight against the mandrel... turn the inboard face. Sounds easy enough.
 
A new chuck, excellent. How did you set up the back plate (mark the position, put it back the same every time)? Get/make a reference bar and check if the chuck axis is parallel to the lathe axis. It is probably pretty good (a few thousands over a foot), but not good enough for what you want. Then you’ll need to decide if you are going to tweak the lathe (did you conduct a careful set up of the lathe?) or tweak the chuck (ie a slip of rolling paper in the chuck mounting flange)?
 
Without seeing the other end of the part....

Face both ends in a single mounting operation (not complexity) Start with a piece about 1.5 to 2 time longer, and turn the cylinder you want leaving enough to work with. You end up with the cylinder and two shoulders to waste shafts on each end. The point being that if cross slide / lathe is setup good you have a constant diameter cylinder and two parallel faces because the part was spinning on exactly one axis. Then it's just a matter of picking up those reference surfaces and indicating them when you remount to work the end details.

Hope that's clear enough. Use the precision that's baked into your lathe.
 
Soft jaws.

What sort of chuck jaws do you have? If they are the standard 2 piece jaws, then pick up a set of soft jaws (just the top portion), scab up a loading ring & cut you jaws to the depth and diameter that you need. If have one piece jaws then the options are a bit more difficult: purchase a chuck with two piece jaws (see comments earlier), make some new jaws (per Harold Hall on cutting the scroll, it is not that difficult, I have done it), grind your jaws (per Robin Renzetti, you need to be very fussy).

Is your lathe cutting straight? You may need to tune it so the spindle axis is parallel to the lathe axis (ie level the lathe - or other approaches, or even shim the headstock slightly).

Have you seriously and carefully tuned you chuck (depends on the chuck and mounting arrangement)? If you have a D1 mount, have you made sure the back plate mounts up properly to the spindle (the face and the taper have to fit up together, in my experience the taper usually lands first and the face does not quite touch 100%), do you always put you chuck on the same orientation, have you skimmed the mounting plate using that orientation. The axis of the jaws should be parallel to the axis of the lathe, it is probably close, but not perfect - you may need to slightly shim the chuck.

You said you wanted the ends parallel, do they need to be square to the long axis of the part? That becomes a different challenge because then you need to be able to measure if it is square to a resolution that is better than the allowed tolerance. Probably a surface plate and a good square.


When you start chasing <0.001 it can get crazy. You need to pay attention to every little detail. What equipment / tools do you have to work with - just the lathe and a rotary table?

-Lathe cuts straight. zero tenths runout over 12 inches.
- They are 2 part jaws. I might play with that.
- I haven't done anything to the chuck. It's a seriously nice piece. Runout is maybe a tenth. I have a ground test bar that I get 2 tenths runout on, but I get that no matter what chuck, and I'm sure it's the bar. Runout (in this chuck and that bar) is the same at the chuck jaws, or 8 inches away from the chuck.
- Long axis doesn't matter. It's just there to look pretty.

- I just have the lathe, a mill, and rotary table. The mill isn't tuned much at all. I only use it for fairly crude ops.
 
Back
Top