Maintaining parallelism when facing both ends of a part

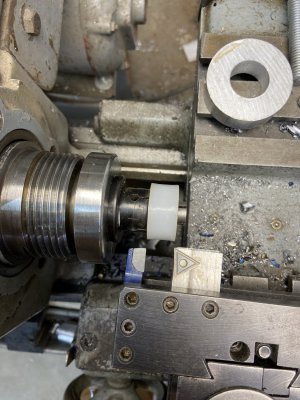
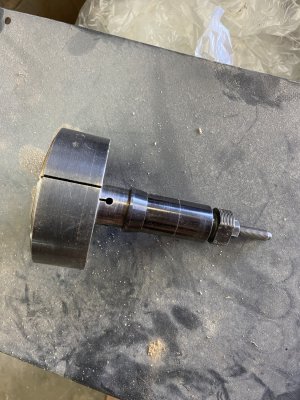
To maintain the truest part, you do all operations without moving it from it's original position. A chuck could have .010" runout but after you turn the OD of the part, the turned surface is now true with machine centerline. You complete ID, so bored hole, threads are parallel to OD, then when you use a parting tool that's hopefully perpendicular to the part and kept short and rigid, the other face is your parted surface.
 
I think I understand. But I need one shoulder to hold the part? How would I put it on a mandrel and be able to turn both faces?
Sorry, it was late - looks like you have lots of help. My comment was really on basic principals.

My point was just turn a cylinder to the most exact length and diameter you can/need, and do it in one operation/mounting. Use the extra on the ends - smaller diameter stubs/leftovers - to hold it while you make the cylinder. When done, you will have a cylinder that is the length you need that has VERRY parallel faces (with nubs sticking out).

What you do next is going to remove the stubs/nubs - if they are useful for the next steps, use them if not no big deal. When you remount to do the end details, use a 4 jaw chuck and a good indicator. Indicate the exposed face and the cylinder to get them running true. The remaining features should be doable to a high degree of accuracy - depending on how good a job you do indicating the part in the 4 jaw.

You started with the goal of parallel faces, the best way/easiest way to do that on the lathe is to cut them in the same operation. That's what lathes do! The precision of a lathe comes from the fact that the stock is spinning on an axis. Old school is to support the part between two points (on a straight line by definition) and drive it with a dog. As long as the part is running true (on an axis defined by two points) the point of the cutter will describe a circle that is by the sheer geometry of the machine (perfectly) perpendicular to the axis. Therefore two cuts (done without changing the mounting) will create two circles that are by definition parallel (because they are both perpendicular to the SAME axis).

This is one of if not the origins of precision machining. It's true for even the crudest lathe. Of course everything else conspires to rob you of this precision. You can create remarkably parallel surfaces by hand on a wood lathe.

Not speaking directly to you (I do not know of your experience / education) but I find it remarkable how many people using lathes don't know or don't understand this.
 
I need to make a couple of different parts like this. I need the faced ends to be as parallel as possible. I can get it it within a thou... maybe 1.5 thou. I also need the part to end up at a specific length. (Well, doesn't really matter what it is, as long as it's something easy to work with 1.2,1.3,1.4 inch)


My best results so far are 8 tenths variation. To get that, I will face one end. Mark where and how the part is inserted in the chuck. Flip it 180 to get the other face, and also turn the part 180 degrees in the chuck. (I think that's how I did it anyway)

Anyway, without a surface grinder... are there any lathe or mill tricks? I have a horizontal/vertical rotary table. Stones... and tons of material to play with.


View attachment 436836
I used to run some tubing that had to be parallel within .0003 tens . I ran tens of thousands of the them. First I ran them on a Traub automatic machine leaving about .02 for finishing cut. Then I ran them on a Logan lathe using a Rovi inside 5c collet cutting both ends at the same time . Tubing was about 2 inch dia and about 4 inches long with a wall thickness about .15 thick. After getting the set up
working I had no rejects.
I went out in the shop and put a Rovi expanding collet that you turn to bore size needed. Then you can use any spacer held against front of spindle to locate part expend collet to hold part then expand collet To grip part then using a front and back tool face both faces at same time with out moving part. I took a pic just to show how you mount the two facing tools at each of part.

Email me if you need more pics and more info. jimatcf@hotmail.com
 

Attachments

  • 422B05B7-C481-46DA-B250-5D1F980D0FAA.jpeg
    422B05B7-C481-46DA-B250-5D1F980D0FAA.jpeg
    298.7 KB · Views: 13
  • 7B1CECFB-72F0-46F8-AA47-EA2467083C05.jpeg
    7B1CECFB-72F0-46F8-AA47-EA2467083C05.jpeg
    459.7 KB · Views: 12
Last edited:
I used to run some tubing that had to be parallel within .0003 tens . I ran tens of thousands of the them. First I ran them on a Traub automatic machine leaving about .02 for finishing cut. Then I ran them on a Logan lathe using a Rovi inside 5c collet cutting both ends at the same time . Tubing was about 2 inch dia and about 4 inches long with a wall thickness about .15 thick. After getting the set up
working I had no rejects.
I went out in the shop and put a Rovi expanding collet that you turn to bore size needed. Then you can use any spacer held against front of spindle to locate part expend collet to hold part then expand collet To grip part then using a front and back tool face both faces at same time with out moving part. I took a pic just to show how you mount the two facing tools at each of part.

Email me if you need more pics and more info. jimatcf@hotmail.com
Also be nice to know what the inside of part looks like. Thread length ect.
 
I would face one side, then flip and face the other, then flip again and face once more. It's possible that only a single point is touching the rear of the chuck on the first operation. After the first facing op, that side should be perpendicular to the jaw clamp line. The second flip puts a good side against the chuck body ready to face the outside to parallel.
 
Back
Top