Making a lathe test bar

I agree with Tozguy. If you think you have a headstock alignment error you must take the chuck out of the equation. The only way I know to do this is with an accurate test bar bought or made on another lathe. This is a different kind of test bar than used for tailstock alignment. You cannot easily make this bar if your headstock is out of alignment. (I suppose you could if you turned between centers but I digress...) This will have an MT taper to fit your spindle and a straight shaft on the other end. Then use an indicator on the saddle to align the headstock. After that is correct you can move on to tailstock alignment.
One question that is not clear above? By "divot" do you mean "center hole" as in made by a center drill?
Robert

Like this:
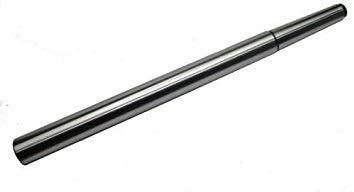
1594389703291.png
$35 on Amazon
 
Last edited:
Yes, the term 'divot' refers to the center hole cut by a center drill. Sorry about that.
 
Gravity will always cause a deflection in the vertical plane. Using either the RDM method or the two collar method would not be materially affected by gravity. Deflection of a rigidly supported beam of round cross section due to gravity can easily be determined. For a 15" rod 1" in diameter, a calculated a deflection of .00032", math errors notwithstanding.

If my chuck was deflected significantly by the weight of a 3 lb. bar, I would worry as cutting forces can greatly exceed that. The biggest problem with chucking a test bar is that chucks are notoriously bad for runout. This problem is removed with either the RDM method or the two collar test as in both cases youa re actually measuring to the spindle axis.

As to determining headstock misalignment, I prefer to check a faced surface as it minimizes any influence from bed twist. Once you can face a flat surface a tapered cut will be due to bed twist. This thread describes my procedure in mire detail. https://www.hobby-machinist.com/threads/on-the-level-further-adventures-with-the-g0602.72338/
 
RJ- I read the post in your link but it is not obvious to me how you determine if the face is cut flat? Or are you starting with a known flat faced item?
Robert
 
RJ- I read the post in your link but it is not obvious to me how you determine if the face is cut flat? Or are you starting with a known flat faced item?
Robert
I mounted a boss on my faceplate. I zero a test indicator on the boss when it is horizontal with the spindle at the front of the lathe and then rotate the spindle so it is horizontal with the spindle at the rear and move the cross slide so the test indicator again contacts the boss. If the indicator reads zero again, the spindle axis, therefore the headstock is not perpendicular with the cross feed ways. which in turn should be perpendicular to the bed ways. (I know that some prefer to have the cross feed cut a very slight dish; I don't subscribe to that).

Alternatively, you could also skim cut the faceplate and check for dishing or doming of the face.
 
  • Like
Reactions: rwm
RJ if the indicator reads zero on the boss when it is in both front and back positions, does that not mean the alignment is good?
Like tramming a mill slide.
How do you check if the cross slide is square to the bed ways?
 
RJ, is that right .00032”?
I would think more than that.
 
RJ if the indicator reads zero on the boss when it is in both front and back positions, does that not mean the alignment is good?
Like tramming a mill slide.
How do you check if the cross slide is square to the bed ways?
Yes. At least it does for me
Re: is the cross slide square, that is a very good question. On my G0602 it really doesn't matter since I can't change it When it comes down to the nitty gritty, I want my lathe to do two things; cut a flat face and turn without a taper. If rotating the headstock slightly to accomplish the former means I have to twist the bed slightly to accomplish the latter, so be it. The true test of the lathe's alignment is how well it performs these tasks.
 
For the back story, when I got my lathe it was cutting a .004"/6" taper. I rotated the headstock slightly and removed the taper. Later when I was facing a large diameter, I noticed that the surface was domed. Coincidentally, .004"/6". Clearly, I had messed up what was a good headstock alignment by correcting the wrong thing. realigning the headstock to cut a flat face brought back my taper issue but leveling the lathe and shimming the tailstock corrected that issue.
 
RJ, is that right .00032”?
I would think more than that.
The equation that I used was d = W*l^3/(24*E*I) where d = deflection at the end of the beam, W = the distributed weght of the bar, E = the modus of elasticity for steel = 30,000kpsi, and I = the moment of inertia. For a beam of round cross section I = π*d^4/64 = .0491 for a 1" bar and .00118 for a 10mm bar. I used a density of .284 lbs/in^3 for steel to calculate the beam weight.
 
Back
Top