-
Welcome back Guest! Did you know you can mentor other members here at H-M? If not, please check out our Relaunch of Hobby Machinist Mentoring Program!
- Forums
- THE MAIN DISCUSSION SECTION
- A BEGINNER'S FORUM (Learn How To Machine Here!)
- Beginner's forum Archive
You are using an out of date browser. It may not display this or other websites correctly.
You should upgrade or use an alternative browser.
You should upgrade or use an alternative browser.
Milling a part bigger than your table strategies
- Thread starter WobblyHand
- Start date
- Joined
- Nov 25, 2015
- Messages
- 8,319
uh, aren't you traveling to your son's?My head hurts between all the doctors appointments every friggin day . How is anyone suppose to actually hold a job with all this BS ?
didn't you retire?
- Joined
- Jan 4, 2021
- Messages
- 1,814
Your X-Axis hand wheel will also get in the way on the other end of the table.Thanks all, looks like a long day tomorrow trying to square this up. Would be nice to have some blocks to help position things. But I do have to stand off the plate from the table with something high enough to be over the X drive motor housing. It's at least a 1/4". Hmm, I do have some awkward 1/2" plywood I could slice off. Need todoubletriple check all the dimensions before I plow ahead.
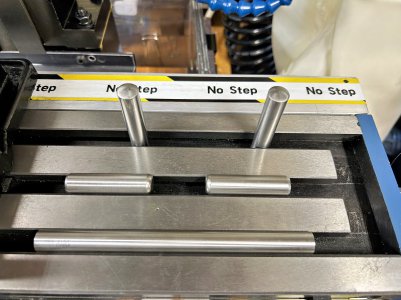
Although a size smaller than the PM25, my LMS 3990 Mini-Mill has the same 12mm T-Slots. These are what I have used to roughly square up stock that is clamped to that table:

- The rear slot has 12mm dowel pins dropped into the slots (flat end down); they are a little loose, but when rearward pressure is applied they snug up against the back of the slot. As you are going to be blocking the material above the table surface, this would be your best option.
- The middle slot has 1/2" dowel pins laid on the top of the slot; as long as you don't push too hard, these provide a good reference to the slots.
- The front slot has a 31/64"drill blank laid in; this sits a little lower into the slot than the 1/2" dowel pins, but works the same.
I know I joining the conversation late, and you already have the steel plate, but have you considered a shallow channel (1 x 4) instead of the flat plate? it will be stiffer and you could saw an attractive bevel on the "top" end, then use an angle grinder to dress it up. I assume that once fabricated you're going to paint it.
Please let us know how it turns out.
- Joined
- Jul 28, 2017
- Messages
- 2,384
I made a tooling plate for stuff like this. I don't trust the accuracy of the tee slots in my mini mill. I made a couple of pieces out of square steel stock, basically long low-profile clamps that attach to the plate with screws. I've used the setup for making things like guide rods for my table saw. They have to have a "tee" style profile to fit the slots in the table and I couldn't find any off-the-shelf versions. The slot dimensions on the table saw aren't standard, probably because the manufacturer wanted to capture every last dollar they could.
I used the guide rods to make a couple of sleds for the table saw.
My 123 blocks + clamps also have been very handy for holding/aligning larger pieces that can't be machined in one go. The approach really depends on the particular item being machined.
I used the guide rods to make a couple of sleds for the table saw.
My 123 blocks + clamps also have been very handy for holding/aligning larger pieces that can't be machined in one go. The approach really depends on the particular item being machined.
- Joined
- Dec 18, 2019
- Messages
- 6,464
Thanks for all the suggestions! I really don't quite trust my mill tee-slots, but they are convenient. My design started out too long for the table, by a little bit. I have changed the design, so it fits on my table, and is a desk mount rather than hutch mount. Really didn't like the idea of permanently drilling holes in furniture in a visible area.
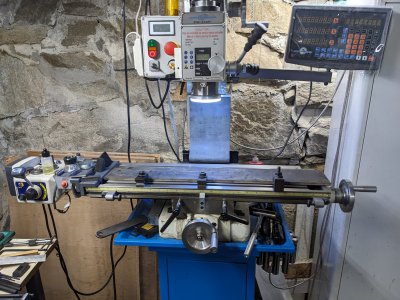
Here's what I started with.

I ended up moving the mill to the right by 4", and back 1". Now I get full travel of the table to the left. Previously, the power feed would hit the end of the lathe. I also moved the cabinet to the right of the mill, so I can get full travel both sides. As mentioned in the first paragraph, I redesigned the mount. Before it was a 26.5" strap connecting to the hutch horizontal wood cross bars, now it is a heavy pedestal base with a 13" high plate.
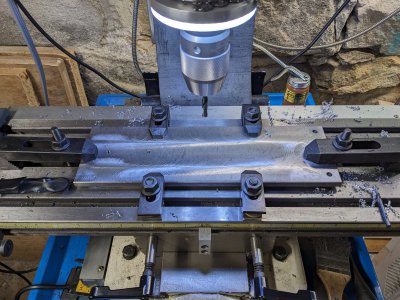
New design on the mill. Plate is offset from the table with a 1/4" thick x 3.5" wide x 12" long piece of aluminum plate. Lined it up the best I could to the slots (back slot with small square in the slot). Since the piece was cut on a shear, the edges were ratty, and the plate had a slight bow. What you see is the top side finished. It's somewhat square now, at least on the 4 edges. Have to flip it over, to chamfer the edges and to run a face mill over it to cut off all the mill scale.

After flipping it, I indicated the least ratty long edge, so I can do the chamfers. To face it, I will play the musical clamp game, so that the plate is well clamped, yet out of the way of the face mill cutters. Takes me 3 passes due to the clamping arrangement.
Here's what I started with.

I ended up moving the mill to the right by 4", and back 1". Now I get full travel of the table to the left. Previously, the power feed would hit the end of the lathe. I also moved the cabinet to the right of the mill, so I can get full travel both sides. As mentioned in the first paragraph, I redesigned the mount. Before it was a 26.5" strap connecting to the hutch horizontal wood cross bars, now it is a heavy pedestal base with a 13" high plate.
New design on the mill. Plate is offset from the table with a 1/4" thick x 3.5" wide x 12" long piece of aluminum plate. Lined it up the best I could to the slots (back slot with small square in the slot). Since the piece was cut on a shear, the edges were ratty, and the plate had a slight bow. What you see is the top side finished. It's somewhat square now, at least on the 4 edges. Have to flip it over, to chamfer the edges and to run a face mill over it to cut off all the mill scale.

After flipping it, I indicated the least ratty long edge, so I can do the chamfers. To face it, I will play the musical clamp game, so that the plate is well clamped, yet out of the way of the face mill cutters. Takes me 3 passes due to the clamping arrangement.


