- Joined
- May 27, 2016
- Messages
- 3,469
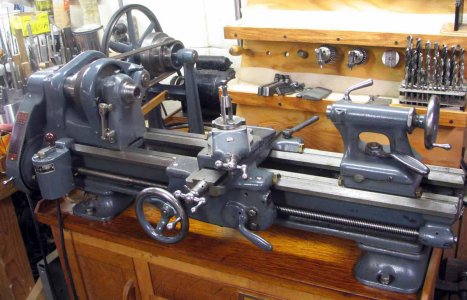
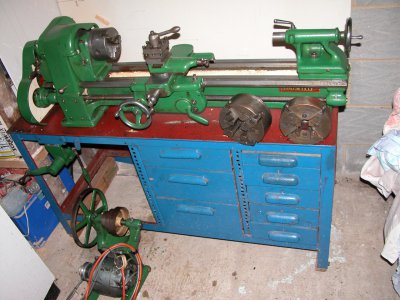
I have two South Bends, a 9C, and a 9A. I have only just started doing anything with them now. Who knew I would ever be getting into this? I take the plunge because after what I have read in this forum, I know there is enough help here. They are an SB-9A, purchased for the US equivalent of £525, and also the green SB-9C with under-drive on a blue bench with spare 4-jaw chucks, and drawers full of various tooling, purchased for $147 (not kidding)! The 9C has been stored for a couple of years, covered in oil, and under covers. The 9A is the recent purchase, because I wanted the quick-change gearbox and power cross-feed, and had been looking out for one to come up. I had thought that one lathe might, at worst, end up as a parts donor for the other. As things are turning out, it looks like neither is so bad as to deserve ending up as a parted out scrap.
I am not sure I would go mad attempting a full restoration job on both. At the least, they will get cleaned up, damage fixed, new wicks, etc. and made to run again. Given the crazy price I shelled out for one of them, it would not be so bad if, in the end, I keep one and sell the other.
In this forum, there are great pictures of restored machines, all clearly loved. Not yet for me! At least for now, I expect to be posting some not-so-pretty "before" pictures of how things are right now. There is yukky dirt, corrosion, and neglect. I will rely on forum advice. If something can be saved, then OK. If it is junk, and a mistake, then also OK - it gets junked!
Start with a couple of pictures of the lathes. The 9A does have a chuck, but I had already taken it off. This iron is heavy! I could just about lift the only heavy end slightly off the floor, so it had to be "divide and conquer". Once I had got it down to the lathe bed + feet sans gearbox, headstock, etc. I could lift it up onto bench. Already in my mind is a future need I had not anticipated. If I am going to be hauling heavy iron stuff around, I have to think about some crane gadget to help me do it!
The 9C is still all oiled up and under covers.
The 9A was still on the garage floor.
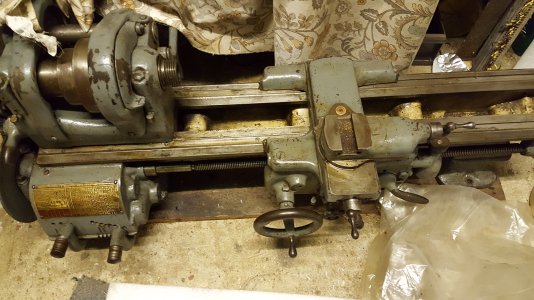
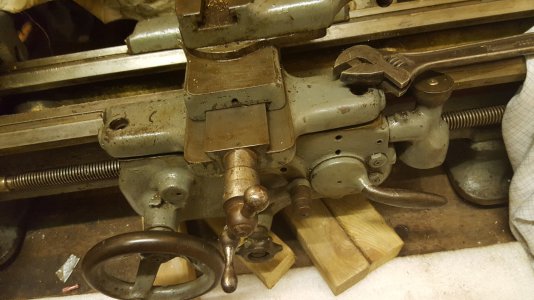
9A is covered in dirt and chips, and my heart sank a bit when I could see the dinged up ways by the chuck, and then I got a look up the quill. Someone had drilled out part of the #MT2 taper, I guess as part of an effort to extract a stuck taper - or something. That stuff, with pictures, is in my previous thread.
9A The first wipe-down and inspection
OK - warts and all, here it is. The dirt turned out to be an oil-soaked yuk of dust and rust - but yay! The key word was OIL!
A bit embarrassed I already be feeling! This is from under the headstock
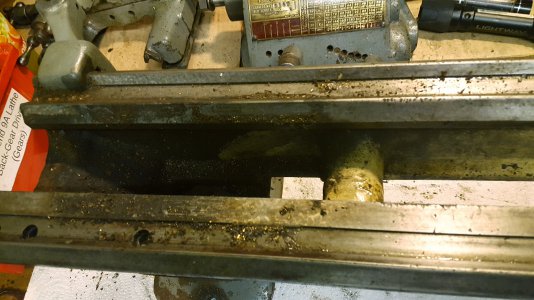
It starts to look better. I cannot catch a fingernail on any wear ridge. There is a slight shine on the top and bottom edge extremes of the inverted V-ways, but they seem "flat" just to feel, or look at.
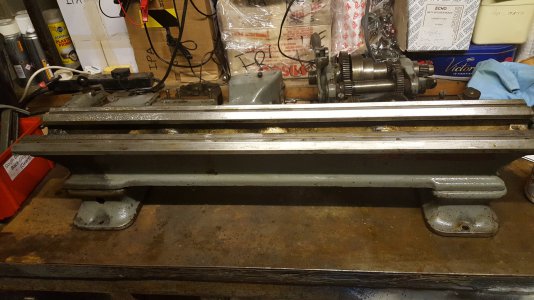
I know I am not the tidiest dude, but I am realizing I had better become a whole lot better about it. I will not be able to make this work unless the surroundings are cleaner and everything is more organized. Already I am pushed to clear out most of the garage accumulations, not least because the entire garage area has to undergo some building operations and be finished properly. There comes a point where temporarily, all these efforts be carefully labelled and put away, so that all the new environment can happen. I've been saving for it for years, and lathe fun takes second place!
Even though the first cleanup was only a cursory effort, using some WD40, because it is mostly kerosene with some floor polish, and it cuts through the grime, I could not resist a first (fast) shot at discovering the wear and general condition. It leads to the first question.
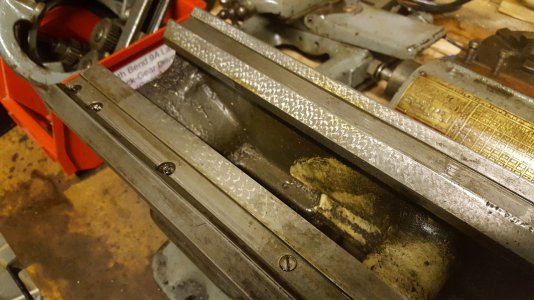
Whey are the scrapings on the front V-way adjacent the headstock worn away?
It is not surface that ever sees the saddle ride over it. Compared to the other ways at that end of the lathe, it stands out.
You can see that in the region right under the chuck, there are the usual dings. There is some incipient rust - a little "browning". Not serious deep rust, just evidence the lathe had been stored awhile with the saddle not moved. By now I am noting the (lack of) serious wear. It looks like it had bit of a hard and abusive life over a relatively short period, and then was stood unused for years.
We try a first "measurement".
A "reverse" measurement where we find the sag of the saddle relative to a supposedly "unworn" surface.
First, very gently I ran a flat fine India stone over the surfaces. Two long strokes, and I checked for dings and burrs sticking up by using a piece of ex-mirror thick glass pressed against the ways, and I look through it as it displaces oil.
I consider using the tops of the V-ways. I dare say they would do, but they look kind of "rounded" in places. I choose the scraped flat between the ways. I think that bit might be used by the tailstock, but the tailstock does not normally visit this far left of the middle.
I worry that the saddle might be riding on the little brass retainers around the V-shaped way-wiper felts. There seemed to no clearance, so I removed them. Then I just went ahead with it. Despite that my Dad once told me the only way to stay confident of a measurement was to "do it only once", all this is going to be done again later - and better!
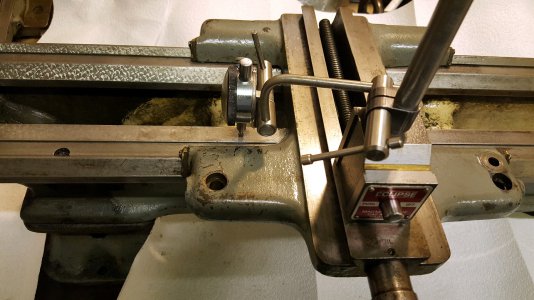
So what happened? I start with the indicator zeroed on the flat between the V-ways. The indicator can see 0.0005"
I can guess it between to about 0.0002" All stays zero until we get away from the surfaces under the headstock.
The saddle then "drops" about 0.0008 at first, and makes it to about -0.0012" before it eventually climbs back to zero..
It stays more or less at the "low" point until we get the saddle moved back to where the tailstock normally lives, which is where the needle returned to zero. The variation stays within about 4 tenths (meaning +/- 0.0002), around the level about 0.001" low, all the way over the "used and worn" region.
This seems to me to be not very much, and maybe I am fooling myself by using the surface I did. They all might be going down and up together(?) The whole thing will be done again until I am really sure of everything. I left out a whole scene involving the 4 arc-seconds level (0.02mm/metre). That too must be done better!
In passing , I briefly tried out the backlash in the cross-slide and compound. There is a tiny bit, but not a whole several degrees worth! Reading on the graduations, perhaps a couple of divisions before the slide moves the "other" way.
Except for the abused quill, for which we can "borrow" one from the 9C, I am thinking the 9A, under all the grime, and forgiving the dings, is maybe not so bad. Clearly it went through a period where it was somewhat unloved, and had a really abusive experience involving the quill, but the actual working life seems to have been relatively short. A clean-up, a new wicks kit, and any damage fixed, and it gets put together right, may yield an OK machine. A real working thing from the 1940's that hopefully works just fine.
Serial Number is 130147 with a "J.A.N." inscribed to the right.
I should not get ahead of myself here. We have yet to go through the gearbox, and for all I know, the motor might just hum and make sparks and smoke! I am not even thinking clearly yet about the day I might post much nicer pictures of the working machine
There is already lots of information on this site on how to do exactly what I am trying. Even so, feel free to comment and make suggestions. I am pleased to take any help I can get.
I am not sure I would go mad attempting a full restoration job on both. At the least, they will get cleaned up, damage fixed, new wicks, etc. and made to run again. Given the crazy price I shelled out for one of them, it would not be so bad if, in the end, I keep one and sell the other.
In this forum, there are great pictures of restored machines, all clearly loved. Not yet for me! At least for now, I expect to be posting some not-so-pretty "before" pictures of how things are right now. There is yukky dirt, corrosion, and neglect. I will rely on forum advice. If something can be saved, then OK. If it is junk, and a mistake, then also OK - it gets junked!
Start with a couple of pictures of the lathes. The 9A does have a chuck, but I had already taken it off. This iron is heavy! I could just about lift the only heavy end slightly off the floor, so it had to be "divide and conquer". Once I had got it down to the lathe bed + feet sans gearbox, headstock, etc. I could lift it up onto bench. Already in my mind is a future need I had not anticipated. If I am going to be hauling heavy iron stuff around, I have to think about some crane gadget to help me do it!

The 9C is still all oiled up and under covers.
The 9A was still on the garage floor.

9A is covered in dirt and chips, and my heart sank a bit when I could see the dinged up ways by the chuck, and then I got a look up the quill. Someone had drilled out part of the #MT2 taper, I guess as part of an effort to extract a stuck taper - or something. That stuff, with pictures, is in my previous thread.
9A The first wipe-down and inspection
OK - warts and all, here it is. The dirt turned out to be an oil-soaked yuk of dust and rust - but yay! The key word was OIL!
A bit embarrassed I already be feeling! This is from under the headstock

It starts to look better. I cannot catch a fingernail on any wear ridge. There is a slight shine on the top and bottom edge extremes of the inverted V-ways, but they seem "flat" just to feel, or look at.

I know I am not the tidiest dude, but I am realizing I had better become a whole lot better about it. I will not be able to make this work unless the surroundings are cleaner and everything is more organized. Already I am pushed to clear out most of the garage accumulations, not least because the entire garage area has to undergo some building operations and be finished properly. There comes a point where temporarily, all these efforts be carefully labelled and put away, so that all the new environment can happen. I've been saving for it for years, and lathe fun takes second place!
Even though the first cleanup was only a cursory effort, using some WD40, because it is mostly kerosene with some floor polish, and it cuts through the grime, I could not resist a first (fast) shot at discovering the wear and general condition. It leads to the first question.

Whey are the scrapings on the front V-way adjacent the headstock worn away?
It is not surface that ever sees the saddle ride over it. Compared to the other ways at that end of the lathe, it stands out.
You can see that in the region right under the chuck, there are the usual dings. There is some incipient rust - a little "browning". Not serious deep rust, just evidence the lathe had been stored awhile with the saddle not moved. By now I am noting the (lack of) serious wear. It looks like it had bit of a hard and abusive life over a relatively short period, and then was stood unused for years.
We try a first "measurement".
A "reverse" measurement where we find the sag of the saddle relative to a supposedly "unworn" surface.
First, very gently I ran a flat fine India stone over the surfaces. Two long strokes, and I checked for dings and burrs sticking up by using a piece of ex-mirror thick glass pressed against the ways, and I look through it as it displaces oil.
I consider using the tops of the V-ways. I dare say they would do, but they look kind of "rounded" in places. I choose the scraped flat between the ways. I think that bit might be used by the tailstock, but the tailstock does not normally visit this far left of the middle.
I worry that the saddle might be riding on the little brass retainers around the V-shaped way-wiper felts. There seemed to no clearance, so I removed them. Then I just went ahead with it. Despite that my Dad once told me the only way to stay confident of a measurement was to "do it only once", all this is going to be done again later - and better!

So what happened? I start with the indicator zeroed on the flat between the V-ways. The indicator can see 0.0005"
I can guess it between to about 0.0002" All stays zero until we get away from the surfaces under the headstock.
The saddle then "drops" about 0.0008 at first, and makes it to about -0.0012" before it eventually climbs back to zero..
It stays more or less at the "low" point until we get the saddle moved back to where the tailstock normally lives, which is where the needle returned to zero. The variation stays within about 4 tenths (meaning +/- 0.0002), around the level about 0.001" low, all the way over the "used and worn" region.
This seems to me to be not very much, and maybe I am fooling myself by using the surface I did. They all might be going down and up together(?) The whole thing will be done again until I am really sure of everything. I left out a whole scene involving the 4 arc-seconds level (0.02mm/metre). That too must be done better!
In passing , I briefly tried out the backlash in the cross-slide and compound. There is a tiny bit, but not a whole several degrees worth! Reading on the graduations, perhaps a couple of divisions before the slide moves the "other" way.
Except for the abused quill, for which we can "borrow" one from the 9C, I am thinking the 9A, under all the grime, and forgiving the dings, is maybe not so bad. Clearly it went through a period where it was somewhat unloved, and had a really abusive experience involving the quill, but the actual working life seems to have been relatively short. A clean-up, a new wicks kit, and any damage fixed, and it gets put together right, may yield an OK machine. A real working thing from the 1940's that hopefully works just fine.
Serial Number is 130147 with a "J.A.N." inscribed to the right.
I should not get ahead of myself here. We have yet to go through the gearbox, and for all I know, the motor might just hum and make sparks and smoke! I am not even thinking clearly yet about the day I might post much nicer pictures of the working machine
There is already lots of information on this site on how to do exactly what I am trying. Even so, feel free to comment and make suggestions. I am pleased to take any help I can get.
Last edited:


