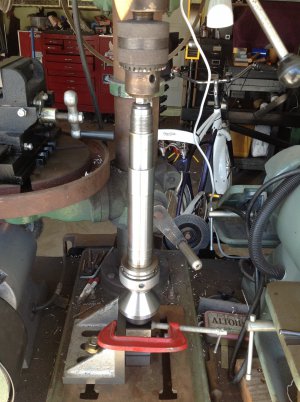
My poor old BD920n

JayUSArmy

Registered
Registered
Joined
Aug 11, 2020
Messages
14
Ok.. so I bought a beat-up, thrashed, old Jet BD920n for a couple hundred bucks. Over the last 6 months, I've been taking it apart, cleaning it out, and making some bits to make it somewhat usable. I'm at the point where I need to start aligning and getting it calibrated and I'm kind of at a loss as to where to start and how.

What I have done so far(besides disassembling, cleaning, and lubricating everything):
Made some rough temporary knobs and holders for the controls.. I think the lathe fell on its face and broke a lot of stuff like the cross slide knob, the carriage handwheel, and the shifter lever.
Pulled the spindle and replaced both of the bearings. (I -may- have to do this again, I'm starting to suspect that my method of putting the new bearing races on may have damaged them)
Pulled the compound/cross slide apart, cleaned and replaced the gib screws.
Bought a 4 post compound clamp from littlemachineshop.com to replace the 2 bolt original one.
Installed a quick change tool post from littlemachineshop.com.
Installed a brand new 3-jaw chuck from littlemachineshop.com.
Replaced a ton of fasteners that were stripped out.


The current problems:
1a) The chuck/adapter/spindle assembly has a kink in it somewhere, which causes the part to wobble. By wobble, I mean that if I get a bar held in the chuck, I can get the end next to the chuck to under 2 thou runout, but the other end (12" bar- not a test bar, though) will have 15+thou indicated.. it's visibly moving. I verified that it's not the bar, because I can loosen the chuck and rotate the bar and still have the same high/low spots in relation to the chuck.
1b) The chuck doesn't fit snugly against the spindle adapter reference. With the bolts barely finger tight, I can slide the chuck across the adapter face 2-3 thou.

2) The headstock is definitely not aligned to the ways. Trying to face-off a large part will repeatedly have the tool digging (taking a deeper and deeper cut) in more as it moves towards the back of the lathe.

3) I need to level the ways, but don't have a precision level yet.. the cheapest ones are $100+ that I have seen.

So.. in your opinion, what should be the order of operations here? I am on a limited budged (typically around $150-250/mo, sometimes more). I work at a paper mill, so I can get all kinds of scrap (mostly different types of steel.. sometimes aluminum, very rarely copper or brass) for practicing and making parts. Where am I going to get the most bang for my buck?
 
I have a tendency to work from heart of the machine and go out. And the heart of the lathe is the spindle. Knowing it fell make me wonder if the spindle is bent. It’s not a super robust piece in the first place.

You also mention the bearings, did you replace them with quality bearings?
Were they super clean before assembly?
What grease did you use?
Did you fully pack them? (You’re not supposed to).
Did you use a press to install the front bearing and seat it fully?
Is the rear bearing a slip fit with no play?
Did you set preload properly?
If you measure the runout inside the nose of the spindle what do you get?

My 9x20 had what is typical from the factory, the rear bearing was an interference fit so was basically impossible to set the preload properly. I learned that here on H-M also some other tricks like not packing the bearings and how to set preload.
 
In addition to what C-bag mentioned you should compare the runout from spindle to adapter and see if the adapter needs to be skimmed.
Having play between the adapter and the chuck can actually be a good thing- it allows for some adjustment to get the chuck true
Get the spindle issues sorted out then cut a test bar to see how much headstock misalignment there is
-Mark
 
Last edited:
In addition to what C-bag mentioned you should measure the runout at the adapter and see if it needs to be skimmed.
Having play between the adapter and the chuck can actually be a good thing- it allows for some adjustment
-Mark
While I agree, that is a much later step IMHO. I went through all this because it's clear the 9x20 is a kit. In order to get it truly straightened out you have to be strictly methodical in your approach. I also got the tip early on that to check runout, don't use the chuck. Use a ground bar(I used a 1/2"x6" reamer blank in a morse taper collet directly mounted in the spindle). Then once you get the runout squared away, then go to leveling the bed, then aligning the head. Once all that is within spec, then check and skim the chuck adapter. If you do it before all this you'll just cut it out of square. I also undercut the chuck register .008 to be able set my runout on the chuck once all those other steps were done properly. I now have around .0005 runout and about that taper in 6". Far and away better than the 008 runout and 012" taper in 6" I started with! But it took a LOT of time, effort and attention to details to get to where it is now.
 
Agreed, I didn't mention all the in between steps- using a Morse collet and ground bar is a better approach.
I was going to suggest if the headstock is really out of alignment he might want to consider replacing it or selling the machine and starting over with another one
Fixing that might be more trouble that it's worth, but sometimes a limited budget is all we have to work with
 
Last edited:
Agreed, I didn't mention all the in between steps- using a Morse collet and ground bar is a better approach.
I was going to suggest if the headstock is really out of alignment he might want to consider replacing it or selling the machine and starting over with another one
Fixing that might be more trouble that it's worth, but sometimes a limited budget is all we have to work with
This is probably true on most American machines where the headstock V set to the ways. But for whatever reason the 9x20 is not this way. It’s bolted to the ways and there isn’t a lot of play but it’s more or less held by them. This is good because it can be adjusted but it can be a PIA to get just right. And often the bolts that come with it are cheesy at best. It also means if you crash it, better check it. Once I got mine set and truly tight it hasn’t wandered. But I’ve not crashed it, yet. Personally I’ve found mine a good practice lathe because it is a copy of a fairly capable lathe (Emco) and being cheap and parts accessible if you have more time than $$ with some precision measuring tools which you should have anyway you can get some decent work out of it.

I was lucky mine was the previous owners hobby of doing upgrades through the various websites online dedicated to the 9x20 and to no use, at all. The problem was he didn’t do the proper setup of the headstock and on down the line. So it had 4”,5”,6”4jw, QCTP, and other stuff for $600. But I was a noob and it took me a while to know what I was doing and why it did the things it did. Then I learned how to fix them. Much more cheerful than paying list and having a resentment it wasn’t right.
 
Ah, I was wondering about that- good news then, it can be adjusted
 
I have a tendency to work from heart of the machine and go out. And the heart of the lathe is the spindle. Knowing it fell make me wonder if the spindle is bent. It’s not a super robust piece in the first place.

You also mention the bearings, did you replace them with quality bearings?
Were they super clean before assembly?
What grease did you use?
Did you fully pack them? (You’re not supposed to).
Did you use a press to install the front bearing and seat it fully?
Is the rear bearing a slip fit with no play?
Did you set preload properly?
If you measure the runout inside the nose of the spindle what do you get?

My 9x20 had what is typical from the factory, the rear bearing was an interference fit so was basically impossible to set the preload properly. I learned that here on H-M also some other tricks like not packing the bearings and how to set preload.

Ok, so on the bearings. I used the ones I found recommended.. Timken 32007 bearings. Not the absolute highest quality money can buy, but from a reputable company as I understood it. I did clean them out as best as I was able prior to greasing and installing.
I used the “Red Tacky” #2 EP grease packed to my best guess of 50%, as recommended in the "Rebuilding the asian 9x20 Lathe" that originated on the yahoo group, though I think I still over packed it because grease has been squeezing out of the bearing guard.

Now, I mentioned my method of installing was likely an issue. To get the front (chuck side) all the way to the end, I had to take a copper (soft) rod against the inner diameter of the bearing and hammer it down bit by bit. This took a lot of patience and many many hours. This was also how I got the bearing races into place on the headstock, as I had already figured out that it was way out of alignment. It also occurs to me NOW that I could probably have rented some kind of puller from the local NAPA autoparts store that would have worked better and with less frustration. How I put on the rear one(both bearings were insanely tight to put on): I basically used the preload nut with a couple washers to apply pressure against the bearing and cranked it down until the nut bottomed out, then took it off and put more spacers against the bearing and repeated the process. The reason I suspect I may have damaged the bearings, is that I might have way over tightened them making sure that the rear bearing was fully seated.

Measuring runout on the lip of the spindle... I don't recall for sure right now (I'm at work), but I -think- it was under half of one thou.

For setting the preload, I basically had already gotten it super tight to where it was really stiff to turn, backed off the tension and let it run for 20-30min to warm up, then tried to follow the procedure in the Rebuilding book that I mentioned:

Although this is probably going to seem terribly un-scientific, the method does work and it’s not Voodoo:
Run the lathe at medium speed for about 10-minutes to warm-up the headstock and bearings. Power-off the lathe and install the3-Jaw chuck on the spindle if it’s not already installed. Remove the V-belt so that the Spindle is free to rotate. Grasp one of the extended jaws with one finger and pull towards you briskly and release. The chuck should rotate approximately one and one half revolutions before coming to a stop. Adjusted like this, you should feel a positive drag when rotating the spindle.. If it does, the Preload is correctly set…. Leave it alone. If it rotates more than one and one half revolutions before coming to a stop, refer to page 30 of the G4000 Manual, loosen the setscrew [12] (if you remove the setscrew, lookout for a little brass disk that sits in there between the setscrew and the threads. This little disk prevents the setscrew from lousing-up the threads) and tighten the Spanner Nut [13] slightly. Retest and readjust until satisfactory. If the rotation is less than one and one half revolutions before coming to a stop the Spanner Nut [13] needs to be loosened slightly instead. Retighten the Set Screw when done. The Headstock should feel warm to the touch after running for prolonged periods (>30-minutes). If the Headstock gets hot, the preload is definitely set too tight.

No matter how loose I set the preload, it wouldn't spin 1.5 times.. even with the spindle loose enough to rattle back and forth, but I think that may be due to having too much grease. It feels nice and smooth now, though, with no movement of the spindle that I can detect.

Thank you for taking the time to comment and give advice, I'll continue to update this thread as I make progress or get stuck.
 
While I agree, that is a much later step IMHO. I went through all this because it's clear the 9x20 is a kit. In order to get it truly straightened out you have to be strictly methodical in your approach. I also got the tip early on that to check runout, don't use the chuck. Use a ground bar(I used a 1/2"x6" reamer blank in a morse taper collet directly mounted in the spindle). Then once you get the runout squared away, then go to leveling the bed, then aligning the head. Once all that is within spec, then check and skim the chuck adapter. If you do it before all this you'll just cut it out of square. I also undercut the chuck register .008 to be able set my runout on the chuck once all those other steps were done properly. I now have around .0005 runout and about that taper in 6". Far and away better than the 008 runout and 012" taper in 6" I started with! But it took a LOT of time, effort and attention to details to get to where it is now.

A "ground bar"? Is that like a test bar? Like, I should buy a #3Morse taper test bar? Or are you referring to something you make? I bought a cheap collet off amazon MT3 ER32 M12 Morse Taper Collet to experiment with, but haven't been able to work out what I'm doing wrong with it (or if it's just because it's cheap-o crap). I was under the impression that on a lathe you didn't need a draw bar to set a morse taper (I guess from using the tailstock), so maybe I just need to get something that will work with my spindle.

This is probably true on most American machines where the headstock V set to the ways. But for whatever reason the 9x20 is not this way. It’s bolted to the ways and there isn’t a lot of play but it’s more or less held by them. This is good because it can be adjusted but it can be a PIA to get just right. And often the bolts that come with it are cheesy at best. It also means if you crash it, better check it. Once I got mine set and truly tight it hasn’t wandered. But I’ve not crashed it, yet. Personally I’ve found mine a good practice lathe because it is a copy of a fairly capable lathe (Emco) and being cheap and parts accessible if you have more time than $$ with some precision measuring tools which you should have anyway you can get some decent work out of it.

I was lucky mine was the previous owners hobby of doing upgrades through the various websites online dedicated to the 9x20 and to no use, at all. The problem was he didn’t do the proper setup of the headstock and on down the line. So it had 4”,5”,6”4jw, QCTP, and other stuff for $600. But I was a noob and it took me a while to know what I was doing and why it did the things it did. Then I learned how to fix them. Much more cheerful than paying list and having a resentment it wasn’t right.

Yes, after I put the spindle back in and got it set, I went ahead and pulled the headstock completely off in order to clean up the ways and stuff. There were no shims under the headstock at all, and I was looking for them as I was taking it off. There was a ton of crap under there, and I also found that several of the studs were bent and some of the nuts were stripped out, so I found a tap to clean up the threads and bought new bolts/nuts to replace them. You are correct that with this lathe, the headstock only sits on the flats of the ways and does not make contact with the V's at all. I noticed while I had the headstock off that there were 2 small set screws on the back side which looked like they might make contact with the headstock studs that would be accessible with the motor removed... might be how horizontal alignment is done at the factory. I've been too busy fighting the spindle/chuck runout to worry about this. I haven't pulled the motor yet because I'm waiting to snag a treadmill motor to switch it out for a variable speed DC motor, so no point in taking it apart and cleaning it.

Thank you for taking the time to comment and give advice, I'll continue to update this thread as I make progress or get stuck.
 
Thanks for the complete description. Many folks are one liners and with this kind of thing you cannot trouble shoot their process or help them. I’ve given up trying.

There are just two crucial mistakes. One was not seating the front bearing with a press. And the other super critical one is tough because you almost need the lathe to do it. Machine the back bearing mount to a slip fit. Pressing on the back bearing mean you will never be able to get proper pre load, period. It will either be to loose or to tight. I had to make a rig using my tail stock large live center and my drill press to CAREFULLY take off what turned out to be about .0012. Those couple of tenths are hard but crucial to make a slip fit. On mine the spindle is #3 MT so I bought a good name collet and a 1/2” reamer blank both on eBay.
 

Attachments

  • F5E23755-8DE6-4C15-969A-D0B6B565F5B6.jpeg
    F5E23755-8DE6-4C15-969A-D0B6B565F5B6.jpeg
    901.8 KB · Views: 18
Back
Top