New Guy looking for help or comfort w/runout

cspeier

Registered
Registered
Joined
Mar 30, 2012
Messages
18
I purchased a Grizzly 11x26 and installed a LMS 5c collet chuck. I had my share of issues, LOL.. Anyway I'm getting it dialed in and need a little help here. Maybe I'm just spoiled using the old Monarch at my local machine shop..

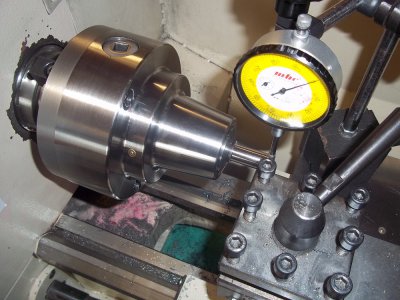
Picture included. The work piece is 1.200 long, mounted in a 9/16 LMS collet. I have .0004 at the chuck (.250 out), .0004 at the mid point (.600 out) and .0004 at the end (1.100 out).. Here is my concern, it doesn't cut it straight. I'm .0008 or .0009 out from start to finish.

Ideas, concerns, good... bad... HELP. :)

Chad
www.SpeierRacingHeads.com


chuck1.jpg

chuck1.jpg
 
And traveling, how well does it do? Moving the indicator down the length of the part (4" would be more telling), top and side. What you've described could be a misaligned spindle or worn/twisted bed. Make some more tests - runnout is by no means the end-all, in fact means very little other than chucking is repeatable. My guess is that the bed is twisted and needs to be properly set up.

It could possibly just need to be set up properly, it's a new machine.

Can you point me in the right direction for proper setup?

THANKS
 
If you are taking a test cut and find taper, it is not the same problem as runout. Is it larger on the end, or near the collet? I'd expect larger at the end, due to pushoff. That can be caused by many things, but easily checked is the tool height. It should be on center, and let's not go through all that again, guys. If the tool is on center, look for other issues. Try a larger, and hence stiffer test piece. Make sure your tool is very sharp. The ways of the machine should not be worn.

If I'm reading you right, you are only holding onto 0.100 of stock. This will not work. Find a piece long enough to fully engage the collet.
 
The work piece is sticking out 1.200 and is 4" overall length. I did this because the majority of my work (seats and guides) will fall into this range.

I'm .0008-.0010 out along the 1.200. I'm also out that far with a solid carbide .375 pilot. A piece I know is straight.

It's 100% level, spent 2 hours on it.

Yes, it's bigger at the end, not closer to the collet.
 
Still seems you are seeing two problems. You have runout, evidenced by the test rod. If the runout is not the same near the collet as it is at the end of the rod, then the collet or the chuck is inducing an angular effect. That could be caused by the mounting of the collet chuck on the backing plate. You might want to dismount the collet chuck and check the runout of the backing plate by itself, and if it shows an error, address that. If it is true, check the runout of the tapered ID surface of the chuck, as well as deeper in the chuck in the straight bore section. These are what determines the observed runout of the OD of the collet. Collets are not perfect, but should be close. If everything else checks out, then the collet itself is suspect. You might want to try another collet size and test rod.

Then, unless I misunderstand, you took a test cut and found taper. I take it that there was no measurable runout on the test piece after the cut? If there is, then things are moving on you. You need to be very consistent in tightening the collet chuck also. You could take a couple of spring passes on the test piece to see if pushoff is the culprit of the taper.
 
Here is what I found.

1" steel. I measured at 3.250 apart.

Measured with a Starrett Final Word.

.0004 at chuck .250 out.
.0010 at 3.250 out

.001 runout, all sides of machined piece.

.8717 at .250
.8727 at 3.250

I wish I had zero at the chuck! :)

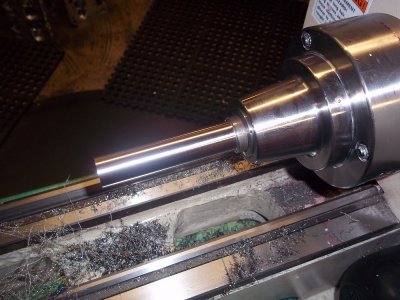
Picture..

chuck2.jpg

chuck2.jpg
 
Set your Last Word to bear against the bar at the end, zero it there and roll the carriage towards the chuck. If it stays on zero, you have alignment issues with the headstock/ways. If it moves 0.0005, then the test cut is tapered because of pushoff. Did you measure each of the components I mentioned earlier? Each can be a contributor to the problem, and I repeat....it seems you have two problems, not related at all. Taper is one thing, runout is another.
 
Set your Last Word to bear against the bar at the end, zero it there and roll the carriage towards the chuck. If it stays on zero, you have alignment issues with the headstock/ways. If it moves 0.0005, then the test cut is tapered because of pushoff. Did you measure each of the components I mentioned earlier? Each can be a contributor to the problem, and I repeat....it seems you have two problems, not related at all. Taper is one thing, runout is another.


Yes, I faced the back plate and the chuck, they were both out. Let me follow you here. I think I have done what you asked. I can zero the guage and roll it towards the chuck and I'm .001 out.

Is this what your asking???

The machine shows .0001 at the mounting flange and .0004 inside the spindle.
 
If the indicator reads 0.001 difference between the end and the chuck, there should be 0.002 thousandths taper on the diameter of the part if the ways are true to the spindle, since you're only reading one side of the part. A 0.001 taper would only read half of that per side, if the ways were dead true.

On the backing plate, is the face also true? There shouldn't be any reason to see more than 0.0001 on the face, of the register. Then it becomes a question of fit between the backing plate and the chuck body. If the face runs out, that may be where the 0.0004 is coming from. The tapered bore of the chuck should run very true also. I didn't mean the spindle ID, but the chuck ID where the collet seats.
 
Back
Top